ROS Group 产品服务
Product Service 开源代码库
Github 官网
Official website 技术交流
Technological exchanges 激光雷达
LIDAR ROS教程
ROS Tourials 深度学习
Deep Learning 机器视觉
Computer Vision
hikey 970 debian 镜像(有opencl 和 tensorflow)
-
最近(2018.8.30) LeMaker发布了一个新的 Hikey 970 debian镜像。此镜像增加了HDMI支持,稳定性也提高了。同时增加了OpenCL和Tensorflow(只有python3.5)支持。此 Tensorflow 应该是进行了优化的,具体的是不是用到了NPU还不确定。经过我自己的测试此 Tensorflow 的速度比我自己安装的速度要快一倍。但是此镜像仍然不支持自带的蓝牙。
下面是安装和使用方法
下载镜像
从上面链接下载镜像并解压
tar -xzvf hikey970-lebian-9.tar.gz刷入镜像
把hikey 970板子开关拨至 on off on off。链接USB线,并给板子上电。然后自己的电脑上执行下面的指令开始刷机
./flash-all-binaries.sh等待刷机完成
刷入分区补丁
默认的系统分区很小,所以需要打一个补丁,之后可以调整系统分区到60G。
从上面的的下载地址下载补丁,之后解压。
把解压后的内容复制到刚才的 hikey970-lebian-9 文件夹内。然后执行
sudo fastboot flash boot boot-hikey970.uefi.2.img
sudo fastboot flash userdata hikey970-lebian9-tf.img
等待程序执行完成
启动系统
断开板子的电源,然后把开关拨至on off off off。给板子连接上鼠标键盘网线和显示器。然后给板子上电。
等待系统启动完成。正常情况下应该可以看到登陆界面。用户名和密码都是shunya。调整分区
运行下面的指令调整分区
sudo resize2fs /dev/sdd15这样能够把系统分区扩展到20G,剩下的需要用gparted扩展
sudo apt-get install gparted
sudo gparted-pkexec # 注意此指令只能再外接显示器的情况下才能运行
选择60G的硬盘,然后把未分配的空间全部扩展到最后一个分区。
shunya@hikey970:~$ df -h
Filesystem      Size  Used Avail Use% Mounted on
/dev/root        53G  7.5G   44G  15% /
devtmpfs        2.8G     0  2.8G   0% /dev
tmpfs           2.9G     0  2.9G   0% /dev/shm
tmpfs           2.9G   25M  2.8G   1% /run
tmpfs           5.0M  4.0K  5.0M   1% /run/lock
tmpfs           2.9G     0  2.9G   0% /sys/fs/cgroup
tmpfs           577M     0  577M   0% /run/user/107
tmpfs           577M     0  577M   0% /run/user/1000
可以看到系统空间已经增大到53G了。
测试tensorflow
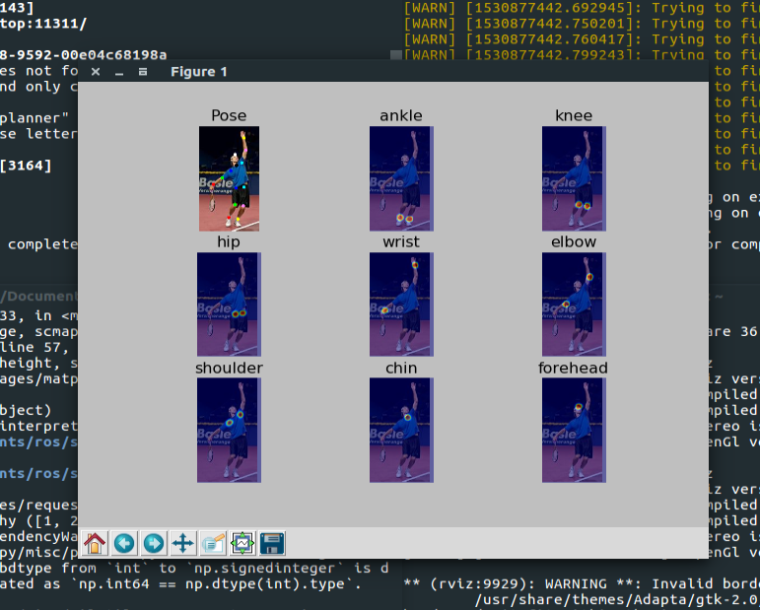
系统默认安装了Python 3.5的 tensorflow。下面用 pose-tensorflow 来测试一下。这个软件是一个利用 tensorflow 识别人体关键位置的程序。
下载程序
git clone https://github.com/eldar/pose-tensorflow安装依赖
pip3 install scipy scikit-image matplotlib pyyaml easydict cython munkres下载模型
# Download pre-trained model files
$ cd models/mpii
$ ./download_models.sh
$ cd -
运行模型
# Run demo of single person pose estimation
$ TF_CUDNN_USE_AUTOTUNE=0 python3 demo/singleperson.py
正常应该会显示下图

-
我按照这个教程烧写可是Debian无法启动。接通电源后会出现Debian和fastboot选择,选择Debian后串口打印部分信息就没法启动了,这是什么问题?
串口打印:
EFI stub: Booting Linux Kernel…
EFI stub: EFI_RNG_PROTOCOL unavailable, no randomness supplied
EFI stub: Using DTB from configuration table
EFI stub: Exiting boot services and installing virtual address map…
[ 0.000000] Booting Linux on physical CPU 0x0
[ 0.000000] Linux version 4.9.78-147538-g244928755bbe (andy@andy-virtual-machine) (gcc version 4.9.x 20150123 (prerelease) (GCC) ) #1 SMP PREEMPT Thu May 31 10:58:02 CST 2018
[ 0.000000] Boot CPU: AArch64 Processor [410fd034]
[ 0.000000] earlycon: pl11 at MMIO 0x00000000fff32000 (options ‘115200’)
[ 0.000000] bootconsole [pl11] enabled
[ 0.000000] Ion: insert heap-name carveout_gralloc
[ 0.031939] /soc/interrupt-controller@0xf4000000: Unable to locate ITS domain
[ 0.039265] /soc/interrupt-controller@0xf4000000: unable to locate ITS domain
[ 0.393094] dmi: Firmware registration failed.
[ 0.397745] Ion: invalid heap-name in node iommu_info, please check the name
[ 0.404943] Ion: invalid heap-name in node linear, please check the name
[ 0.411752] Ion: node name [heap_sys_user], heap-name [sys_heap]
[ 0.417763] Ion: heap index 0 : name sys_heap base 0x0 size 0x0 id 0 type 0
[ 0.424726] Ion: heap sys_heap base =0, try to find dynamic area
[ 0.430820] Ion: name = sys_heap, table name carveout_gralloc
[ 0.436652] Ion: name = sys_heap, table name
[ 0.441091] Ion: name = sys_heap, table name
[ 0.445530] Ion: name = sys_heap, table name
[ 0.449971] Ion: name = sys_heap, table name
[ 0.454418] Ion: node name [heap_carveout_gralloc], heap-name [carveout_gralloc]
[ 0.461813] Ion: heap index 1 : name carveout_gralloc base 0x0 size 0x0 id 2 type 2
[ 0.469467] Ion: heap carveout_gralloc base =0, try to find dynamic area
[ 0.476252] Ion: name = carveout_gralloc, table name carveout_gralloc
[ 0.482777] Ion: have found heap name carveout_gralloc base = 0xbc800000, size 31457280
[ 0.490793] of_get_iova_info:start_addr 0x40000, size 0xbffc0000 align 0x8000
[ 0.502246] no hisilicon,hisi-pmic-irq-num1 property set
[ 0.507560] hisi_pmic 2-00: the platform don’t support ext-interrupt.
[ 0.521120] <[hisi_dt_parse_ip_atf]: regulator_id=0, ppll0_clock_set_rate_flag=0>
[ 0.528786] <[hisi_dt_parse_ip_atf]: regulator_id=1, ppll0_clock_set_rate_flag=0>
[ 0.536346] <[hisi_ip_to_atf_is_enabled]:regulator_id=1>
[ 0.541756] <[hisi_dt_parse_ip_atf]: regulator_id=8, ppll0_clock_set_rate_flag=0>
[ 0.549357] <[hisi_dt_parse_ip_atf]: regulator_id=2, ppll0_clock_set_rate_flag=0>
[ 0.556877] <[hisi_ip_to_atf_is_enabled]:regulator_id=2>
[ 0.562289] <[hisi_dt_parse_ip_atf]: regulator_id=3, ppll0_clock_set_rate_flag=0>
[ 0.569809] <[hisi_ip_to_atf_is_enabled]:regulator_id=3>
[ 0.575230] <[hisi_dt_parse_ip_atf]: regulator_id=4, ppll0_clock_set_rate_flag=0>
[ 0.582748] <[hisi_ip_to_atf_is_enabled]:regulator_id=4>
[ 0.588160] <[hisi_dt_parse_ip_atf]: regulator_id=5, ppll0_clock_set_rate_flag=0>
[ 0.595680] <[hisi_ip_to_atf_is_enabled]:regulator_id=5>
[ 0.601088] <[hisi_dt_parse_ip_atf]: regulator_id=6, ppll0_clock_set_rate_flag=0>
[ 0.608608] <[hisi_ip_to_atf_is_enabled]:regulator_id=6>
[ 0.614028] <[hisi_dt_parse_ip_atf]: regulator_id=7, ppll0_clock_set_rate_flag=0>
[ 0.621546] <[hisi_ip_to_atf_is_enabled]:regulator_id=7>
[ 0.636327] Kirin-pcie f4000000.pcie: eye_param_vboost = [0xffffffff]
[ 0.642791] Kirin-pcie f4000000.pcie: eye_param_iboost = [0xffffffff]
[ 0.649235] Kirin-pcie f4000000.pcie: eye_param_pre = [0xffffffff]
[ 0.655541] Kirin-pcie f4000000.pcie: eye_param_post = [0xffffffff]
[ 0.661808] Kirin-pcie f4000000.pcie: eye_param_main = [0xffffffff]
[ 0.767524] ion domain already init return domain
[ 0.973911] [drm:adv7511_detect.isra.7] ERROR Read connector status timout, time = 10
[ 1.095695] gpio_hub_power_on:regulator_enable -
@myzhuang 在 hikey 970 debian 镜像(有opencl 和 tensorflow) 中说:
ERROR Read connector status timout,
我没有遇到过这个问题,不太清楚。你可以重刷镜像试试。
-
@weijiz 重刷问题解决了,可是分区补丁的那个文件中,没有hikey970-lebian9-tf.img这个文件啊,只有boot-hikey970.uefi.2.img
-
@myzhuang hikey970-lebian9-tf.img 是原本镜像里面带的文件。补丁只是修改uefi,相当于修改后重刷一下系统。
-
@weijiz 镜像里面的文件是hikey970-lebian9.img,所以命令应该写
sudo fastboot flash userdata hikey970-lebian9.img
才对,没有带“tf”的 -
-
@weijiz 抱歉,应该是我用错镜像了,这里下载的确实有带tf,我原先烧的那个没带,而且装好后里面的python3也没办法import tensorflow
-
我想问一下这个安装scipy成功了吗?我使用sudo apt-get install scipy 安装会出错。
-
@myzhuang scipy是一个python包可以通过下面的方式安装
# 使用 apt-get sudo apt-get install python-scipy # 使用 pip sudo pip install scipy -
这是我按照这篇文章操作的记录,可以给大家做个参考:
hikey970开发板lebian系统烧写(ubuntu下):
https://blog.csdn.net/qqqzmy/article/details/82691880
hikey970开发板lebian系统空间拓展:
https://blog.csdn.net/qqqzmy/article/details/82701619
tensorflow环境的搭建:
https://blog.csdn.net/qqqzmy/article/details/82767635 -
能提供下 ubuntu 和debian rootfs制作流程么,感谢
-
@myzhuang 你测得好认真啊 厉害啊
-
@xiaofeimo1 不会,官方也没有提供。不过这里有一个制作Ubuntu镜像的源。但是这个镜像还有一些问题。
-
此回复已被删除! -
请问设备不识别nvme是什么回事?另外我编译tensorflow一直不成功
-
@SprayHank nvme我没有测试过,可能内核没有开启对应的驱动模块。Tensorflow不需要从源码编译,这个镜像已经有编译好的版本。
-
你好,你是说这个镜像里面内置有Opencl吗,那么如何查询是否有呢,有什么使用的相关教程吗
-
@youngestuser 运行clinfo可以查看信息。
