升级到OpenCV3还是有很多好处的,首先代码基本上和2是兼容的,然后3的很多方法都开了显卡加速,运行效率上有很大提升,所以kinetic就升级到OpenCV3了。
ROS Group 产品服务
Product Service 开源代码库
Github 官网
Official website 技术交流
Technological exchanges 激光雷达
LIDAR ROS教程
ROS Tourials 深度学习
Deep Learning 机器视觉
Computer Vision
weijiz 发布的帖子
-
RE: kinetic opencv cmake.conf 文件的bug修复
-
利用网络传输系统的声音
为什么要做这件事呢,因为我的电脑耳机插孔不太好使。插上耳机后声音经常的是左边有声音右边没有这样子。在玩游戏的时候这样太不爽了。 而且像VNC这种远程软件是没有声音的,用起来也很不舒服。所以我很需要一个能够远程传输声音的软件。现在有了代码在Github上,虽然还有一些问题,但是基本上能用了,而且还是跨平台的。
下面说一下具体的实现方法。
基本的流程就是从声卡获取到声音信息然后写入到http流里面。这样通过浏览器就可以听到系统的声音了。程序用C#写的,我很喜欢这种语言。声音的获取和转码处理方面用的是一个叫做cscore的库。把http流传给cscore里面对应的API就可以了。但是由于HttpResponse的流是只写的,而cscore里面转码需要的输出流是可读可写的,所以这里要修改cscore的源代码才行。贴上比较关键的代码吧
在C# web api里面如何处理流using System; using System.Collections.Generic; using System.IO; using System.Linq; using System.Net; using System.Net.Http; using System.Net.Http.Headers; using System.Text; using System.Threading.Tasks; using System.Web.Http; namespace RemoteAudio.Controllers { public class AudioController : ApiController { [Route("audio")] [HttpGet] public HttpResponseMessage Get() { var response = Request.CreateResponse(); response.Content = new PushStreamContent((Action<Stream, HttpContent, TransportContext>)(AudioServer.getInstance().WriteToStream), new MediaTypeHeaderValue("audio/mpeg")); response.Headers.Add("Cache-Control", "no-cache"); return response; } //[Route("web")] //[HttpGet] //public HttpResponseMessage Get() //{ // var response = Request.CreateResponse(); // return response; //} } }
关键在于以上代码中的
PushStreamContent
方法。在传进去的回调函数中第一个参数就是HttpResponse的流,把这个流传给修改后的cscore api就可以了。using (var encoder = MediaFoundationEncoder.CreateMP3Encoder(capture.WaveFormat, httpStream, 48000)) { capture.DataAvailable += (s, e) => { encoder.Write(e.Data, e.Offset, e.ByteCount); }; }
用起来也是很简单的。
现有的问题
- 会有大约三秒的延时。用来听歌之类的是没问题,但是用来玩游戏,绝对不能忍。个人感觉是编码函数里面做了buffer。以后要进行改进。还有就是浏览器按下暂停键后是用浏览器的缓存继续播放,这个和服务器正在传输的流之间的时间差就会增加。这个声音同步应该在浏览器中用js实现呢还是应该在服务器通过一些手段实现呢?还没想好。
- 没有回收httpResponse stream。这个也是要改进的地方,不然会内存泄露。
-
kinetic opencv cmake.conf 文件的bug修复
在 kinetic 版本的 ros 中,系统自带了OpenCV 3.1。但是如果直接通过cmake文件引用的话可能会出现错误。
Imported target "opencv_xphoto" includes non-existent path "/usr/include/opencv-3.1.0-dev/opencv" in its INTERFACE_INCLUDE_DIRECTORIES. Possible reasons include: The path was deleted, renamed, or moved to another location. An install or uninstall procedure did not complete successfully. The installation package was faulty and references files it does not provide. CMake Error in m-explore/map_merge/CMakeLists.txt: Imported target "opencv_xphoto" includes non-existent path "/usr/include/opencv-3.1.0-dev/opencv" in its INTERFACE_INCLUDE_DIRECTORIES. Possible reasons include: The path was deleted, renamed, or moved to another location. An install or uninstall procedure did not complete successfully. The installation package was faulty and references files it does not provide.
不止我一个人遇到这个错误。可以看这里, 但是这个是在jade版本的OpenCV 3里面。
最后找到了原因在OpenCV的conf.cmake文件里面的一个配置。在
/opt/ros/kinetic/share/OpenCV-3.1.0-dev/OpenCVConfig.cmake
里面的第144行和116行# Extract the directory where *this* file has been installed (determined at cmake run-time) if(CMAKE_VERSION VERSION_LESS "2.8.12") get_filename_component(OpenCV_CONFIG_PATH "${CMAKE_CURRENT_LIST_FILE}" PATH CACHE) else() get_filename_component(OpenCV_CONFIG_PATH "${CMAKE_CURRENT_LIST_FILE}" DIRECTORY CACHE) endif()
把其中的CACHE去掉,改成下面的样子
# Extract the directory where *this* file has been installed (determined at cmake run-time) if(CMAKE_VERSION VERSION_LESS "2.8.12") get_filename_component(OpenCV_CONFIG_PATH "${CMAKE_CURRENT_LIST_FILE}" PATH) else() get_filename_component(OpenCV_CONFIG_PATH "${CMAKE_CURRENT_LIST_FILE}" DIRECTORY) endif()
如果加
CACHE
,OpenCV的路径就会定位到/usr/
。不加CACHE
就会正确定位。不知道是为什么。原则上说CACHE
只是把路径加到缓存里面,可以提高效率,应该不会出这个问题。难道是由于系统装了其他版本的OpenCV所以CACHE出了问题?经过我搜索发现并不是所有的人都遇到这个问题,看来还是和本地的环境配置有关系。反正如上的方法是可以解决问题
-
安装Nvidia显卡驱动和CUDA
网上看到的,但是原链接
不过这里安装的是CUDA7.5,现在最新的是8.0。可以到官网进行下载,记住一定不要选择deb方式,会出问题。用run文件最好了。如果你已经安装过驱动了,一定在安装CUDA的时候选择不要安装驱动,否则系统的显卡驱动会出问题。In this article, I will share some of my experience on installing NVIDIA driver and CUDA on Linux OS. Here I mainly use Ubuntu as example. Comments for CentOS/Fedora are also provided as much as I can.
Table of Contents
Install NVIDIA Graphics Driver via apt-get
Install NVIDIA Graphics Driver via runfile
Remove Previous Installations (Important)
Download the Driver
Install Dependencies
Creat Blacklist for Nouveau Driver
Stop lightdm/gdm/kdm
Excuting the Runfile
Check the Installation
Common Errors and Solutions
Additional Notes
Install CUDA
Install cuDNN
Table of contents generated with markdown-tocInstall NVIDIA Graphics Driver via apt-get
In Ubuntu systems, drivers for NVIDIA Graphics Cards are already provided in the official repository. Installation is as simple as one command.
For ubuntu 14.04.5 LTS, the latest version is 352. To install the driver, excute sudo apt-get nvidia-352 nvidia-modprobe, and then reboot the machine.
For ubuntu 16.04.1 LTS, the latest version is 361. To install the driver, excute sudo apt-get nvidia-361 nvidia-modprobe, and then reboot the machine.
The nvidia-modprobe utility is used to load NVIDIA kernel modules and create NVIDIA character device files automatically everytime your machine boots up.
It is recommended for new users to install the driver via this way because it is simple. However, it has some drawbacks:
The driver included in official Ubuntu repository is usually not the latest.
There would be some naming conflicts when other repositories (e.g. ones from CUDA) are added to the system.
One has to reinstall the driver after Linux kernel are updated.
Install NVIDIA Graphics Driver via runfileFor advanced user who wants to get the latest version of the driver, get rid of the reinstallation issue caused bby dkms, or using Linux distributions that do not have nvidia drivers provided in the repositories, installing from runfile is recommended.
Remove Previous Installations (Important)
One might have installed the driver via apt-get. So before reinstall the driver from runfile, uninstalling previous installations is required. Executing the following scripts carefully one by one.
sudo apt-get purge nvidia* # Note this might remove your cuda installation as well sudo apt-get autoremove # Recommended if .deb files from NVIDIA were installed # Change 1404 to the exact system version or use tab autocompletion # After executing this file, /etc/apt/sources.list.d should contain no files related to nvidia or cuda sudo dpkg -P cuda-repo-ubuntu1404
Download the Driver
The latest driver for NVIDIA products can always be fetched from NVIDIA’s official website. It is not necessary to select all terms carefully. The driver provided for the same Product Series and Operating System is generally the same. For example, in order to find a driver for a GTX TITAN X graphics card, selecting GeForce 900 Series in Product Series and Linux 64-bit in Operating System is enough.
If you want to down load the driver directly in a Linux shell, the script below would be useful.
cd ~ wget http://us.download.nvidia.com/XFree86/Linux-x86_64/367.57/NVIDIA-Linux-x86_64-367.57.run Detailed installation instruction can be found in the download page via a README hyperlink in the ADDITIONAL INFORMATION tab. I have also summarized key steps below.
Install Dependencies
Software required for the runfile are officially listed here. But this page seems to be stale and not easy to follow.
For Ubuntu, installing the following dependencies is enough.
build-essential – For building the driver
gcc-multilib – For providing 32-bit support
dkms – For providing dkms support
(Optional) xorg and xorg-dev. On a workstation with GUI, this is require but usually have already been installed, because you have already got the graphic display. On headless servers without GUI, this is not a must.
As a summary, excuting sudo apt-get install build-essential gcc-multilib dkms to install all dependencies.Required packages for CentOS are epel-release dkms libstdc++.i686. Execute yum install epel-release dkms libstdc++.i686.
Required packages for Fedora are dkms libstdc++.i686 kernel-devel. Execute dnf install dkms libstdc++.i686 kernel-devel.
Creat Blacklist for Nouveau Driver
Create a file at /etc/modprobe.d/blacklist-nouveau.conf with the following contents:
blacklist nouveau
options nouveau modeset=0
Note: It is also possible for the NVIDIA installation runfile to creat this blacklist file automatically. Excute the runfile and follow instructions when an error realted Nouveau appears.Then,
for Ubuntu 14.04 LTS, reboot the computer;
for Ubuntu 16.04 LTS, excute sudo update-initramfs -u and reboot the computer;
for CentOS/Fedora, excute sudo dracut --force and reboot the computer.
Stop lightdm/gdm/kdmAfter the computer is rebooted. We need to stop the desktop manager before excuting the runfile to install the driver. lightdm is the default desktop manager in Ubuntu. If GNOME or KDE desktop environment is used, installed desktop manager will then be gdm or kdm.
For Ubuntu 14.04 / 16.04, excuting sudo service lightdm stop (or use gdm or kdm instead of lightdm)
For Ubuntu 16.04 / Fedora / CentOS, excuting sudo systemctl stop lightdm (or use gdm or kdm instead of lightdm)
Excuting the RunfileAfter above batch of preparition, we can eventually start excuting the runfile. So this is why I, from the very begining, recommend new users to install the driver via apt-get.
cd ~ chmod +x NVIDIA-Linux-x86_64-367.57.run sudo ./NVIDIA-Linux-x86_64-367.57.run --dkms -s
Note:
option --dkms is used for register dkms module into the kernel so that update of the kernel will not require a reinstallation of the driver. This option should be turned on by default.
option -s is used for silent installation which should used for batch installation. For installation on a single computer, this option should be turned off for more installtion information.
option --no-opengl-files can also be added if non-NVIDIA (AMD or Intel) graphics are used for display while NVIDIA graphics are used for display.
The installer may prompt warning on a system without X.Org installed. It is safe to ignore that based on my experience.
WARNING: nvidia-installer was forced to guess the X library path ‘/usr/lib’ and X module path ‘/usr/lib/xorg/modules’; these paths were not queryable from the system. If X fails to find the NVIDIA X driver module, please install thepkg-config
utility and the X.Org SDK/development package for your distribution and reinstall the driver.
Check the InstallationAfter a succesful installation, nvidia-smi command will report all your CUDA-capable devices in the system.
Common Errors and Solutions
ERROR: Unable to load the ‘nvidia-drm’ kernel module.
One probable reason is that the system is boot from UEFI but Secure Boot option is turned on in the BIOS setting. Turn it off and the problem will be solved.
Additional Notesnvidia-smi -pm 1 can enable the persistent mode, which will save some time from loading the driver. It will have significant effect on machines with more than 4 GPUs.
nvidia-smi -e 0 can disable ECC on TESLA products, which will provide about 1/15 more video memory. Reboot is reqired for taking effect. nvidia-smi -e 1 can be used to enable ECC again.
nvidia-smi -pl can be used for increasing or decrasing the TDP limit of the GPU. Increasing will encourage higher GPU Boost frequency, but is somehow DANGEROUS and HARMFUL to the GPU. Decreasing will help to same some power, which is useful for machines that does not have enough power supply and will shutdown unintendedly when pull all GPU to their maximum load.
-i can be added after above commands to specify individual GPU.
These commands can be added to /etc/rc.local for excuting at system boot.
Install CUDA
Installing CUDA from runfile is much simpler and smoother than installing the NVIDIA driver. It just involves copying files to system directories and has nothing to do with the system kernel or online compilation. Removing CUDA is simply removing the installation directory. So I personally does not recommend adding NVIDIA’s repositories and install CUDA via apt-get or other package managers as it will not reduce the complexity of installation or uninstallation but increase the risk of messing up the configurations for repositories.
The CUDA runfile installer can be downloaded from NVIDIA’s websie. But what you download is a package the following three components:
an NVIDIA driver installer, but usually of stale version;
the actual CUDA installer;
the CUDA samples installer;
To extract above three components, one can execute the runfile installer with --extract option. Then, executing the second one will finish the CUDA installation. Installation of the samples are also recommended because useful tool such as deviceQuery and p2pBandwidthLatencyTest are provided.Scripts for installing CUDA Toolkit are summarized below.
cd ~ wget http://developer.download.nvidia.com/compute/cuda/7.5/Prod/local_installers/cuda_7.5.18_linux.run chmod +x cuda_7.5.18_linux.run ./cuda_7.5.18_linux.run --extract=$HOME sudo ./cuda-linux64-rel-7.5.18-19867135.run
After the installation finishes, configure runtime library.
sudo bash -c "echo /usr/local/cuda/lib64/ > /etc/ld.so.conf.d/cuda.conf" sudo ldconfig
It is also recommended for Ubuntu users to append string /usr/local/cuda/bin to system file /etc/environments so that nvcc will be included in $PATH. This will take effect after reboot.
Install cuDNN
The recommended way for installing cuDNN is to first copy the tgz file to /usr/local and then extract it, and then remove the tgz file if necessary. This method will preserve symbolic links. At last, execute sudo ldconfig to update the shared library cache.
-
升级ORB_SLAM2依赖程序以提升效率
ORB_SALM2的默认依赖是g2o, OpenCV, Eigen。这些软件的新版和作者使用的版本相比都有比较大的更新。比如OpenCV和Eigen在新版里面都可以使用显卡加速。下面介绍怎么对ORB_SLAM2进行修改使其使用最新版本的对应软件。
首先是OpenCV,我使用的是ros自带的3.1版本
如果你是jade系统则执行下面的指令安装OpenCV
sudo apt-get install ros-jade-opencv3
如果你是kinetic系统则执行下面的指令
sudo apt-get install ros-kinetic-opencv3
默认安装的OpenCV的cmake 文件可能会出问题,最好还是按照这篇文章所说的修改一下。
在ORB_SLAM2的cmake文件里面添加OpenCV引用,在ORB_SLAM2的CMakeList文件里面把
find_package(OpenCV 2.4.9 REQUIRED)
更改为
find_package(OpenCV 3.1.0 REQUIRED)
这样OpenCV就添加完成了。
安装Eigen
到这里去下载最新版本的Eigen
然后安装网站的提示进行编译安装就可以了注意如果你之前安装过Eigen,很有可能cmake找不到新的Eigen位置。
更改ORB_SLAM2的cmakelist 文件,
把find_package(Eigen3 3.1.0 REQUIRED)
改成
find_package(Eigen3 3.3.1 REQUIRED)
再次运行cmake,如果cmake没有报错则说明已经成功找到了,如果报错了就说明没有找到。修改的方法也比较简单。
更改ORB_SLAM2/cmake_modules/FindEigen3.cmake文件
在最上面添加set(EIGEN3_INCLUDE_DIR "FALSE")
因为其他版本的Eigen可能会把EIGEN3_INCLUDE_DIR这个变量设值,导致寻找错误,所以这里重新设置成False就没有问题了。
这样Eigen的依赖问题就解决了。安装g2o
g2o的安装是一个比较大的问题,因为作者使用了自己修改的一份g2o。所以如果我们想要使用最新版的g2o就要把作者的修改内容给移植过去。
-
ros系统升级,如何从jade升级到kinetic
现在(2017年一月)大部分人使用的ROS都是基于ubuntu 14.04 的 jade 版本。新的基于16.04的 kinetic版本已经发布了很长时间了,新的系统也比较稳定了。
这篇文章就是介绍如何从jade系统安全的系统升级到kinetic系统。
在升级之前首先要说明一下jade系统和kinetic系统之间的主要区别。我所感受到的主要有两点。- Ubuntu 14.04和Ubuntu 16.04之间的区别。16.04相对于14.04主要的改动在于系统启动管理程序的替换。由原来的upstart替换成systemd。所以原有的启动管理配置文件都要进行修改移植之后才能使用。修改起来也是比较简单的,可以google一下相关的文档。
- 默认使用OpenCV 3
新的ROS系统默认使用OpenCV 3,如果你的原有的程序依赖于OpenCV 2,建议你还是替换到OpenCV 3。否则OpenCV之间的版本配置可能是一个问题。3相对于2,虽然说并不是完全兼容,但是但部分都是可以不用修改直接移植的。而且3默认开启了GPU加速,性能上相对2也有很大的提升。我用ORB_SLAM2程序做了测试,可以在不修改源代码的情况下直接移植到3。
下面就开始正式升级系统了
移除第三方软件源
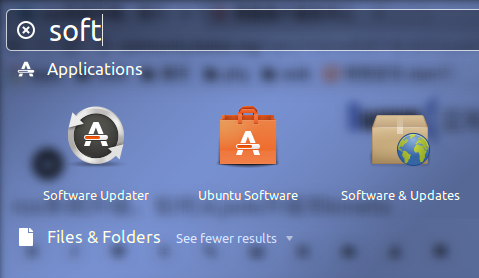
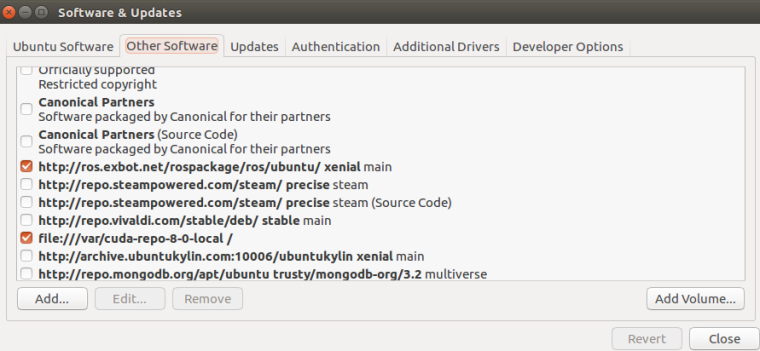
打开软件包管理器
把这里面的所有第三方的软件源都移除掉
移除jade软件包
在终端输入
sudo apt-get remove ros-jade*
等待删除完成
启动系统更新
在终端输入
sudo update-manager -d
在弹出的窗口中确认升级
然后等待升级完成,这个过程可能会很久
在升级过程中可能会询问你是否保留一些配置文件,一般默认选保留就可以,否则还要重新写配置文件,比较麻烦。恢复第三方软件源
在之前的软件包管理窗口中点击对应的软件源就可以了,注意一定要恢复ROS的源
安装kinetic
在终端输入
sudo sh -c 'echo "deb http://packages.ros.org/ros/ubuntu $(lsb_release -sc) main" > /etc/apt/sources.list.d/ros-latest.list' sudo apt-key adv --keyserver hkp://ha.pool.sks-keyservers.net:80 --recv-key 421C365BD9FF1F717815A3895523BAEEB01FA116 sudo apt-get update sudo apt-get install ros-kinetic-desktop-full
等待安装完成
ROS的初始化
- 修改环境变量
如果你原先在bash的启动配置里面添加了jade的环境变量,就需要把对应的环境变量改成kinetic的。比如下面是我的.bashrc
文件
source /opt/ros/kinetic/setup.bash source /home/randoms/Documents/ros/workspace/devel/setup.sh export ROS_PACKAGE_PATH=/home/randoms/Documents/ros/workspace/src:/home/randoms/Documents/ros/workspace/src/ORB_SLAM2/Examples/ROS:$ROS_PACKAGE_PATH
你要根据自己的环境配置进行修改
- 初始化工作空间
初始化rosdep
sudo rosdep init #如果提示文件已经存在就先把它给删掉 rosdep update
假设你原来的ros工作空间在
/home/randoms/Documents/ros/workspace
。这个文件夹内有src
,devel
,build
三个文件夹,删除其中的build
和devel
文件夹
然后运行编译catkin_make
等待编译完成
一般来说肯定会有编译错误,提示错误的程序一般重新编译一遍就没问题。一般产生错误的原因是软件包依赖没有满足。根据错误提示进行修改就可以了。确认kinetic安装完成
运行
rviz
看看能否执行可能会遇到的问题
系统更新比较头疼的就是驱动问题。可能系统更新完成之后重启发现进不去桌面了。这一般是显卡驱动出问题了。遇到这种情况也不用着急,只要重新装一下显卡驱动就可以了。在grub启动选项中的高级模式里面有
recovery mode
,从里面可以以文本的方式进入系统,这样就可以重新安装驱动了。具体的安装方法每个显卡都不太一样,自己google一下基本就可以解决了。如果你遇到了什么奇怪的问题,也欢迎在下面评论,我会尽量帮助解决的
-
OpenCV 2.X 和 OpenCV 3.X的区别是什么?
原文链接
尽管3相对与2有一些功能上的增加,但是3和2最大的区别还是在速度上。
最关键的不同在于OpenCV 3.x的API。几乎所有的OpenCV 3.X 方法都采用OpenCL加速了。所以所有的能够在GPU上运行的方法在性能上都会有10% - 230%的提升。你的代码所需要做的修改只是用UMat替换Mat。如果你想要在OpenCV 2.X 里面提升性能,你就要分别的触发cv::ocl::* or cv::gpu::*
这些方法才行。如果你是Java开发者那就更好了,现在已经有经过包装的Java类可以使用了。
内部组件的结构也发生了改变,但是从开发者的角度来说,只要修改对应的头文件就可以了。
所以用3.X更好,3.X和2.X是不兼容的,不过可以很容易的移植过去。
-
android无线调试
在android开发的过程中经常要用adb来看程序输出,安装程序之类的。一般是用USB直接连接到电脑上进行开发。但是这样会比较费事。经常插USB线也会损害手机的USB接口。
实际上android是可以无线调试的。这就是wireless adb。如果你的手机是已经root过的,这就非常简单了,在网上直接搜wireless adb 下载对应应用然后给root权限就可以了。具体使用的方式可以按照应用的说明进行。
下面介绍的方法是给没有root过的手机使用的。原方法链接
首先用数据线链接手机,开启手机的USB调试模式
然后在电脑上输入adb tcpip 5555
这条指令是开启adb的tcpip模式,打开端口 5555
然后就可以拔掉手机的USB了,继续在电脑上输入adb tcpip 5555 adb connect 192.168.2.5
其中的ip地址是手机的ip地址,要根据你的手机的具体地址进行替换。
看到下面的输入则说明adb已经成功连接了
* daemon not running. starting it now on port 5037 * * daemon started successfully * connected to 192.168.2.5:5555
现在就可以和用数据线一样对手机进行调试了。
实际上安装的android应用做的就是第一步的工作。把adb监听的tcp端口打开。不安装应用有一点不太方便就是每次都要先用USB连接一次,好处就是手机不用root。
-
rviz的简单使用
rviz是ros自带的一个图形化工具,可以方便的对ros的程序进行图形化操作。其使用也是比较简单。
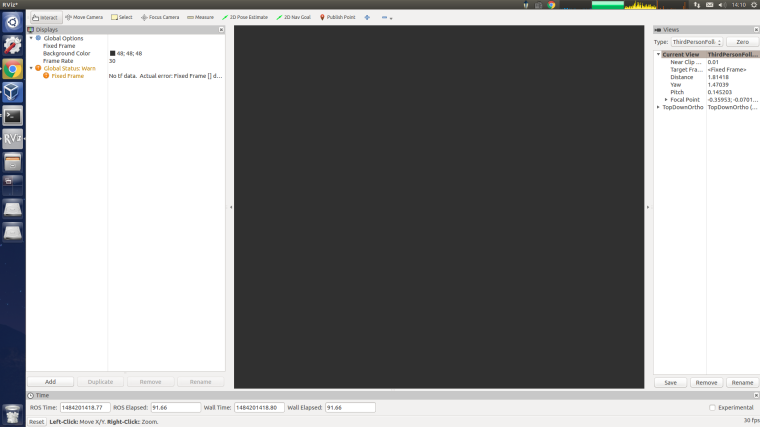
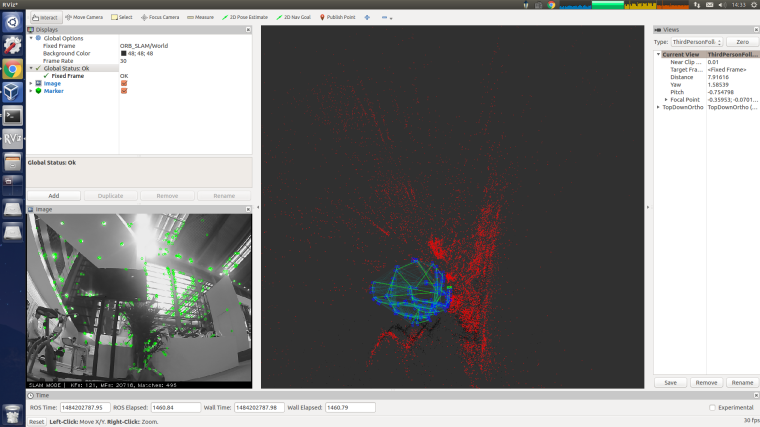
整体界面如下图所示
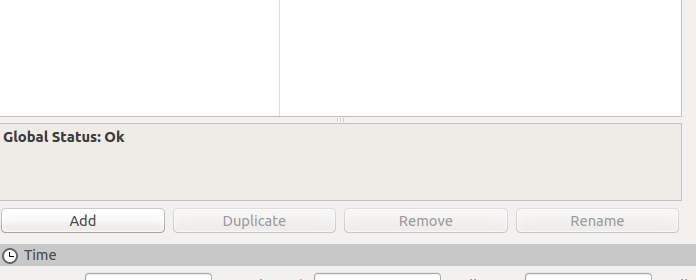
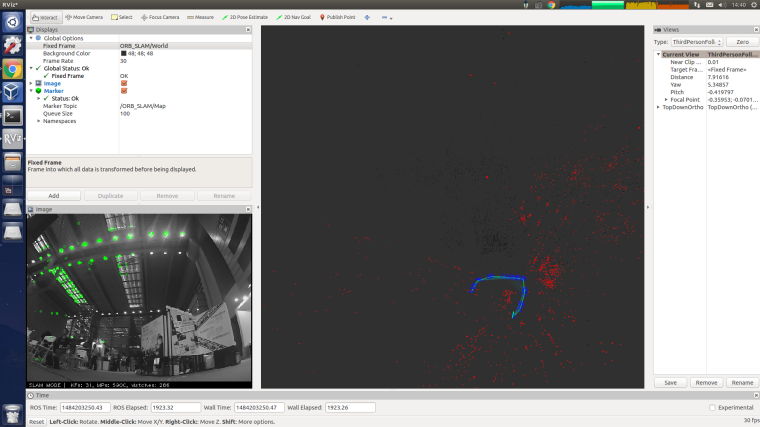
界面主要分为左侧的显示设置区域,中间的大的显示区域和右侧的视角设置区域。最上面是和导航相关的几个工具。最下面是ros状态相关的一些数据的显示。
下面以用rviz查看ORB_SLAM2的topic数据为例展示一下rviz的使用方法
启动ORB_SLAM程序
在终端依次输入
roscore roslaunch ORB_SLAM2 map.launch
等待程序成功运行启动运行
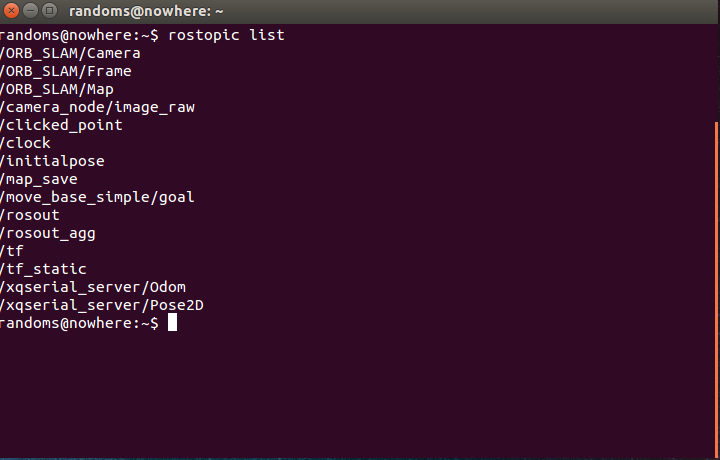
这时在终端输入rostopic list
看到如下的输出则说明程序已经成功启动了
添加topic进入rviz
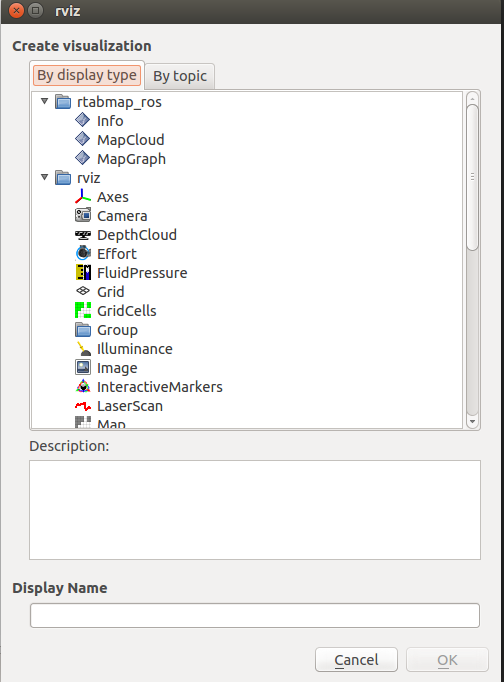
点击rviz左下角的添加按钮,弹出如下图所示的对话框
点击by topic,在下面的列表中选择ORB_SLAM相关的几个topic
这样就可以成功添加了
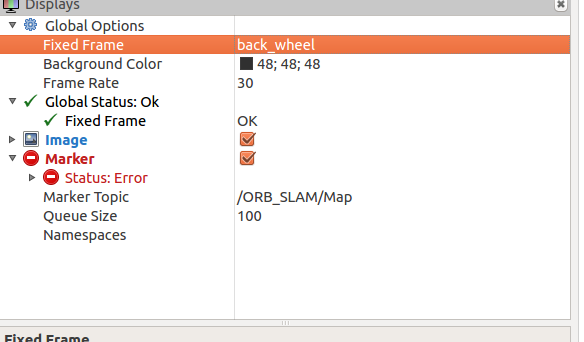
如果添加后出现如下图所示的错误
这是由于Glabal Options里面的坐标系设置有问题。将其改成对应的坐标系就可以了。其他的各种topic都可以通过这种方式方便的进行添加。
基本操作
中间区域显示的ORB_SLAM程序计算出的三维点云。可以通过鼠标左键拖动进行视角的调整。具体的操作方式在最下面的状态栏里面有提示。
右侧区域可以对视角进行更详细的设置
换个角度看一看保存设置
在配置完成之后,如果不想以后每次都要进行一样的配置,可以把配置文件保存起来。
在最上面的菜单中有保存的选项。更详细的rviz相关信息可以看官方的wiki
-
Ubuntu VNC 如何调整分辨率
VNC是一个跨平台的远程桌面软件。在Linux环境下是非常不错的选择。但是在连接的时候分辨率默认会比较小,怎么进行设置呢。网上大部分是说用-geometry WxH 进行设置,但是这个对于使用Unity桌面环境的Ubuntu来说并不好用。下面介绍一个利用xrandr的方法。
xrandr --fb 1920x1080
先试试这个是不是好使的。后面1920x1080是分辨率。请根据自己的分辨率进行调整。
远程连接过去之后在终端输入
xrandr -s WIDTHxHEIGHT
其中WIDTH是你的分辨率宽度,HEIGHT是你的分辨率高度
比如你是1920x1080的分辨率,直接输入xrandr -s 1920x1080
就可以了。如果这时候提示了
the resolution is not available in 'Display Settings'
那么就要先依次输入下面的指令添加对应的分辨率设置gtf 1920 1080 60 xrandr --newmode "1920x1080_60.00" 172.80 1920 2040 2248 2576 1080 1081 1084 1118 -HSync +Vsync xrandr --addmode VGA1 "1920x1080_60.00" xrandr --output VGA1 --mode "1920x1080_60.00"
然后再输入
xrandr -s 1920x1080
不过上面是1920x1080分辨率的设置,其他分辨率的参数要对应进行调整。
Update
不知道为什么再次使用这个方法的时候就不好使了
xrandr --fb 1920x1080
这个指令是好使的
-
UC Berkeley's Salto Is the Most Agile Jumping Robot Ever
Ron Fearing’s Biomimetic Millisystems Lab at UC Berkeley is famous for its stable of bite-sized bio-inspired robots, and Duncan Haldane is responsible for a whole bunch of them. He’s worked on running robots, robots with wings, robots with tails, and even robots with hairs, in case that’s your thing. What Haldane and the other members of the lab are especially good at is looking to some of the most talented and capable animals for inspiration in their robotic designs.
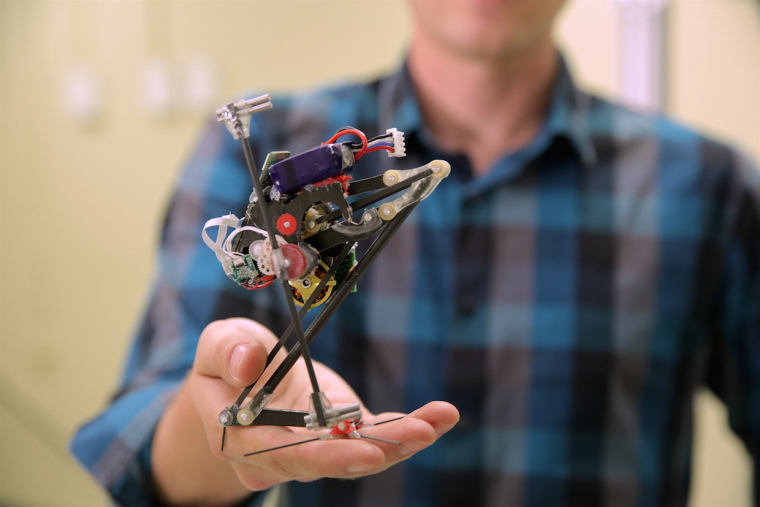
One of most talented and capable (and cutest) jumping animals is a fluffy little thing called a galago, or bushbaby. They live in Africa, weigh just a few kilos, and can leap tall (nearly two meter) bushes in a single bound. Part of the secret to this impressive jumping ability, which biologists only figured out a little over a decade ago, is that galagos use the structure of their legs to amplify the power of their muscles and tendons. In a paper just published in the (brand new!) journal Science Robotics, Haldane (along with M. M. Plecnik, J. K. Yim, and R. S. Fearing) demonstrate the jumping capability of a little 100g robot called Salto, which leverages the galago’s tricks into what has to be the most agile and impressive legged* jumping skill we’ve ever seen.
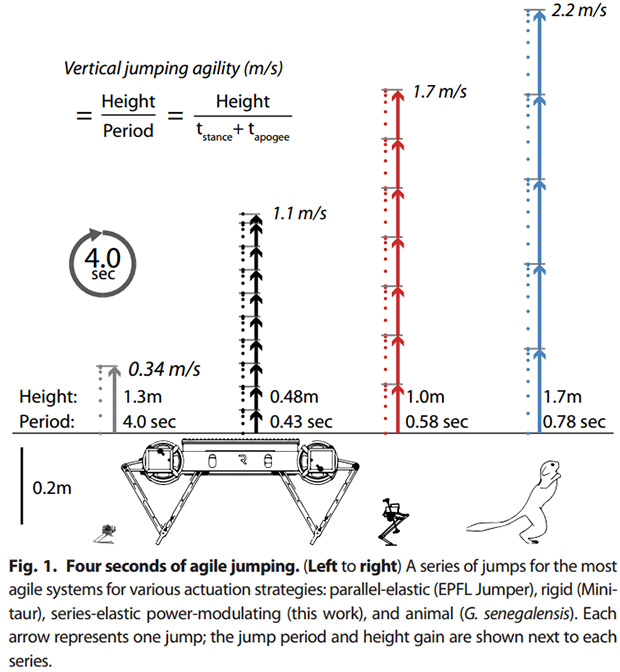
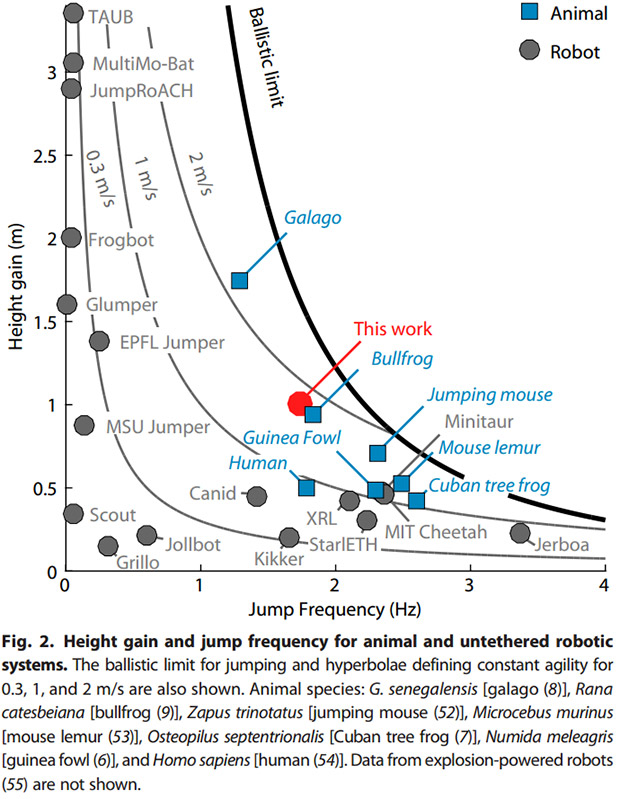
Useful motion through jumping is about more than just how high you can jump— it’s also about how frequently you can jump. For the purposes of this research, the term “agility” refers to how far upwards something can go while jumping over and over, or more technically, “the maximum achievable average vertical velocity of the jumping system while performing repeated jumps.” So, if you’re a galago, you can make jumps of 1.7m in height every 0.78s, giving you an agility of 2.2 m/s.
To be very agile, it’s not enough to be able to jump high: you also have to jump frequently. A robot like EPFL’s Jumper can make impressive vertical jumps of 1.3 meters, but it can only jump once every four seconds, giving it low agility. Minitaur, on the other hand, only jumps 0.48m, but it can do so every 0.43 second, giving it much higher agility despite its lower jumping height.
Increasing agility involves either jumping higher, jumping more frequently, or (usually) both. Galagos can jump high, but what makes them so agile is that they can jump high over and over again. Most robots that jump high have low agility, because (like EPFL’s Jumper) they have to spend time winding up a spring in order to store up enough energy to jump again, which kills their jump frequency. The Berkeley researchers wanted a robot that could match the galago in both jump height and frequency to achieve comparable agility, and they managed to get pretty darn close with Salto, which can make 1m hops every 0.58 seconds for an agility of 1.7 m/s.
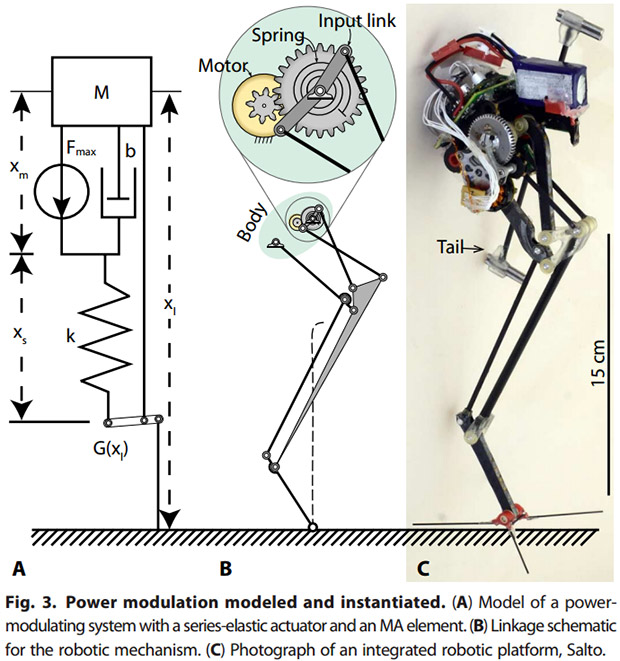
The starting point for Salto’s jumping is common to many jumping robots: an elastic element, like a spring. In Salto’s case, the spring (which is a bit of rubber that can be twisted) is placed in series between a motor and the environment, resulting in a series elastic actuator (SEA). SEAs are nice because they help to protect the motor, allow for force control, let you recover some energy passively, and enable power modulation.
That last one is especially important: power modulation is a controlled (modulated) storing and releasing of power, and in the case of a jumping robot like Salto, it means that you can pump a bunch of energy into winding up a spring over a (relatively) long amount of time, and then release that energy over a (relatively) short amount of time. Many of the most successful jumping robots use elastic actuators to modulate how their actuators deliver power: by using a motor to wind up a spring, and then dumping all of that energy out of the spring at once to jump, robots can be much more powerful than if they were relying on the motor output alone.
Galagos have springs like this in the form of muscles and tendons, but what the Berkeley researchers implemented in Salto was something else that the galagos use to increase their jumping performance: a leg with variable mechanical advantage. The shape of a galago’s leg, and the technique that it uses to jump, allow it to output a staggering 15 times more power than its muscles can by themselves, and this kind of performance is the goal of Salto.
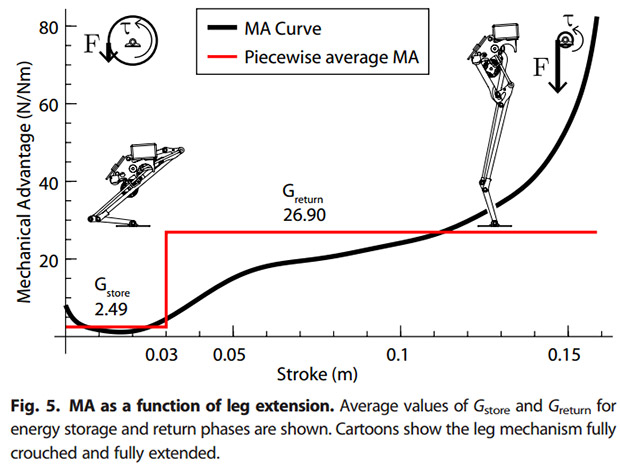
Mechanical advantage is what happens when you use a lever (like a crowbar) to convert a small amount of force and a large amount of motion into a large amount of force and a small amount of motion. What’s unique about Salto’s leg (and the legs of galagos and other jumping animals) is that its mechanical advantage is variable: when the leg is retracted (when the robot or animal is crouching on a surface), it has very low mechanical advantage. As the jumping motion begins, the mechanical advantage stays low as long as possible, and then rapidly increases as the leg extends in a jumping motion. Essentially, this slows down the takeoff part of the jump, giving the foot more time in contact with the surface. When the galago does this, Haldane calls it a “supercrouch.”
This mechanically-advantaged crouching adds 60 milliseconds to the amount of time that Salto spends in contact with a surface during the takeoff phase of a jump. It doesn’t sound like much, and you barely notice while watching the robot in action, but it more than doubles the time that Salto can transmit energy through its leg over a non-variable mechanically-advantaged design, which results in an increase in jumping power of nearly 3x. A Salto-like robot using only a series elastic actuator would be able to jump to 0.75m, while Salto itself (with its variable mechanical advantage leg) jumps to a full meter in height. This is what’s so cool about Salto: you get this massive boost to performance thanks purely to a very clever bio-inspired leg design. It’s not a galago yet, but it does do just as well as a bullfrog:
I guess the other thing that’s so cool about Salto is that it’s already doing Parkour— using a vertical surface that would otherwise be an obstacle to instead simultaneously increase its jump height and change direction. You’ve probably noticed that Salto doesn’t have a lot of sensing on it right now, and its jumping skills are all open-loop. In order to orient itself, it uses a rotary inertial tail, but it’s not (yet) able to adapt to different surfaces on its own.
The next things that the researchers will be working on include investigating new modes of locomotion, and of course chaining together multiple jumps, perhaps with integrated sensing. There’s also potential for adding another leg (or three) to see what happens, but at least in the near term, Haldane says he’s going to see how far he can get with the monopedal version of Salto.
It’s also worth mentioning that Salto’s variable mechanical advantage leg can be adapted to other legged robots that use SEAs, like StarlETH, ANYmal, or ATRIAS, and we’re very interested to see how this idea might improve the performance and efficiency of other platforms.
“Robotic Vertical Jumping Agility Via Series-Elastic Power Modulation,” by Duncan W. Haldane, M. M. Plecnik, J. K. Yim, and R. S. Fearing from UC Berkeley, was published today in the very first issue of Science Robotics.
[ UC Berkeley ]
- The researchers are, in general, comparing Salto to untethered, non-explosive jumpers. Using a tether for power means that you don’t have to worry nearly as much about efficiency, which is sort of cheating. And explosive jumpers (such as Sand Flea and these little rocket-jumpers) are certainly capable of some ridiculous jumping performance, but it’s difficult to compare their energy production to mechanical robots like Salto.
-
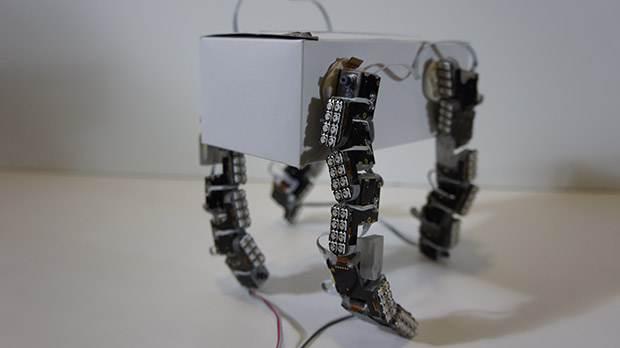
MIT's Modular Robotic Chain Is Whatever You Want It to Be
As sensors, computers, actuators, and batteries decrease in size and increase in efficiency, it becomes possible to make robots much smaller without sacrificing a whole lot of capability. There’s a lower limit on usefulness, however, if you’re making a robot that needs to interact with humans or human-scale objects. You can continue to leverage shrinking components if you make robots that are modular: in other words, big robots that are made up of lots of little robots.
In some ways, it’s more complicated to do this, because if one robot is complicated, n robots tend to be complicatedn. If you can get all of the communication and coordination figured out, though, a modular system offers tons of advantages: robots that come in any size you want, any configuration you want, and that are exceptionally easy to repair and reconfigure on the fly.
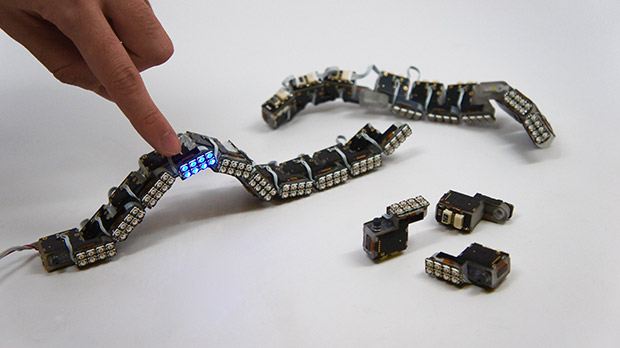
MIT’s ChainFORM is an interesting take on this idea: it’s an evolution of last year’s LineFORM multifunctional snake robot that introduces modularity to the system, letting you tear of a strip of exactly how much robot you need, and then reconfigure it to do all kinds of things.
MIT Media Lab calls ChainFORM a “shape changing interface,” because it comes from their Tangible Media Group, but if it came from a robotics group, it would be called a “poke-able modular snake robot with blinky lights.” Each ChainFORM module includes touch detection on multiple surfaces, angular detection, blinky lights, and motor actuation via a single servo motor. The trickiest bit is the communication architecture: MIT had to invent something that can automatically determine how many modules there are, and how the modules are connected to each other, while preserving the capability for real-time input and output. Since the relative position and orientation of each module is known at all times, you can do cool things like make a dynamically reconfigurable display that will continue to function (or adaptively change its function) even as you change the shape of the modules.
ChainFORM is not totally modular, in the sense that each module is not completely self-contained at this point: it’s tethered for power, and for overall control there’s a master board that interfaces with a computer over USB. The power tether also imposes a limit on the total number of modules that you can use at once because of the resistance of the connectors: no more than 32, unless you also connect power from the other end. The modules are still powerful, though: each can exert 0.8 kg/cm of torque, which is enough to move small things. It won’t move your limbs, but you’ll feel it trying, which makes it effective for haptic feedback applications, and able to support (and move) much of its own weight.
If it looks like ChainFORM has a lot of potential for useful improvements, that’s because ChainFORM has a lot of potential for useful improvements, according to the people who are developing useful improvements for it. They want to put displays on every surface, and increase their resolution. They want more joint configurations for connecting different modules and a way to split modules into different branches. And they want the modules to be able to self-assemble, like many modular robots are already able to do. The researchers also discuss things like adding different kinds of sensor modules and actuator modules, which would certainly increase the capability of the system as a whole without increasing the complexity of individual modules, but it would also make ChainFORM into more of a system of modules, which is (in my opinion) a bit less uniquely elegant than what ChainFORM is now.
“ChainFORM: A Linear Integrated Modular Hardware System for Shape Changing Interfaces,” by Ken Nakagaki, Artem Dementyev, Sean Follmer, Joseph A. Paradiso, and Hiroshi Ishii from the MIT Media Lab and Stanford University was presented at UIST 2016.
-
Why the United Nations Must Move Forward With a Killer Robots Ban
Russia’s Uran-9 is an unmanned tank remotely controlled by human operators, who are “in the loop” to pull the trigger. Many observers fear that future AI-powered weapons will become fully autonomous, able to engage targets all on their own.This is a guest post. The views expressed here are solely those of the authors and do not represent positions of IEEE Spectrum or the IEEE.
Killer robots are on the agenda of a major United Nations meeting in Geneva this week.
As part of a U.N. disarmament conference, participating countries are deciding on Friday whether or not to start formal discussions on a ban of lethal autonomous weapons following on from three years of informal discussions.
Last July, thousands of researchers working in AI and robotics came together and issued an open letter calling for a pre-emptive ban on such weapons.
I was one of the organizers of the letter, and today I spoke at the U.N. for a third time calling once again for a ban.
The reason I have been motivated to do this is simple. If we don’t get a ban in place, there will be an arms race. And the end point of this race will look much like the dystopian future painted by Hollywood movies like The Terminator.
Even before this end point, such weapons will likely fall into the hands of terrorists and rogue nations. These people will have no qualms about removing any safeguards. Or using them against us.
And it won’t simply be robots fighting robots. Conflicts today are asymmetric.
It will mostly be robots against humans. So unlike what some robot experts might claim, many of those humans will be innocent civilians.This is a terrible and terrifying prospect. But we don’t need to end there.
The world has decided collectively not to weaponize other technologies. We have bans on biological and chemical weapons. Most recently, we have banned several technologies including blinding lasers and anti-personnel mines.
And whilst these bans have not been 100 percent effective, the world is likely a better place with these bans than without.
These bans have not prevented related technologies from being developed. If you go into a hospital today, a “blinding” laser will actually be used to fix your eyes. But arms companies will not sell you one. And you will not find them on any battlefield.
The same should be true for autonomous weapons. We will not stop the development of the broad technology that has many other positive uses like autonomous vehicles.
But if we get an U.N. ban in place, we will not have autonomous weapons on the battlefield. And this will be a good thing.
Like with blinding lasers, there is unlikely to be a regulatory authority or inspection regime for autonomous weapons. Instead, the ban would be implemented by more subtle measures like adverse publicity, and ultimately moral stigma.
Professional organizations like the IEEE are starting to act in this space.
Earlier this week, the IEEE announced an initiative to develop ethical standards for the developers of autonomous systems. The initial report warns that autonomous weapons would destabilize international security, lead to unintended military escalation and even war, upset strategic balance, and encourage offensive actions.
The IEEE report contains a number of recommendations, including the need for meaningful human control over direct attacks employing such weapons. It also says the design, development, or engineering of autonomous weapons beyond meaningful human control to be used offensively or to kill humans should be considered unethical.
From the reaction I have had talking about this issue in public, many people around the world support the view that a ban would be a good idea.
Even nine members of the U.S. Congress wrote to the secretaries of State and Defense last week supporting the call for a pre-emptive ban.
All technology can be used for good or bad. We need to make a conscious and
effective decision soon to take the world down a good path. My fingers are
crossed that the U.N. will take the first step on Friday. -
如何调试崩溃的程序
在程序开发中经常会遇到这样的问题,对于C或C++的程序有时程序崩溃不能获得有效的调试信息
Segmentation fault
Core dump
这样的程序如何进行调试呢?
我们可以利用gdb去调试崩溃程序。首先开启core dump文件。在开启之后,当程序崩溃的时候操作系统会自动的把崩溃信息存储到core文件里面。
在终端输入ulimit -c unlimited
这样就打开core dump 功能了。
下面是一个崩溃的实际例子
randoms@nowhere:~/ramdisk$ /home/randoms/Documents/ros/workspace/devel/lib/orb_slam2/mono /home/randoms/Documents/ros/workspace/src/ORB_SLAM2/Examples/ROS/orb_slam2/Data/ORBvoc.bin /home/randoms/Documents/ros/workspace/src/ORB_SLAM2/Examples/ROS/orb_slam2/Data/setting4.yaml /camera/image_raw:=/camera_node/image_raw /Pose2D:=/xqserial_server/Pose2D > orb.log mono: ../nptl/pthread_mutex_lock.c:350: __pthread_mutex_lock_full: Assertion `(-(e)) != 3 || !robust' failed. Aborted (core dumped) randoms@nowhere:~/ramdisk$ ls 2.bag core KeyFrameTrajectory.txt orb.log
可以看到在程序崩溃后创建了一个core文件,在终端输入下面的指令开始调试
randoms@nowhere:~/ramdisk$ gdb /home/randoms/Documents/ros/workspace/devel/lib/orb_slam2/mono core
gdb
的指令格式是gdb EXE_FILE_PATH CORE_FILE_PATH
等待载入完成
GNU gdb (Ubuntu 7.7.1-0ubuntu5~14.04.2) 7.7.1 Copyright (C) 2014 Free Software Foundation, Inc. License GPLv3+: GNU GPL version 3 or later <http://gnu.org/licenses/gpl.html> This is free software: you are free to change and redistribute it. There is NO WARRANTY, to the extent permitted by law. Type "show copying" and "show warranty" for details. This GDB was configured as "x86_64-linux-gnu". Type "show configuration" for configuration details. For bug reporting instructions, please see: <http://www.gnu.org/software/gdb/bugs/>. Find the GDB manual and other documentation resources online at: <http://www.gnu.org/software/gdb/documentation/>. For help, type "help". Type "apropos word" to search for commands related to "word"... Reading symbols from /home/randoms/Documents/ros/workspace/devel/lib/orb_slam2/mono...(no debugging symbols found)...done. [New LWP 14392] [New LWP 14370] [New LWP 14365] [New LWP 14367] [New LWP 14371] [New LWP 14388] [New LWP 14376] [New LWP 14391] [New LWP 14407] [New LWP 14406] [New LWP 14408] [New LWP 14377] [New LWP 14411] [New LWP 14410] [New LWP 14369] [New LWP 14387] [New LWP 14409] [New LWP 14412] [New LWP 14390] [Thread debugging using libthread_db enabled] Using host libthread_db library "/lib/x86_64-linux-gnu/libthread_db.so.1". Core was generated by `/home/randoms/Documents/ros/workspace/devel/lib/orb_slam2/mono /home/randoms/Do'. Program terminated with signal SIGABRT, Aborted. #0 0x00007fe6ca6ecc37 in __GI_raise (sig=sig@entry=6) at ../nptl/sysdeps/unix/sysv/linux/raise.c:56 56 ../nptl/sysdeps/unix/sysv/linux/raise.c: No such file or directory.
gdb在终端中输入
bt
可以显示出崩溃时的堆栈信息
#0 0x00007fe6ca6ecc37 in __GI_raise (sig=sig@entry=6) at ../nptl/sysdeps/unix/sysv/linux/raise.c:56 #1 0x00007fe6ca6f0028 in __GI_abort () at abort.c:89 #2 0x00007fe6ca6e5bf6 in __assert_fail_base ( fmt=0x7fe6ca8363b8 "%s%s%s:%u: %s%sAssertion `%s' failed.\n%n", assertion=assertion@entry=0x7fe6c9bb6a25 "(-(e)) != 3 || !robust", file=file@entry=0x7fe6c9bb6a08 "../nptl/pthread_mutex_lock.c", line=line@entry=350, function=function@entry=0x7fe6c9bb6b20 <__PRETTY_FUNCTION__.8695> "__pthread_mutex_lock_full") at assert.c:92 #3 0x00007fe6ca6e5ca2 in __GI___assert_fail ( assertion=assertion@entry=0x7fe6c9bb6a25 "(-(e)) != 3 || !robust", file=file@entry=0x7fe6c9bb6a08 "../nptl/pthread_mutex_lock.c", line=line@entry=350, function=function@entry=0x7fe6c9bb6b20 <__PRETTY_FUNCTION__.8695> "__pthread_mutex_lock_full") at assert.c:101 #4 0x00007fe6c9ba9ce1 in __pthread_mutex_lock_full (mutex=0x9643740) at ../nptl/pthread_mutex_lock.c:350 #5 0x00007fe6cb03403a in __gthread_mutex_lock (__mutex=0x9643740) at /usr/include/x86_64-linux-gnu/c++/4.8/bits/gthr-default.h:748 #6 lock (this=0x9643740) at /usr/include/c++/4.8/mutex:134 #7 lock (this=0x7fe694ed5a10) at /usr/include/c++/4.8/mutex:511 #8 unique_lock (__m=..., this=0x7fe694ed5a10) ---Type <return> to continue, or q <return> to quit--- at /usr/include/c++/4.8/mutex:443 #9 ORB_SLAM2::MapPoint::isBad (this=0x96434c0) at /home/randoms/Documents/ros/workspace/src/ORB_SLAM2/src/MapPoint.cc:272 #10 0x00007fe6cb03c957 in ORB_SLAM2::KeyFrame::RemoveBadPoints (this=0xa33f510) at /home/randoms/Documents/ros/workspace/src/ORB_SLAM2/src/KeyFrame.cc:1155 #11 0x00007fe6caff8b5a in ORB_SLAM2::Tracking::GC (this=0x711d310) at /home/randoms/Documents/ros/workspace/src/ORB_SLAM2/src/Tracking.cc:311 #12 0x00007fe6cb0baef2 in ORB_SLAM2::GC::Run (this=0x7157fe0) at /home/randoms/Documents/ros/workspace/src/ORB_SLAM2/src/GC.cc:37 #13 0x00007fe6cad42a60 in ?? () from /usr/lib/x86_64-linux-gnu/libstdc++.so.6 #14 0x00007fe6c9bac184 in start_thread (arg=0x7fe694ed6700) at pthread_create.c:312 #15 0x00007fe6ca7b037d in clone () at ../sysdeps/unix/sysv/linux/x86_64/clone.S:111
这样我们就可以定位到具体在哪一个语句崩溃的。可以看出这次的崩溃是一个锁的问题。在
MapPoint.cc
文件里面。 -
最大期望算法
什么是最大期望算法
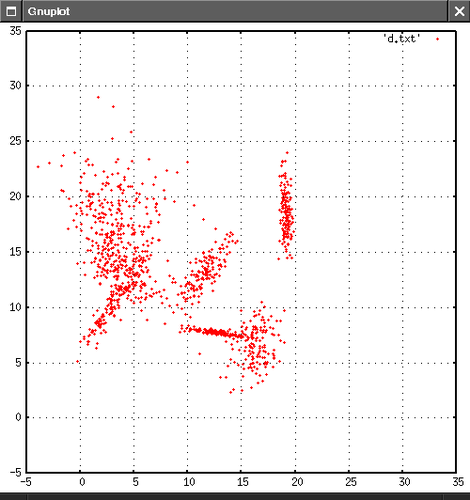
在我们进行数据分析的时候经常会遇到这个的问题。我们有一系列的数据点,可以看出他们大致上属于不同的类别。比如下面的数据点。如何找到一种算法把这些点分类?
最大期望算法(Expectation Maximization algorithm )就是这样一种分类算法。
原理
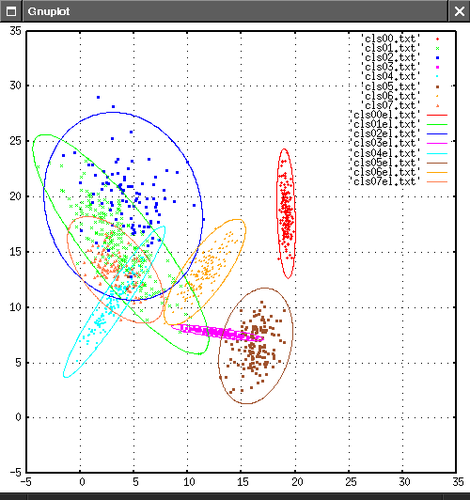
原理上也是十分的简单的。对于一个随机过程来说,一般数据分布都是一个高斯分布。所以我们就可以假设这样的数据是几个高斯分布叠加出来的结果。下面只要通过一定的方法找到这些高斯分布的参数就可以了。为什么叫做最大期望呢?因为找到的分布是最有可能的产生这样的数据结果的分布。具体找参数的方法我就不介绍了,可以详细看这里
如何在opencv里面使用最大期望算法
在opencv中已经实现了EM算法,所以我们可以直接使用,官方文档
这里是opencv官方给的sample code下面是我写的更简单一些的sample code。作用是对三维空间中的点进行归类。
cv::Mat framePos = cv::Mat( vpKF.size(), 3, sizeof(float)); for(size_t it = 0; it < vpKF.size(); it ++){ framePos.at<float>(it * 3) = 0; // 构造数据 framePos.at<float>(it * 3 + 1) = 0; framePos.at<float>(it * 3 + 2) = 0; } // 所有点的坐标信息都已经存入framePos cv::EM em = cv::EM(); // 创建一个EM对象 cv::Mat labels; cv::Mat pos = cv::Mat( 1, 3, sizeof(float)); // pos是需要进行判断分类的点 // 开始训练数据 em.train( framePos, cv::noArray(), labels, cv::noArray() ); // 开始判断分类 em.predict(pos, cv::noArray())[1]; // 返回值就是分类
-
Ubuntu 如何把内存当做硬盘使用
在做开发的时候有时候会有大量的磁盘读写操作,这样很伤硬盘。比如在进行ROS开发的时候经常要播放bag文件。长时间的测试可能好几个小时都在连续的读硬盘。这时候如果你的内存足够大的话就可以把内存的一部分挂载到文件系统里面当做硬盘使用。使用方法也非常简单。
首先创建一个挂载点
mkdir ramdisk
然后把内存挂载上去
sudo mount -t tmpfs -o size=8G tmpfs ramdisk/
size
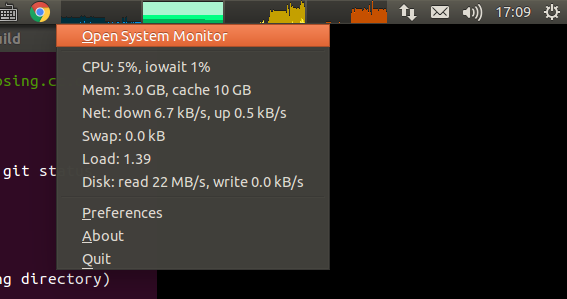
后面跟的是硬盘的大小。这里是挂载了8G的内存。看一下效果吧
直接使用硬盘播放bag文件
使用内存之后
可以看到效果很明显
-
最后的沉思(彭加勒)
最后的沉思是彭加勒关于物理,数学,时空,科学,伦理等一系列的想法形成的一本书。我只看了第一章规律的演变和第二章空间和时间。感觉这本书非常值得一读。在这里推荐给大家。
彭加勒是一个非常伟大的数学家和物理学家。他的介绍这里就不说了。下面是这本书的目录结构。
英文版译者说明 ································ ································ ··············· 1
法文版前言 ································ ································ ······················· 2
第一章 规律的演变 ································ ································ ········ 3
第二章 空间和时间 ································ ································ ······ 19
第三章 空间为什么有三维 ································ ·························· 30
第四章 无限的逻辑 ································ ································ ······ 52
第五章 数学和逻辑 ································ ································ ······ 75
第六章 量子论 ································ ································ ············· 87
第七章 物质和以太之间的关系 ································ ················ 103
第八章 伦理和科学 ································ ································ ···· 117
第九章 道德联盟 ································ ································ ······· 132下面简单介绍下第一章作者的主要思想,希望大家能感受到其中的魅力。
作者的主要疑问来自于物理规律本身是不是随着时间在进行改变。如果规律确实实在发生变化我们如何证明这件事情?
首先所谓的规律是什么?它是前因和后果之间、世界的目前状态和直接后继状态之间的恒定联系。通过这些联系我们可以根据世界在此时的状态推测世界在下一时刻的状态。以此类推可以得到世界在所有时刻的状态。我们如何去了解过去的状态呢?只能通过一些历史遗留到现在的痕迹,然后反推过去这个遗迹当时的状态。但是这个推断的过程还是不能让我们了解过去规律是不是发生了变化。因为推断本身包含了规律本身是不变的假设。总之,我们无法认识过去,除非我们承认规律不改变;如果我们承认这一点,那么规律演变的问题就毫无意义;如果我们不承认这个条件,那么认识过去的问题便不可能有解,正如与过去有关的所有问题一样。
-
如何调试手机网页页面
现在大部分人浏览网页都是用手机。所以在制作网站的过程中对于手机页面的开发和调试显得越来越重要了。下面就介绍一下手机页面的调试方法。
- 利用chrome模拟进行调试
如果你在使用chrome浏览器,那么就可以利用其自带的模拟功能进行调试。
开启浏览器的调试模式,在调试窗口的左上角第二个按钮就是手机调试按钮。点击之后就可以开启手机调试模式。
在左侧窗口最上方可以选择具体的手机型号。如果没有自己的型号还可以点击最上方的下拉菜单选择Responsive,然后直接拖动窗口进行高度和宽度的调整。这样对于各种屏幕尺寸的适配调试起来是很方便的。
但是这种调试方法只是在测试网页在不同尺寸的屏幕上的显示效果。但是实际浏览的时候可能会出现异常显示的情况。这样就只能采用第二种方法进行调试了。
- 利用chrome远程调试
打开手机浏览器,在地址栏输入about:debug,如下图所示
在菜单中选择设置
然后点击调试按钮。
然后在各种调试选项中把 remote debug启用
然后用浏览器打开需要测试的网站。将手机通过数据先连接电脑,电脑上要安装有adb这样的软件。
在电脑上打开chrome 浏览器,选择tools->Inspect devices
如果一切正常的话应该会如下图所示
点击Inspect就可以开始调试了,调试方法和电脑上的基本是一样的。
实际的调试过程应该是这两种方法相结合。第一中用起来更方便,但是结果和实际结果可能会有出入。第二种更加准确,但是使用起来会相对比较困难一些。
- 利用chrome模拟进行调试