@123 什么设备
ROS交流群
ROS Group 产品服务
Product Service 开源代码库
Github 官网
Official website 技术交流
Technological exchanges 激光雷达
LIDAR ROS教程
ROS Tourials 深度学习
Deep Learning 机器视觉
Computer Vision
ROS Group 产品服务
Product Service 开源代码库
Github 官网
Official website 技术交流
Technological exchanges 激光雷达
LIDAR ROS教程
ROS Tourials 深度学习
Deep Learning 机器视觉
Computer Vision
weijiz 发布的帖子
-
lio_sam和ndt导航精度差别的原因发布在 激光雷达
实际跑bag时发现,同样的地图同样的数据,参数调整好之后ndt导航的精度要比lio_sam的高。在机器人静止时,lio_sam大概有最大2厘米左右的定位波动。但是ndt可以做到2个毫米的定位波动。误差来自于雷达匹配误差上。
由于lio_sam是scan 到 map的匹配,而map本身可能存在误差,地图的真实点在地图点云上表现可能是一个点云分布。lio_sam匹配时按照最近点去找很有可能找到不是真实值。由于寻找匹配的随机性这样就定位就存在波动。比如实际是一个平整的墙面,但是建图后的点云很可能是有一定厚度的点云分布,这样匹配就存在这个厚度的误差。
ndt就不存在这个问题,它按照最大概率去匹配。很好的去掉了这个误差带来的随机影响。

-
raid 更换硬盘后 Ubuntu系统无法进入的解决方法发布在 技术交流
服务器是Ubuntu系统,安装在Intel的raid 10上。最近一个硬盘有坏道,尝试更换硬盘。首先在Ubuntu中下线有坏道的硬盘。然后关机安装上硬盘后显示如下画面
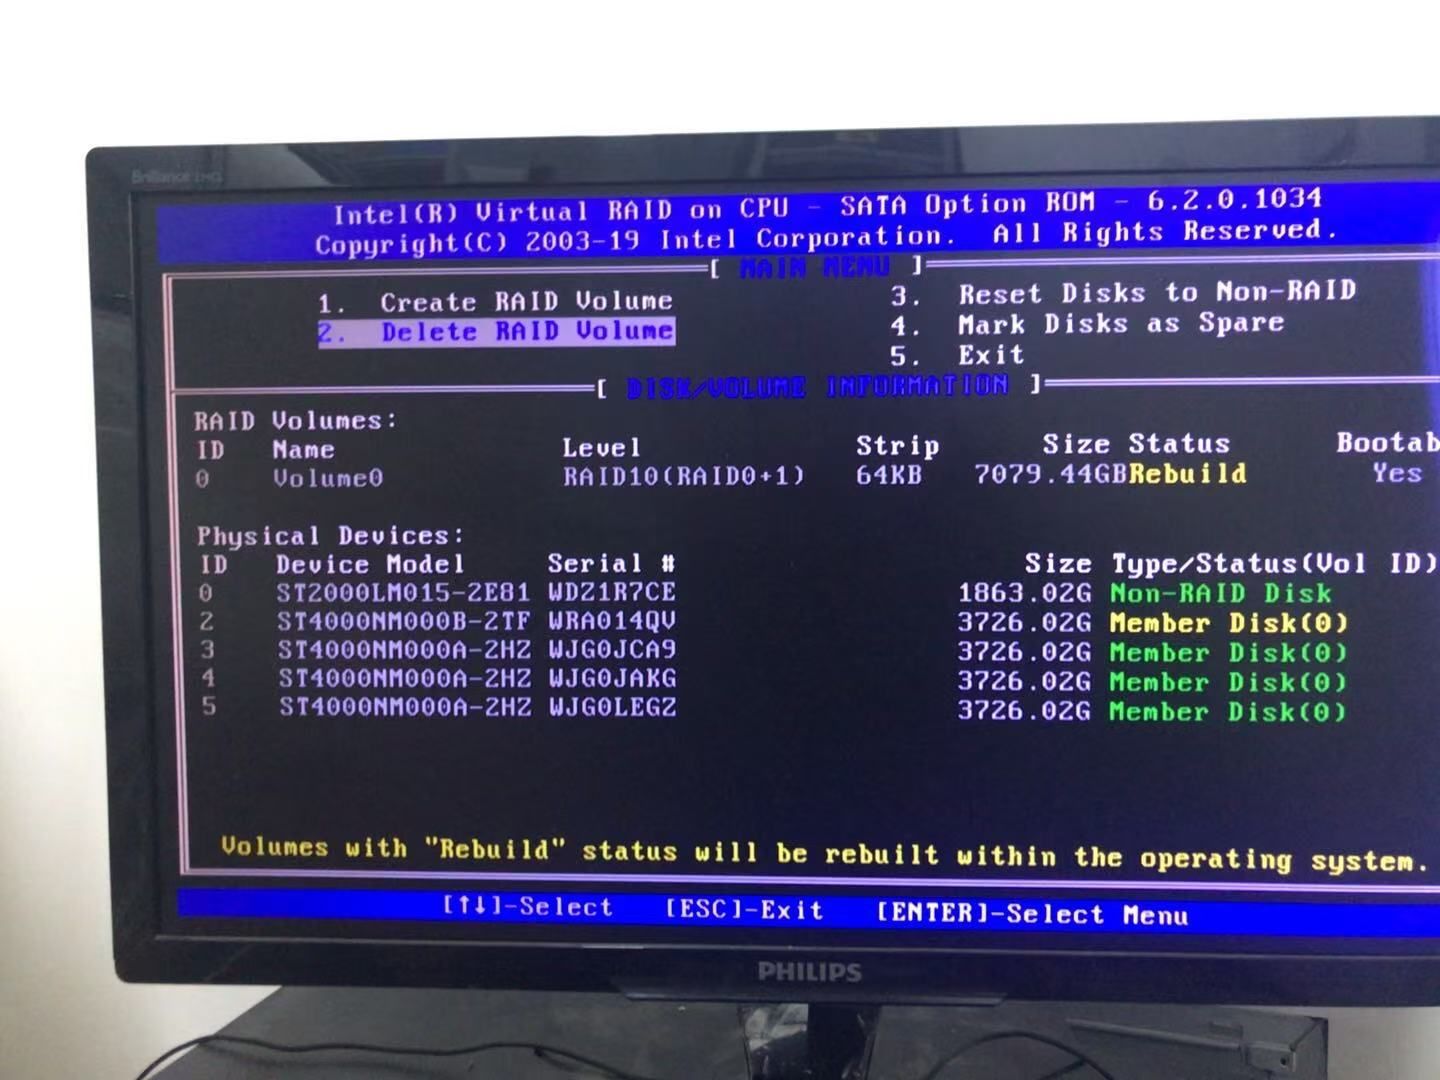
然后重启之后再也无法进入系统。尝试吧老硬盘换上去仍然没有效果。显示老硬盘状态为offline。
再次插入新硬盘状态变成degraded。经过各种搜索尝试最终找到原因。主板自带的raid 10 不是完整raid。其必须要在操作系统的协助下才能完成raid的功能。正常情况下如果服务器系统是windows,那么应该可以直接启动进入系统开始raid rebuild。板载的raid是intel的rst,但是这个功能不支持Linux。详细的可以参考 https://zhuanlan.zhihu.com/p/106623640。
我们采用的方法是在一块独立的硬盘上安装一个Windows Server 2016,然后装上对应版本的intel rst,注意版本一定要对应,可以根据主板信息到主板官网上去找。硬盘装上新盘。如果一切正常打开intel rst程序就能看到raid在rebuild。rst默认安装位置在
C:\Program Files (x86)\Intel\Intel(R) Rapid Storage Technology enterprise\IAStorUI.exe。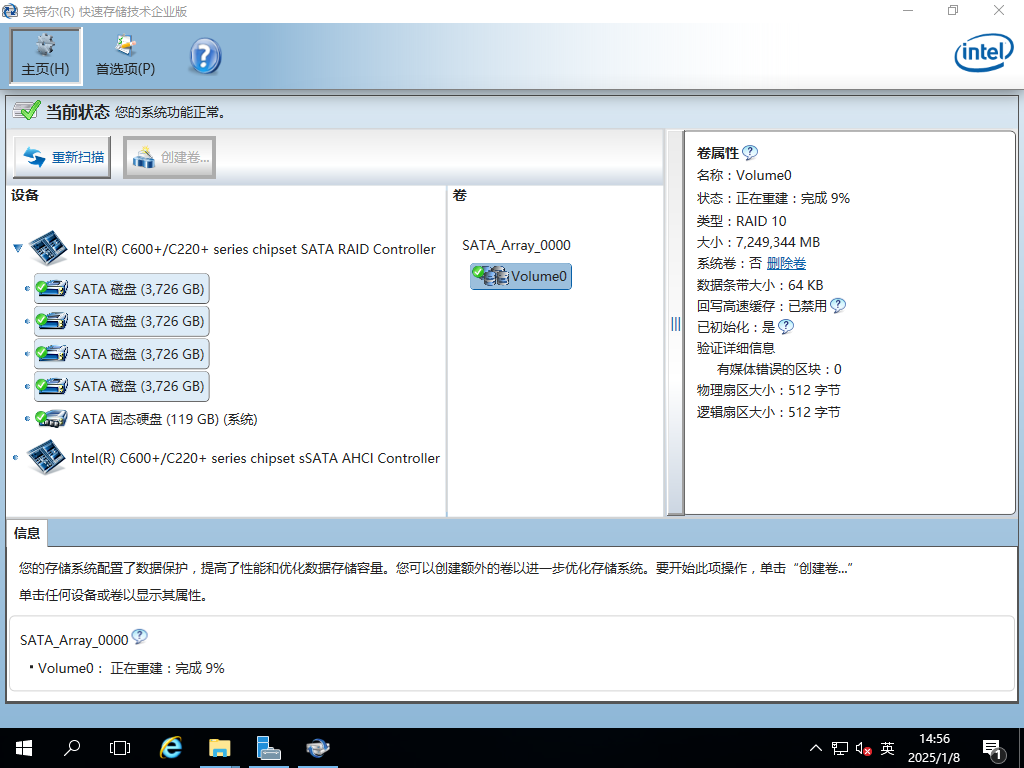
如此等待重建完成就可以了。
-
二维码摄像头和里程计的时间戳同步发布在 技术交流
假设里程计时间戳和二维码摄像头的时间戳都是准确的(或者和真实时间都差了一个相同的固定值),那么同一时刻通过里程计计算的机器人移动的相对位姿应该和通过二维码计算的相对位资完全一样。因为两个传感器数据同一时刻对应的是同一个机器人位置。
对于时间戳其真实值实际上对我们没有多大意义,更有意义的是不同传感器之间时间戳的偏差。通过这种方式我们可以用来校准这两个传感器的时间戳。我们可以以一个传感器的时间戳作为基准,其他传感器的时间戳对其到这个时间戳上。里程计时间戳就是一个很好的基准。
我们控制机器人下方扫码摄像头在机器人正中央,保证机器人在原地旋转时二维码始终在自己的摄像头范围中央。同时录制摄像头和里程计数据。通过里程计数据可以计算出一个相对于初始位置的相对位姿,通过二维码数据也可以计算出一个相对位姿。机器人以固定速度原地旋转。很容易计算出这两个位姿的差就是 delta_theta = delta_t * w, 其中delta_t就是两个传感器的时间戳差别,w是机器人旋转的角速度。如果时间戳的差距是固定的,那么就应该有这个角度差也是固定的。
通过实验我计算出 角度差均值是 -0.09949351795361913, 标准差是 0.014604546858801595
可以看到这两个传感器的时间戳基本上确实是一个定值。机器人角速度为2rad/s,则计算出时间戳大概差50ms。把这个偏差加入到计算中相关精度有了明显的提升。
-
RE: 雷达数据的运动校准和里程计时间同步发布在 激光雷达
@weijiz 还有一点,如果不进行运动校准,直接在odom坐标系下看scan数据,你会发现之前存在的运动校准误差消失了。这是因为rviz在odom下显示scan数据的时候不是按照整体显示的,它会计算每个点的时间戳去显示。相当于完成了运动校准。所以如果你的运动校准计算正确,那么你的计算数据在odom下就应该和rviz的原始数据重合。
-
雷达数据的运动校准和里程计时间同步发布在 激光雷达
雷达固定在机器人上,当机器人运动时由于LaserScan每个beam存在时间差就会产生运动误差。同时如果里程计和雷达本身存在时间差,也会造成扫描误差。不过这两个误差的表现形式有所区别。
首先是雷达的运动误差。如果在rviz中laser坐标系下看雷达数据。当机器人在原地快速旋转时,会发现雷达的x轴左右两边的数据是明显不一致的。如下图所示
右前方基本是两条平行线,当这个部分运动到雷达正前方时会发生形变
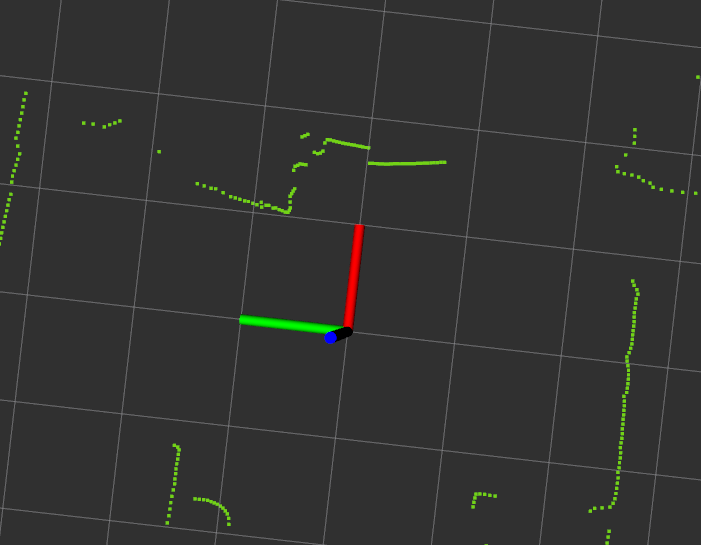
两条直线不再平行。这是由于x轴两边的数据正好对应差了一个scan time。雷达产生的相对移动是最大的。
通过计算实际时间差可以把这个修正回来。
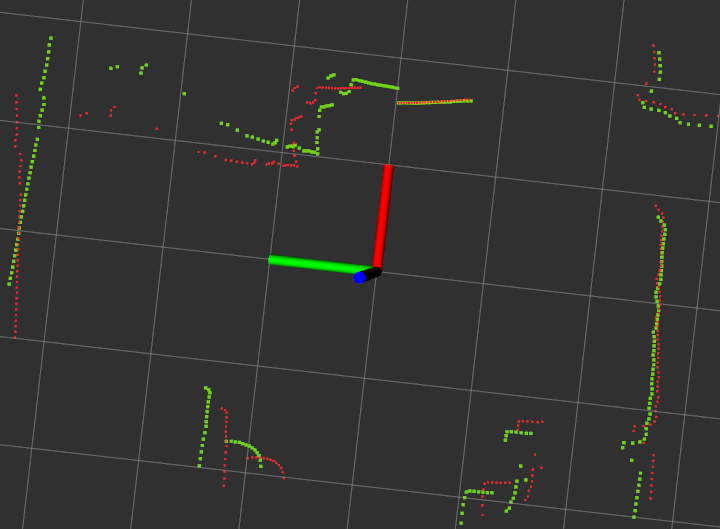
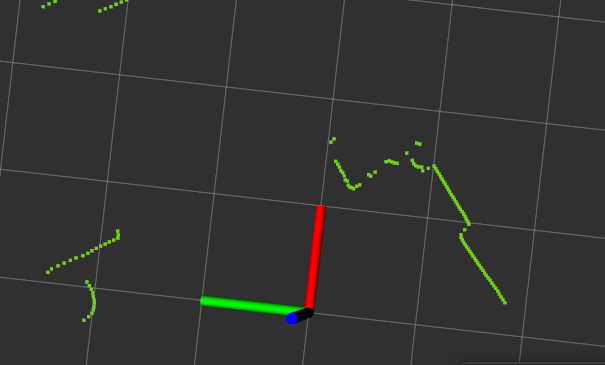
图中红色就是修正后的数据。另一个主要的误差来自odom和scan的时间戳不同步。它会造成的误差表现是如果机器人在原地匀速旋转那么雷达数据和里程计当前对应的雷达数据就会差一个固定角度。如下图所示。
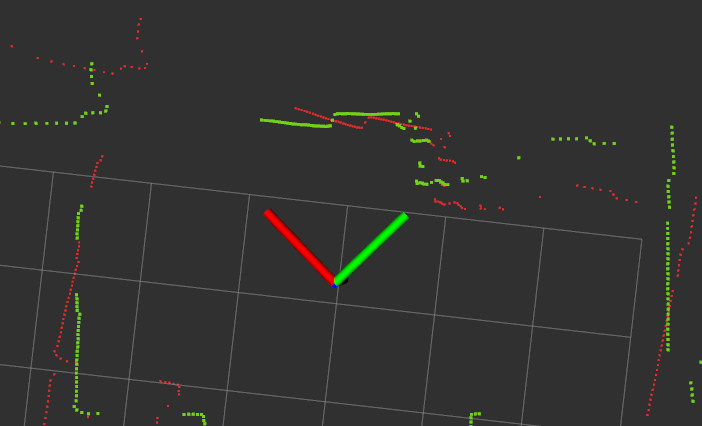
其中绿色是真值红色是测量值。同时这个角度也很容易算出是delta_t * w, 其中delta_t是时间戳差值,w是旋转角速度。
所以我们很容易通过现象去判断是否存在此误差。如果机器人原地旋转时在rviz中,odom坐标系下,你发现雷达数据随着角速度的不同有明显的整体的角度变化。那就说明存在一个雷达和里程计的时间戳是不同步的,有可能某个传感器的时间戳不准。
-
RE: 小强ROS机器人教程(27)___bw_auto_dock自动充电功能包的使用和实现原理发布在 产品服务
@xiaowei 没有就对应安装上 sudo apt install libboost-filesystem-dev
-
RE: 小强ROS机器人教程(27)___bw_auto_dock自动充电功能包的使用和实现原理发布在 产品服务
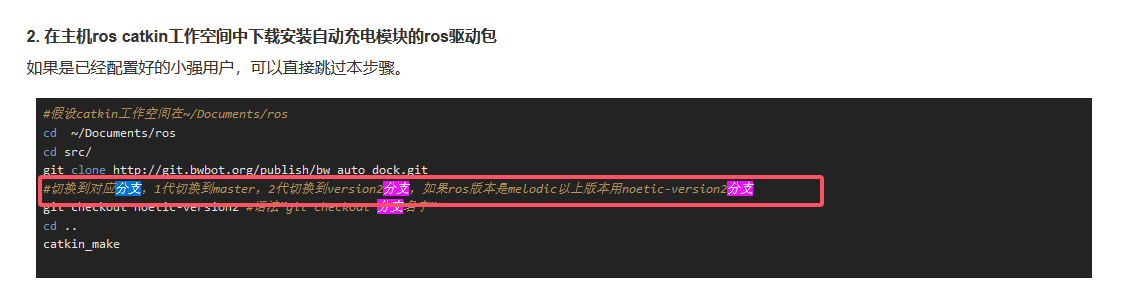
@xiaowei 执行上面的指令
git clone http://git.bwbot.org/publish/bw_auto_dock.git
cd bw_auto_dock
git checkout noetic-version2
如果不明白先学习一下git指令的使用
-
RE: 小强ROS机器人教程(27)___bw_auto_dock自动充电功能包的使用和实现原理发布在 产品服务
@xiaowei 你切换到了noetic-version2 版本了吗 从代码看应该是没有
-
RE: 使用xiaoqiang_track进行人体跟随和追踪发布在 技术交流
@huapiaoxiang21 支持现在应该只支持python3, https://git.bwbot.org/publish/body_pose
-
netplan导致systemd-networkd-wait-online.service卡住的问题发布在 技术交流
如果用netplan控制网络设备,同时把设备设置成固定ip。如果对应的设备不存在,那么在系统启动后
systemd-networkd-wait-online.service就会卡住几分钟,导致后续的服务无法执行。比如下面的网络设置
network:
  version: 2
  ethernets:
    enx00e04c680c9b:
      dhcp4: false
      addresses:
        - 192.168.198.1/24
      routes:
        - to: default
          via: 192.168.198.1
          metric: 200
    enx344b50000000:
      dhcp4: true
      dhcp4-overrides:
        route-metric: 90
这样即使
enx00e04c680c9b这个网络设备不存在或者enx00e04c680c9b网口上没有插网线systemd-networkd-wait-online.service这个服务也还是会卡住。这是因为netplan默认的后台用的是systemd-network。按照这样设置之后系统图形界面中也是看不到被控制的网卡的。同时由于网络同时受两个后端控制,还可能导致dns错误等问题。我们可以让netplan也使用NetworkManager作为后端来解决这个问题。只需要在配置中增加
renderer: NetworkManager最后配置如下
network:
  version: 2
  renderer: NetworkManager
  ethernets:
    enx00e04c680c9b:
      dhcp4: false
      addresses:
        - 192.168.198.1/24
      routes:
        - to: default
          via: 192.168.198.1
          metric: 200
    enx344b50000000:
      dhcp4: true
      dhcp4-overrides:
        route-metric: 90
这样就不会存在卡住的问题。同时网卡也可以在系统网络设置界面中看到。
-
linux 优化启动速度发布在 技术交流
https://wiki.archlinux.org/title/Improving_performance/Boot_process
Improving the boot performance of a system can provide reduced boot wait times and serves as a means to learn more about how certain system files and scripts interact with one another. This article attempts to aggregate methods on how to improve the boot performance of an Arch Linux system.
1 Analyzing the boot process
1.1 Using systemd-analyze
systemd provides a tool called systemd-analyze that can be used to show timing details about the boot process, including an svg plot showing units waiting for their dependencies. You can see which unit files are causing your boot process to slow down. You can then optimize your system accordingly.
To see how much time was spent in kernelspace and userspace on boot, simply use:
$ systemd-analyzeTip: If you boot via UEFI and use a boot loader which implements systemd’s Boot Loader Interface (which currently systemd-boot and GRUB do), systemd-analyze can additionally show you how much time was spent in the EFI firmware and the boot loader itself.
To list the started unit files, sorted by the time each of them took to start up:
$ systemd-analyze blameAt some points of the boot process, things can not proceed until a given unit succeeds. To see which units find themselves at these critical points in the startup chain, do:
$ systemd-analyze critical-chainYou can also create an SVG file which describes your boot process graphically, similar to Bootchart:
$ systemd-analyze plot > plot.svgSee systemd-analyze(1) for details.
1.2 Using bootchart2
You could also use Bootchart2 to visualize the boot sequence.
2 Using systemd instead of busybox on early init
By default, the Mkinitcpio configuration uses the base and udev hooks for building the initramfs. Faster boot times can be achieved by replacing them with systemd.
See Mkinitcpio#Common hooks for more details. See also Fsck#Boot time checking if replacing the fsck hook.
3 Compiling a custom kernel
Compiling a custom kernel can reduce boot time and memory usage. Though with the standardization of the 64-bit architecture and the modular nature of the Linux kernel, these benefits may not be as great as expected. See Kernel#Compilation for more info.
4 Initramfs
In a similar approach to #Compiling a custom kernel, the initramfs can be slimmed down. A simple way is to include the mkinitcpio autodetect hook. If you want to go further than that, see Minimal initramfs.
Depending on your hardware (processor and storage speed), using lz4 instead of the default zstd compression option may be quicker since the faster decompression speed at boot time usually offsets the slightly larger size of the initramfs that has to be read from disk. See Mkinitcpio#COMPRESSION.
5 Choose the adequate way to start for services
One central feature of systemd is D-Bus and socket activation. This feature should be preferred for most cases as it causes services to be started only when they are first accessed and is generally a good thing (e.g. having cups.service enabled at boot time is usually not useful for desktop use, enable instead cups.socket which will only start the service when actually printing).
However, if you know that a service (like upower) will always be started during boot, then the overall boot time might be reduced by starting it as early as possible. This can be achieved (if the service file is set up for it, which in most cases it is) by enabling upower.service.
This will cause systemd to start UPower as soon as possible, without causing races with the socket or D-Bus activation.
6 Staggered spin-up
Some hardware implements staggered spin-up, which causes the OS to probe ATA interfaces serially, which can spin up the drives one-by-one and reduce the peak power usage. This slows down the boot speed, and on most consumer hardware provides no benefits at all since the drives will already spin-up immediately when the power is turned on. To check if SSS is being used:
# dmesg | grep SSSIf it was not used during boot, there will be no output.
To disable it, add the libahci.ignore_sss=1 kernel parameter.
7. Filesystem mounts
Thanks to mkinitcpio’s fsck hook, you can avoid a possibly costly remount of the root partition by changing ro to rw on the kernel line: options can be set with rootflags=rw,other_mount_options. The entry must be removed from the /etc/fstab file, otherwise the systemd-remount-fs.service will continue to try applying these settings. Alternatively, one could try to mask that unit.
If Btrfs is in use for the root filesystem, there is no need for a fsck on every boot like other filesystems. If this is the case, mkinitcpio’s fsck hook can be removed. You may also want to mask the systemd-fsck-root.service, or tell it not to fsck the root filesystem from the kernel command line using fsck.mode=skip. Without mkinitcpio’s fsck hook, systemd will still fsck any relevant filesystems with the systemd-fsck@.service
You can also remove API filesystems from /etc/fstab, as systemd will mount them itself (see pacman -Ql systemd | grep ‘.mount$’ for a list). It is not uncommon for users to have a /tmp entry carried over from sysvinit, but you may have noticed from the command above that systemd already takes care of this. Ergo, it may be safely removed.
Other filesystems, like /home or EFI system partition, can be mounted with custom mount units. Adding noauto,x-systemd.automount to mount options will buffer all access to that partition, and will fsck and mount it on first access, reducing the number of filesystems it must fsck/mount during the boot process.
Note:
This will make your /home filesystem type autofs, which is ignored by mlocate by default. The speedup of automounting /home may not be more than a second or two, depending on your system, so this trick may not be worth it.
If the system is installed into a btrfs subvolume (specifically: the root directory / itself is a subvolume) and /home is a separate file system, you may also want to prevent the creation of a /home subvolume. Mask the home.conf tmpfile: ln -s /dev/null /etc/tmpfiles.d/home.conf.
8. Less output during boot
For some systems, particularly those with an SSD, the slow performance of the TTY is actually a bottleneck, and so less output means faster booting. See the Silent boot article for suggestions.
9. Changing boot loader
Changing your boot loader (e.g. a simpler boot loader such as systemd-boot) may reduce boot time by seconds.
If your setup allows it, try using only EFISTUB for even shorter boot times.
10. Suspend to RAM
The best way to reduce boot time is not booting at all. Consider suspending your system to RAM instead.