@myzhuang scipy是一个python包可以通过下面的方式安装
# 使用 apt-get
sudo apt-get install python-scipy
# 使用 pip
sudo pip install scipy
@myzhuang scipy是一个python包可以通过下面的方式安装
# 使用 apt-get
sudo apt-get install python-scipy
# 使用 pip
sudo pip install scipy
@gahoo 在 谷歌cartographer使用速腾聚创3d激光雷达数据进行三维建图 中说:
functions.cmake
你的cartographer可能没有安装好,function.cmake没有找到。这个文件位于cartographer包内。
安装的方法可以参照这里
indigo比较老了建议更新到kinetic
@leslie 你的slamdb 文件夹中应该已经有保存的充电桩位置文件。
如果有更多的问题话,建议加入交流群,这样能够更加及时的回复。群号: 538456117
@leslie 应该创建slamdb, 发图片可以点击最右边的上传文件按钮。
这个错误是由于程序无法连接到 ros master 节点。
如果是远程连接,首先保证网络是正常联通的。比如在执行
export ROS_MASTER_URL=http://xiaoqiang-desktop:11311
之后。
可以先ping一下自己的计算机名。对于小强来说可以执行下面的指令。
ping xiaoqiang-desktop
如果正常显示可以ping通则说明网络是正常的。一般问题就可以解决了。
如果无法ping通则说明hosts设置有错误。检查/etc/hosts文件内的ip设置是否正确。正常本地计算机名应该是12.0.0.1或者计算机的实际ip。
如果网络没有问题但是仍然出现以上错误,看看远程机器上的ROS master节点是否正常运行。可以在远程机器上执行
rostopic list
如果正常显示话题,则说明远程机器master节点正常。
反之则远程机器的master 节点未启动。对于 小强来说可以通过执行
sudo service startup start
来启动ROS节点。
@woshisj 在不插显示器使用rviz时会报错。插上hdmi转vga的转接头(不接显示器,只是转接头)就可以打开正常使用了。如果想要调整分辨率可以像正常电脑设置分辨率一样,在设置里面进行调整
Direct Sparse Odometry (DSO) was developed by Jakob Engel with better measured performance and accuracy than lsd_slam. DSO was open sourced to github by the author. At the same time, the author has also open sourced the usage code dso_ros of DSO in the ros system. This tutorial will demonstrate how to install DSO and dso_ros on the Xiaoqiang development platform, use the camera on Xiaoqiang platform to run DSO in real time to perform 3D modeling, Click to view the video.
Note: Since the Xiaoqiang development platform has already installed a lot of DSO-needed dependencies in advance, the following will skip the installation of these packages. Readers of other development platforms should refer to the complete installation tutorial on github for installation.
sudo apt-get install libsuitesparse-dev libeigen3-dev libboost-dev
sudo apt-get install libopencv-dev
cd ~/Documents/
git clone https://github.com/JakobEngel/dso.git
sudo apt-get install zlib1g-dev
cd ~/Documents/dso/thirdparty
tar -zxvf libzip-1.1.1.tar.gz
cd libzip-1.1.1/
./configure
make
sudo make install
sudo cp lib/zipconf.h /usr/local/include/zipconf.h
cd ~/Documents/dso/
mkdir build
cd build
cmake ..
make -j
Note: The source code provided by the original author has two branches. The master branch corresponds to the rosbuild version, and the catkin branch corresponds to the catkin version. For modern ROS versions, the catkin version is recommended for easier installation and use. However, the author's catkin branch has a code defect and cannot be installed and used. Therefore, the following will install the dso_ros version of our Bwbot modification.
cd ~/Documents/ros/src
git clone https://github.com/BlueWhaleRobot/dso_ros.git
cd ..
export DSO_PATH=/home/xiaoqiang/Documents/dso
catkin_make
Note: The camera calibration files of the Xiaoqiang development platform are the same, so you can directly run the following commands. Readers of other development platforms should modify the contents of the camera.txt file (note that there should be no spaces at the end of each line) and Image topic name in commands.
rosrun dso_ros dso_live image:=/camera_node/image_raw calib=/home/xiaoqiang/Documents/ros/src/dso_ros/camera.txt mode=1
Now move the camera and start modeling the surroundings in 3D, avoiding sharp turns and strenuous movements. For Xiaoqiang users, first control the Xiaoqiang movement and use the rosbag to record the image/camera_node/image_raw image topic data, and then replay. This can achieve a wide range of modeling. Before the rosbag is replayed, it is necessary to stop the camera node. sudo service startup stop, otherwise there will be image publishing conflicts.
To achieve visual navigation, a three-dimensional model of space is required. ORB_SLAM2 is a very effective algorithm for building spatial models. This algorithm is based on the recognition of ORB feature points, with high accuracy and high operating efficiency. We have modified the original algorithm, added the map’s save and load functions, making it more applicable to the actual application scenario. The following describes the specific use.
Note: Since the ORB_SLAM2 version of xiaoqiang has been upgraded to the Galileo version, the runtime detects if a valid certificate is available. Xiaoqiang is configured with a valid certificate. If you do not have a certificate by default, and you can contact customer service to get a cert for free. If you are not a xiaoqiang user, then the following tutorial cannot be performed.
Before starting ORB_SLAM2, please confirm that Xiaoqiang’s camera is working properly. When building map with ORB_SLAM2, xiaoqiang has to move around, it is inconvenient to display the ORB_SLAM2 status at the same time (ssh remote operation is not smooth, and it is impossible to drag the monitor while running), please install Xiaoqiang map remote control windows client to get a better experience.
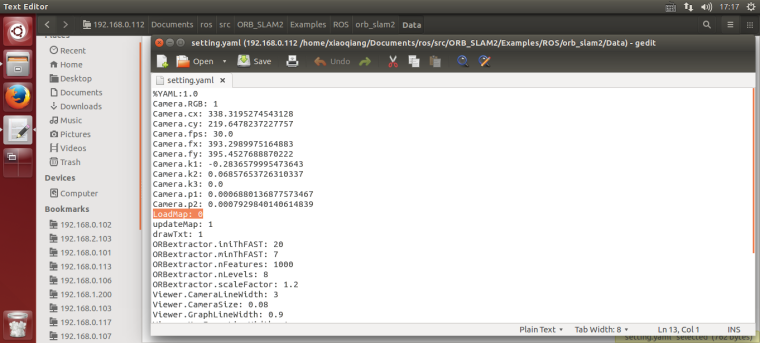
Change the configuration file. The configuration file for ORB_SLAM2 is located in the /home/xiaoqiang/Documents/ros/workspace/src/ORB_SLAM2/Examples/ROS/ORB_SLAM2/Data folder. Change the value of LoadMap in the setting4.yaml and set it to 0. When set to 1, the program automatically loads map data from the /home/xiaoqiang/slamdb folder after startup. When set to 0, map data will not be loaded. Since we want to create a map, LoadMap needs to be set to 0.
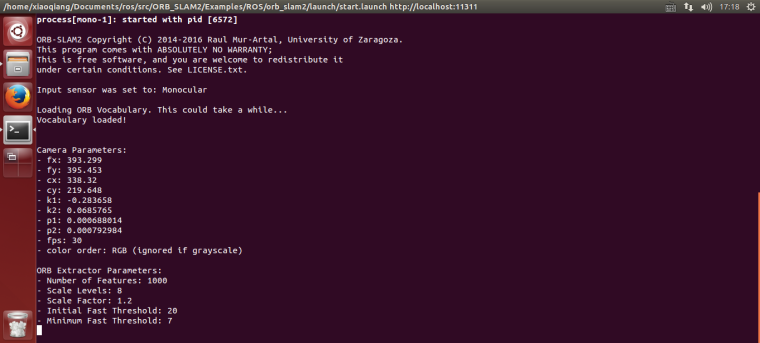
Use ssh to enter Xiaoqiang and execute the following command
ssh -X xiaoqiang@192.168.xxx.xxx
roslaunch ORB_SLAM2 map.launch
Start Xiaoqiang remote control windows client, click on the “Not connected” button to connect Xiaoqiang. Right-click in the image window to open the “original image” and “ORB_SLAM2’s feature point image”

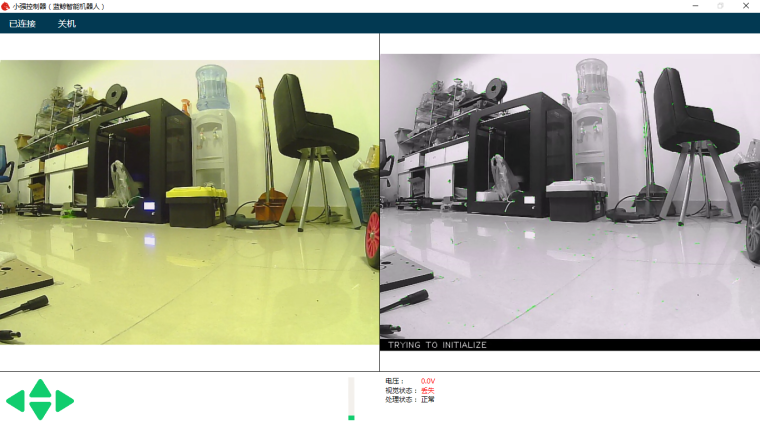
In the figure above, the left image is the camera’s original color image, and the right side is the ORB_SLAM2 processed black and white image. ORB_SLAM2 has not been initialized successfully in the image, so the black and white image has no feature points. Hold down the “w” key to start the remote control Xiaoqiang, slowly move forward, so that ORB_SLAM2 initialized successfully, that is, black and white images began to appear red and green features.
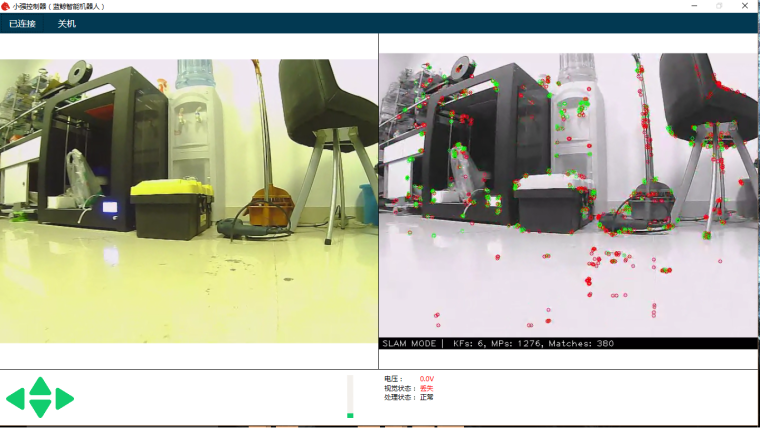
It is now possible to remote control of Xiaoqiang, and create a map of the surrounding environment. During the remote control process, it is necessary to ensure that the black-and-white image always has red and green feature points. If it does not exist, it means that the visual had lost, and it is necessary to remotely control Xiaoqiang to return to the place where the last missed lost position.
Add Xiaoqiang IP address in the local virtual machine’s hosts file, then open a new terminal to open rviz.
export ROS_MASTER_URI=http://xiaoqiang-desktop:11311
rviz
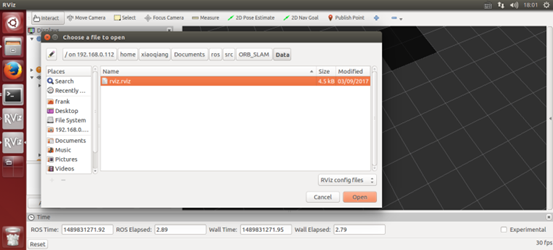
Open the /home/xiaoqiang/Documents/ros/src/ORB_SLAM/Data/rivz.rviz configuration file. Some systems may not be able to open this file remotely. You can copy the file locally and open it locally.
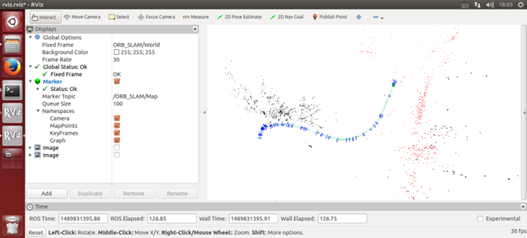
As shown in the figure below, the red and black points are three-dimensional models (sparse feature point clouds) created, and the blue boxes are keyframes that can represent the tracks of Xiaoqiang.
After the map has been created to meet the requirements, start a new terminal in the VM and enter the following command to save the map:
ssh -X xiaoqiang@192.168.xxx.xxx
rostopic pub /map_save std_msgs/Bool '{data: true}'  -1
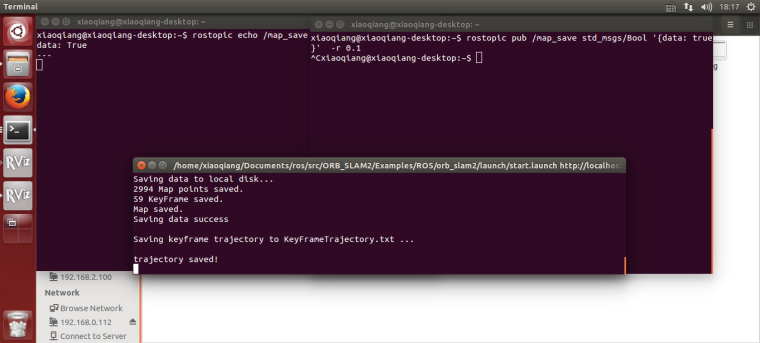
The map file will be created in ~/home/slamdb.
You can load the map into ORB_SLAM2 again after saving the map. After the map is loaded, the program can quickly locate the location of the camera. The way to load the map is also very simple.
roslaunch ORB_SLAM2 run.launch
The Loadmap was set to 1 by the launch file actually .
After creating the map, you may want to use this map for navigation, you need to do further operations on the map file. For example, to create a navigation path, and so on. This section can be found in the article Visual Navigation Path Editor Tutorial.
For xiaoqiang users, you can use Galileo navigation client, for more detail, please refer to Galileo navigation user manual
The following is an ORB_SLAM2 setting file. The specific meaning of the parameter can refer to the comment.
%YAML:1.0
Camera.RGB: 1
# Camera calibration parameters,the parameters has moved to usb_cam after 2018.6
Camera.cx: 325.0466266836216
Camera.cy: 238.9974356449355
Camera.fps: 30.0
Camera.fx: 395.6779619478691
Camera.fy: 397.4934332366201
Camera.k1: -0.2805598785308578
Camera.k2: 0.06685114307459132
Camera.k3: 0.0
Camera.p1: -0.0009688764167839786
Camera.p2: -0.0002636873513136712
LoadMap: 0 # whether to load map, 1 load and 0 not load
updateMap: 1 # whether to update map while running,1 update and 0 not update.
drawTxt: 1 # whether to display text in processed video
# ORB_SLAM2 slam algorithm-related parameters
ORBextractor.iniThFAST: 20
ORBextractor.minThFAST: 7
ORBextractor.nFeatures: 2000
ORBextractor.nLevels: 8
ORBextractor.scaleFactor: 1.2
# ORB_SLAM2 display-related parameters
Viewer.CameraLineWidth: 3
Viewer.CameraSize: 0.08
Viewer.GraphLineWidth: 0.9
Viewer.KeyFrameLineWidth: 1
Viewer.KeyFrameSize: 0.05
Viewer.PointSize: 1000
Viewer.ViewpointF: 500
Viewer.ViewpointX: 0
Viewer.ViewpointY: -0.7
Viewer.ViewpointZ: -1.8
UseImu: 1 # whether to use IMU, 1 use and 0 not use.
updateScale: 1 # Whether update scale while running, if set 1, the visual scale will be updated according to the data from odom
DealyCount: 5
# tf between camera and base_link
TbaMatrix: !!opencv-matrix
   rows: 4
   cols: 4
   dt: f
   data: [ 0., 0.03818382, 0.99927073, 0.06, -1., 0., 0., 0., 0., -0.99927073, 0.03818382, 0.0, 0., 0., 0., 1.]
#   data: [ 0., 0.55176688, 0.83399839, 0., -1., 0., 0., 0., 0., -0.83399839, 0.55176688, 0., 0., 0., 0., 1.]
EnableGBA: 1 # whether to enable Global Bundle Adjustment
dropRate: 2 # frame skip rate, skip frames to improve performance
minInsertDistance: 0.3 # min distance between frames, prevent keyframes from being too dense. Insert only one frame at this distance.
EnableGC: 0 # Whether to enable memory recycling, 0 is disable, 1 is enable. Enable memory recycling can make more efficient use of memory, and the relative computational efficiency will decrease
Q: Can I create map without the client?
A: Yes, you can. The client is mainly for remote control and video streaming. You can use command line remote control instead. But the client is recommended for better experience.
Q: Can I choose not to use IMU
A: The ORB_SLAM2 is an edited version with additional IMU support. If you don’t want to use it, you can set UseImu to 0 in setting.yaml.
Q: Where is xiaoqiang’s camera calibration file?
A:the camera calibration file located at usb_cam/launch/ov2610.yaml
Q: The camera’s image is not clear
A:It may be that the camera’s lens has been touched, causing it no focus. You can turn the camera lens and adjust the image to a clear position. Note that the camera parameters need to be re-calibrated after adjustment. Calibration methods can be found in how to calibrate camera
With Google’s Cartographer and slamtec’s lidar, we can try to create a floor plan for a large building. Take a look at our demo and click to watch the video.
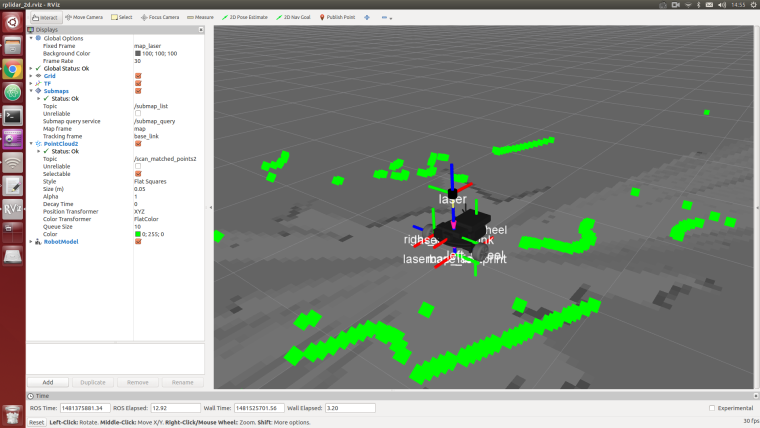
In this demo, Xiaoqiang actually operates in a 5,000-square-meter office building corridor. There are a large number of glass walls on both sides of the corridor. There is a large area of open space in the center of the building. With rplidar’s range of only 6 meters, so the following figure The final result is still relatively good (only use lidar, IMU and odometer are not turned on, the large loop path is still closed successfully)
The idea of this article: Because it is a large-scale mapping, wifi network coverage is a problem, so we use the Bluetooth joystick to remotely control the robot movement. During the remote control, the lidar data was recorded through the rosbag. The joystick controlled robot ran a circle within the area and finally play the bag for map creation.
Note: All the following operations are completed on Xiaoqiang host ubuntu
1.Installing rplidar driver
If you are using xiaoqiang system image, then the driver was already installed, you can skip this step.
For the instructions to install rplidar driver, please refer to this post
2.Install PS3 handle driver
If you are using xiaoqiang system image, then the driver was already installed, you can skip this step.
For the instructions to install joystick driver, please refer to this post
3.Install cartographer_ros
Please refer to this installation tutorial
1.Open a new window to start rplidar
roslaunch rplidar_ros rplidar.launch
2.Open two windows to start PS3 controller remote control program, press the handle connection key to connect the platform.
First window
sudo bash
rosrun ps3joy ps3joyfake_node.py
The second window
roslaunch turtlebot_teleop ps3fakexiaoqiang_teleop.launch
3.Opens a new window to start the rosbag recording process and starts recording lidar data/scan
rosbag record /scan
4.Use the handle to remotely control the movement of the platform, circle around the building area, and it can also be used for multiple rotations.
5.Bag recording is complete, close the above 1,2,3 window
The newly recorded point bag file is in the home directory of Xiaoqiang, rename it to 1.bag
6.Start platformtographer_ros start bag playback build
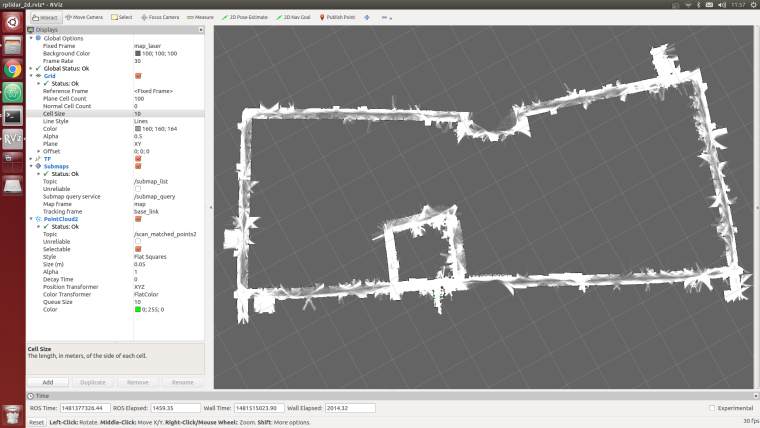
roslaunch platformtographer_ros demo_xiaoqiang_rplidar_2d.launch bag_filename:=/home/xiaoqiang/1.bag

7.If everything is normal, you can now see a similar effect in the picture below, waiting for the bag to be played.
8.Save the map, this article ends
rosservice call /finish_trajectory "stem: 'rplidar_test'"
The following will demonstrate the AMCL navigation operation using rplidar a2 as the scan input and the map file created in Tutorial 14 as the global map.
Install and upgrade nav_test, laser_filters package first.
1.1 ssh login Xiaoqiang host and cd to Xiaoqiang’s ros workspace
ssh xiaoqiang@192.168.xxx.xxx -X
cd Documents/ros/src/
1.2 Update upgrade package
cd  laser_filters
git stash
git pull
cd ..
cd nav_test
git stash
git pull
cd ..
cd ..
catkin_make
1.3 Update the Xiaoqiang hosts file and the hosts file of the local virtual machine so that Xiaoqiang and the local virtual machine can communicate with each other. Refer to sections 1.A and 1.B in Tutorial 13.
First, copy the two map files created in Tutorial 14 to /home/xiaoqiang/Documents/ros/src/nav_test/maps/, overwrite the files with the same name.
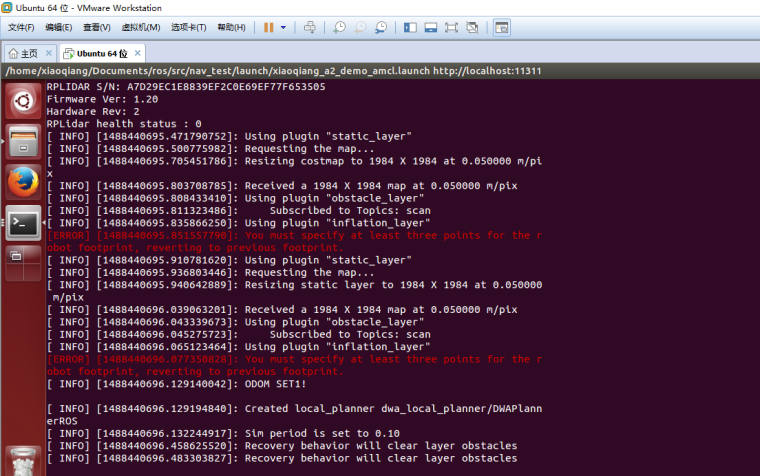
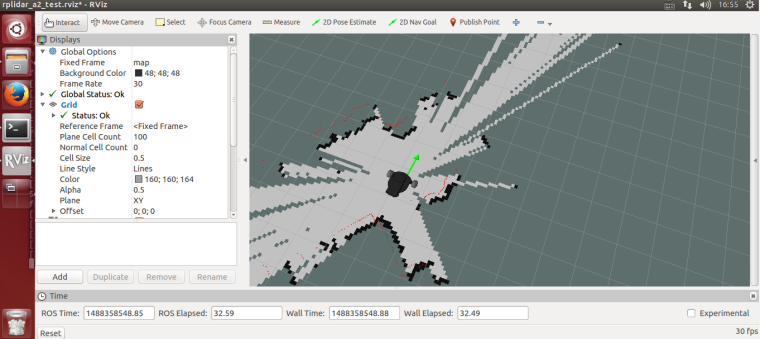
roslaunch nav_test xiaoqiang_a2_demo_amcl.launch
Normally there will be similar results in the figure below, while the lidar starts to rotate
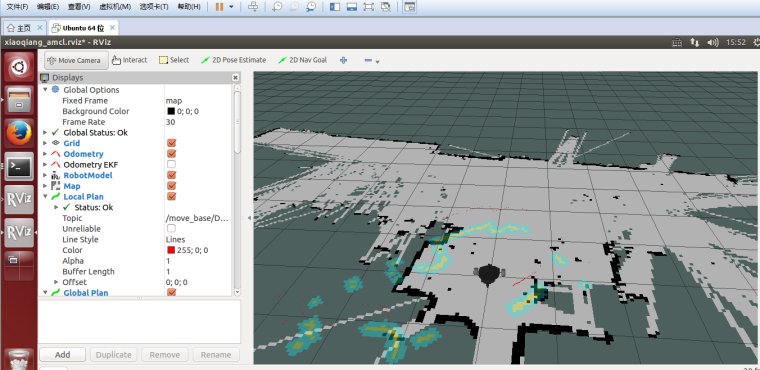
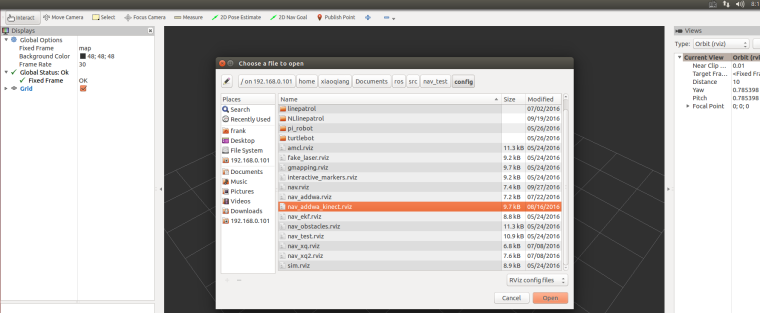
3.1 Start rviz in the local virtual, select the open nav_test/config/xiaoqiang_amcl.rviz configuration file in the work directory of Xiaoqiang ros
export ROS_MASTER_URI=http://xiaoqiang-desktop:11311
rviz

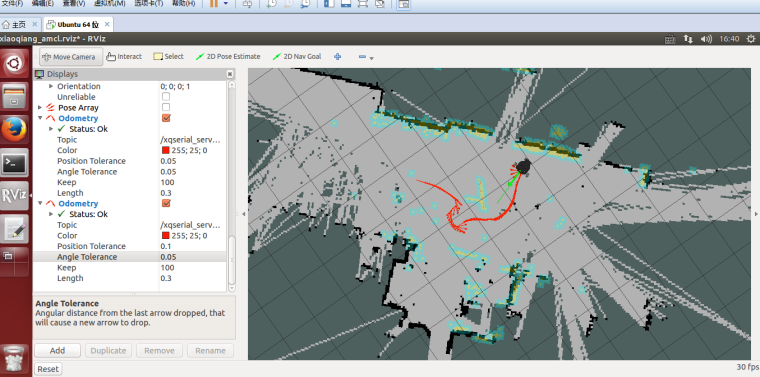
3.2 After waiting for a few seconds, rviz will normally have a screen similar to the one below.
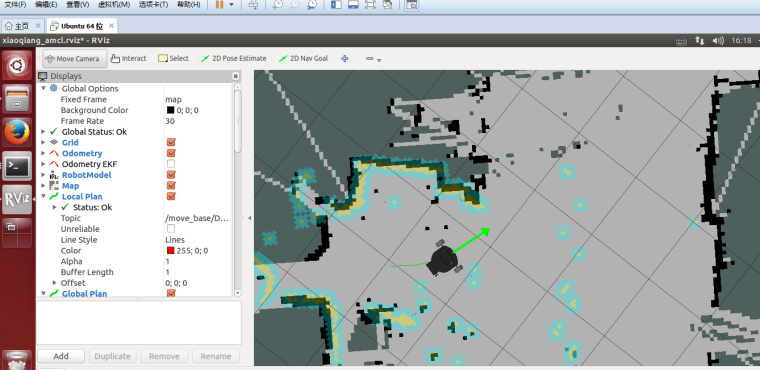
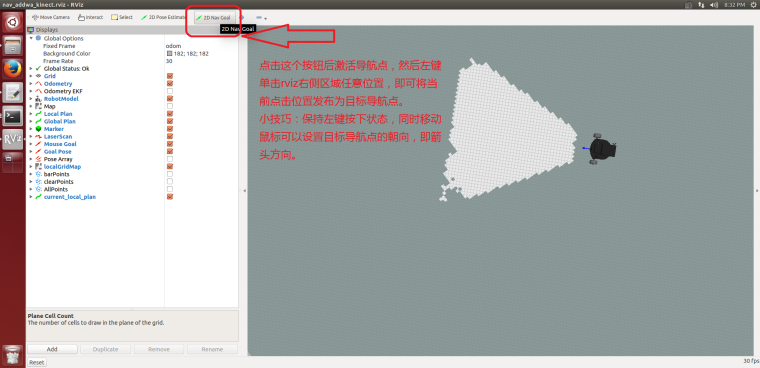
4.1 In rviz, use 2D Pose Estimation to set the position of the initial pose of the robot in the map. Because the AMCL algorithm needs a more accurate initial value, the actual position of the robot in the map can be further matched by the current liadr scanning dot matrix.
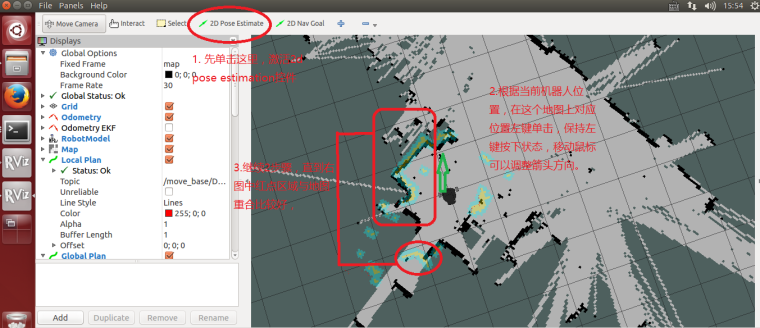
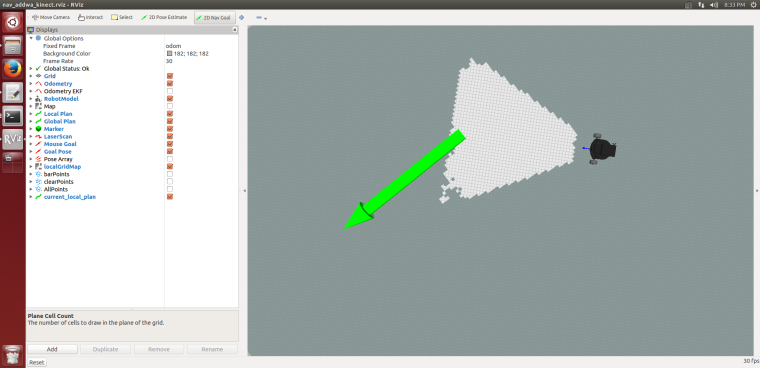
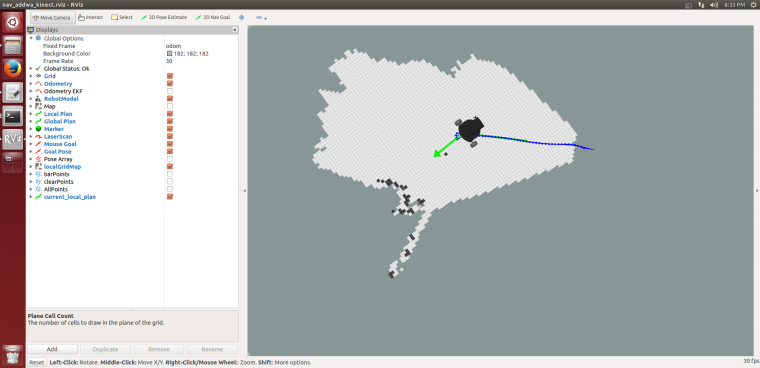
4.2 Using 2D Nav Goal in rviz to release targets to Xiaoqiang
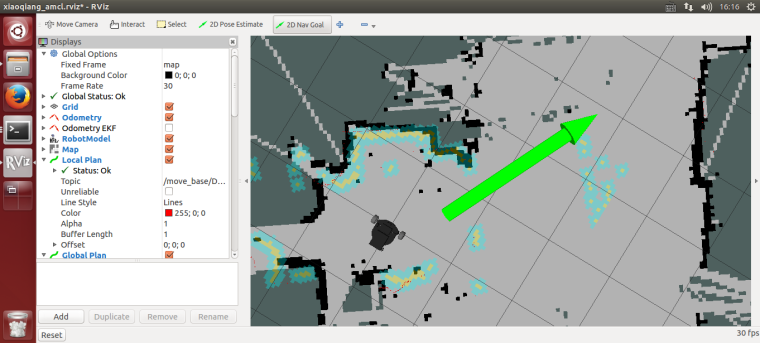
4.3 Xiaoqiang began to move autonomously to the designated location

Ensure that the lidar is properly installed, and launch the gmapping launch file after ssh login the host.
ssh xiaoqiang@192.168.XXX.XXX
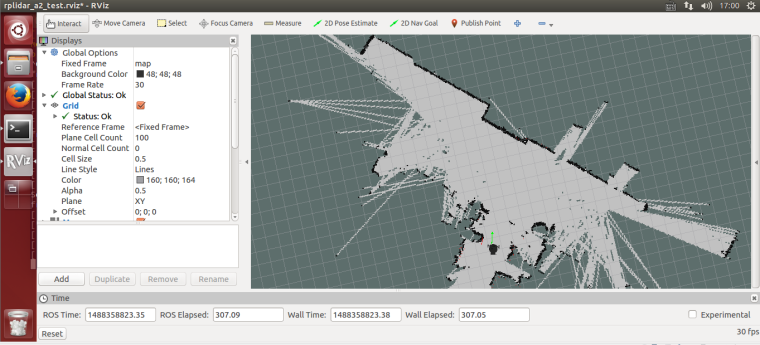
roslaunch gmapping slam_gmapping_xiaoqiang_rplidar_a2.launch
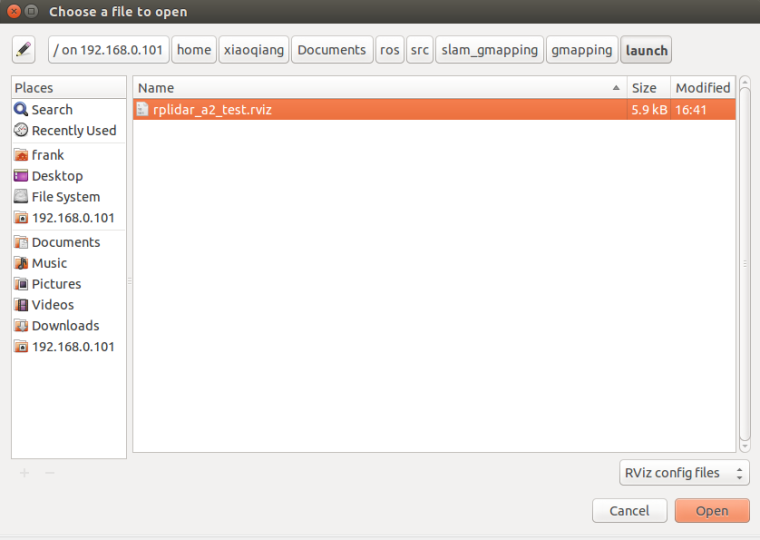
Open rviz in the local virtual machine, select the slam_gmapping/gmapping/launch/rplidar_a2_test.rviz configuration file and open it in Xiaoqiang ROS directory.
Note: Some systems can't do this. You can copy that file directly to your local computer and open it locally.
export ROS_MASTER_URI=http://xiaoqiang-desktop:11311
rviz
Wait a few seconds, normal results similar to the following figure will appear.
The first way: use the windows remote control client, refer to this post
The second way:using the ssh remote control
ssh xiaoqiang@192.168.XXX.XXX
rosrun nav_test control.py
The third way: use mobile app, refer to this post Xiaoqiang mobile remote control app for Android
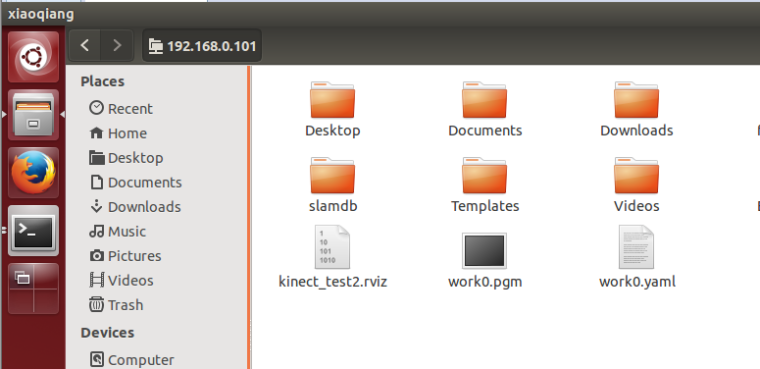
ssh login Xiaoqiang, in the Xiaoqiang home directory save the map as the beginning of work0 file.
ssh xiaoqiang@192.168.XXX.XXX
rosrun map_server map_saver -f work0
The 1, 2, 3, and 4 steps of the tutorial in this section are only used to demonstrate the method of adding serial devices to Xiaoqiang. These rules are already added in Xiaoqiang system image. Xiaoqiang users should directly jump to step 5 to test the lidar after connecting the hardware.
Xiaoqiang host and motor driver communicate through the serial port, In the actual development process, we may add serial peripherals to Xiaoqiang. This can lead to confusion over the serial number (ttyUSB*), causing anomalies in the xiaoqiang’s ros driver and serial device. The following uses the rplidar A2 lidar as an example to demonstrate how to resolve serial port conflicts by modifying the device serial number specified in the udev file. The source of this method
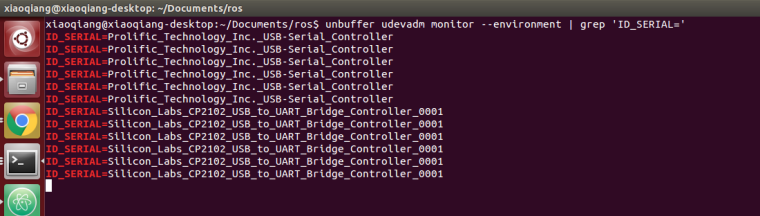
1.Check the ID of each serial device
sudo apt-get install expect-dev
unbuffer udevadm monitor --environment | grep 'ID_SERIAL='
After the USB to serial cable of the platform is re-plugged, the terminal will print out the ID information of this device. For example, "Silicon_Labs_CP2102_USB_to_UART_Bridge_Controller" in the following figure.
Then re-inserted the lidar’s usb adapter into the host, and the terminal will also print the lidar’s ID information. For example, "Prolific_Technology_Inc._USB-Serial_Controller_0001" in the following figure.
2.Please create a udev rule file based on the ID of the serial device you obtained. Specify platform communication USB to serial port as ttyUSB001 and lidar as ttyUSB002.
sudo gedit /etc/udev/rules.d/60-persistent-serial.rules
Enter the following content and save it. Please replace the string following ID_SERIAL with the ID you obtained in step 1.
ACTION!="add", GOTO="persistent_serial_end"
SUBSYSTEM!="tty", GOTO="persistent_serial_end"
KERNEL!="ttyUSB[0-9]*", GOTO="persistent_serial_end"

# This is old 11.10 style: IMPORT="usb_id --export %p"
IMPORT{builtin}="path_id"
ENV{ID_SERIAL}=="Prolific_Technology_Inc._USB-Serial_Controller"         , SYMLINK="stm32Platform"        , SYMLINK+="ttyUSB001" , OWNER="xiaoqiang"
ENV{ID_SERIAL}=="Silicon_Labs_CP2102_USB_to_UART_Bridge_Controller_0001" , SYMLINK="rplidarA2"       , SYMLINK+="ttyUSB002" , OWNER="xiaoqiang"

LABEL="persistent_serial_end"
Update system udev rules
sudo udevadm control --reload
Re-plug all USB devices, now the platform communication USB to serial successfully identified as ttyUSB001, lidar is identified as ttyUSB002, regardless of the device insertion order and port.

3.Modify the ROS driver node launch file, set the serial device as ttyUSB001.

4.Modify the ROS driver node launch file for rplidar A2 and set the serial device as ttyUSB002.
# Driver installation
cd ~/Documents/ros/src
git clone https://github.com/BlueWhaleRobot/rplidar_ros.git
cd  ..
catkin_make
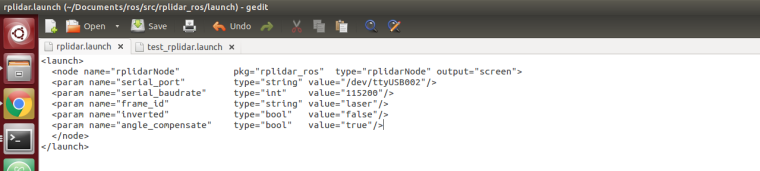
roslaunch rplidar_ros view_rplidar.launch

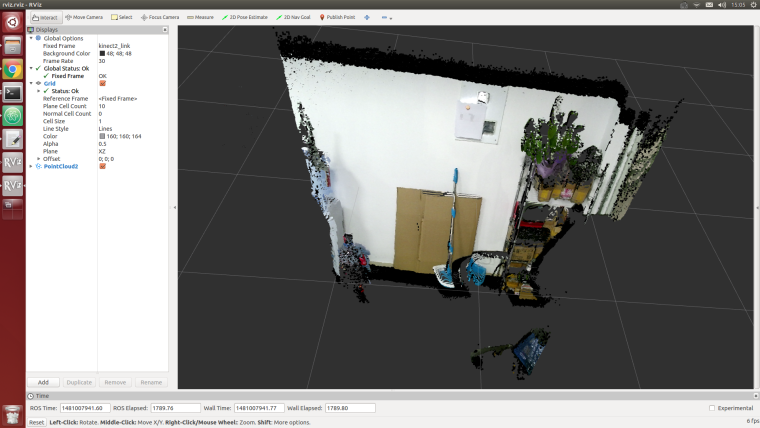
1.Start kienct v2 ROS driver
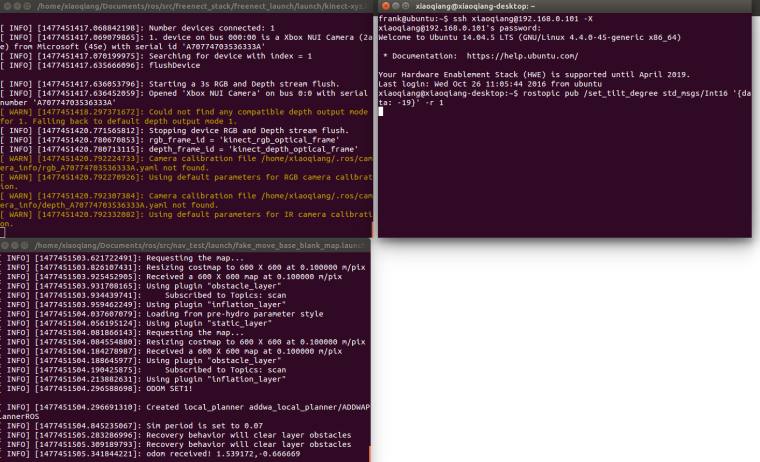
The Xiaoqiang platform outputs a 12V power supply (DC head with “kinect power supply” tag) for kinect power supply, and the kinect v2 needs to be inserted into the blue host USB 3.0 interface of the Xiaoqiang. Connect the Xiaoqiang host to the monitor and keyboard. Open a terminal on the Xiaoqiang host and enter the following command
roslaunch kinect2_bridge kinect2-xyz.launch
2.Open a new terminal, start rviz
rviz
Open this rviz configuration file /home/xiaoqiang/Documents/ros/src/iai_kinect2/kinect2_bridge/launch/rviz.rviz, Click to download this file. If everything is normal, an interface similar to the one below can appear
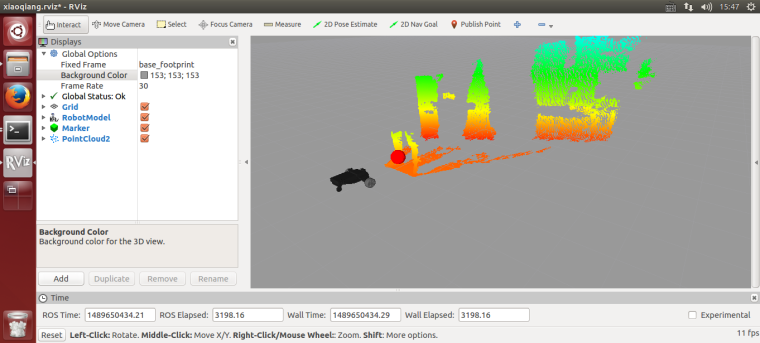
turtlebot_follower uses the point cloud image feed back by the depth camera to calculate the coordinates of the point cloud in a certain area as the target following point, and controls the platform movement to achieve the following function according to this coordinate and the set safety distance.
After Xiaoqiang identifies the human legs, a red ball is set as the target point in the human leg position, demo video 1
1.Install the package
After ssh logs in to the host, enter the ros workspace, download and install the test package
ssh xiaoqiang@192.168.xxx.xxx
cd Documents/ros/src/
git clone https://github.com/turtlebot/turtlebot_msgs.git
git clone https://github.com/BlueWhaleRobot/turtlebot_apps.git
cd ..
catkin_make
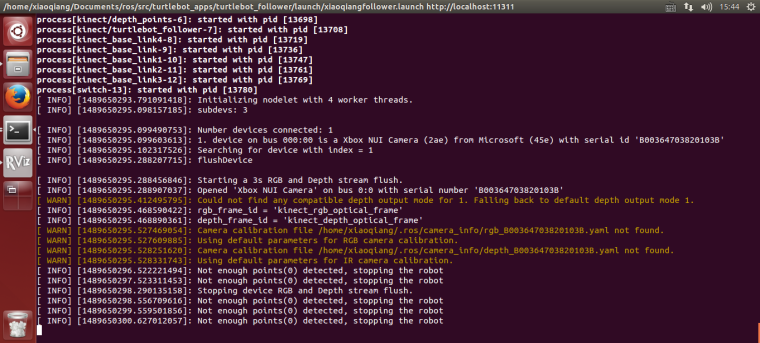
2.Ensure that Xiaoqiang is 2 meters * 2 meters in front of the open space without debris, first check the kinect angle is horizontal, if not in the horizontal state, please turn off the platform power, start the turtlebot_follower package on the Xiaoqiang host
ssh xiaoqiang@192.168.xxx.xxx
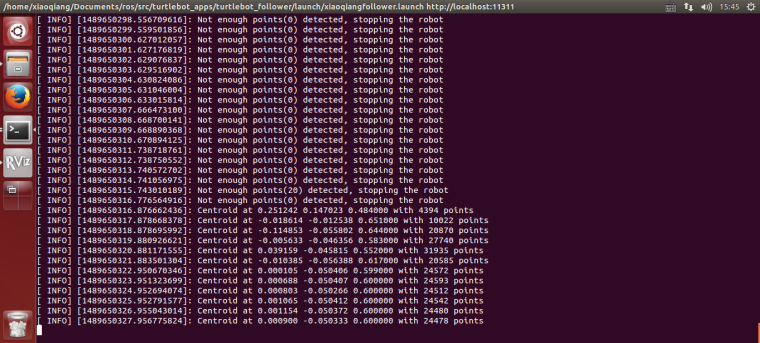
roslaunch turtlebot_follower xiaoqiangfollower.launch
The following figure will appear after normal startup
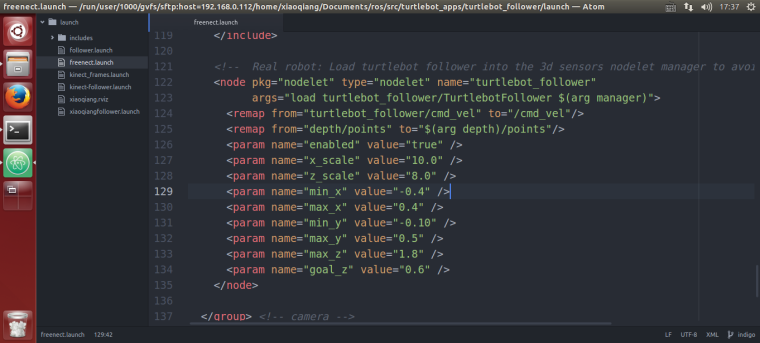
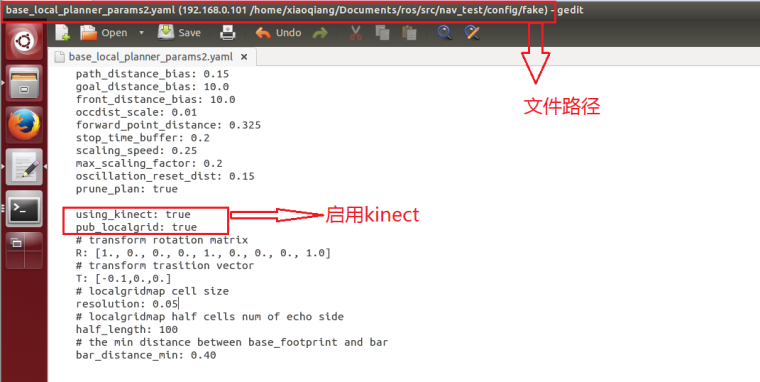
Modify the parameters in the /home/xiaoqiang/Documents/ros/src/turtlebot_apps/turtlebot_follower/launch/freenect.launch file on the Xiaoqiang host, similar to the following figure. Then you can control the following performance
Click to watch the demo video
The freenct_stack package provides a kinect driver, and its published point cloud is transformed into an obstacle grid distribution image by image_pipeline. After the nav_test software package starts the navigation program, it analyzes the obstacle distribution map automatically, and then moves autonomously according to the target navigation point published by the rviz.
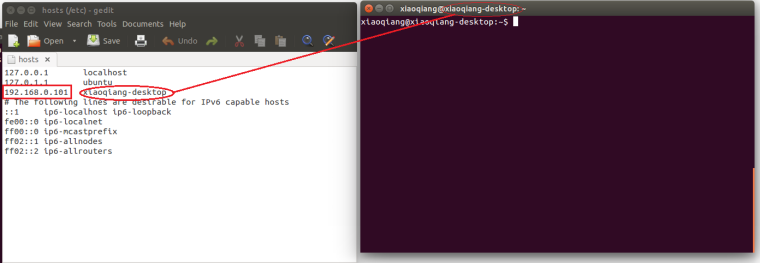
sudo gedit /etc/hosts
Replace the ip address in the figure below with the actual value of the platform
LAN ssh login Xiaoqiang host
ssh xiaoqiang@192.168.0.101 -X
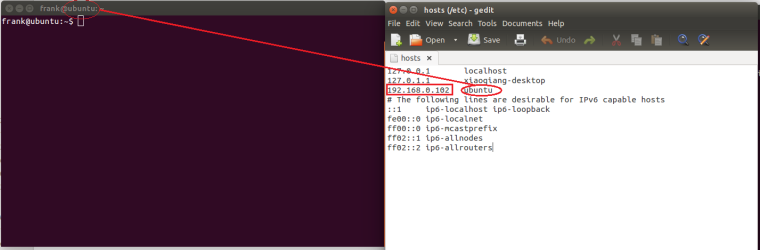
sudo gedit /etc/hosts
Replace the ip address in the following figure with the actual value of the virtual machine and change the host name to the virtual machine name
For kinect v1
roslaunch freenect_launch kinect-xyz.launch
For Kinect v2
roslaunch kinect2_bridge kinect2-xyz.launch
For astrapro
roslaunch astra_launch astrapro.launch
For kinect v1
rostopic pub /set_tilt_degree std_msgs/Int16 '{data: -19}' -1
For Kinect v2
Since the kinect v2 does not have a pitch angle motor, manually adjust the kinect v2 to the maximum depression angle
For astrapro
Since the astrapro does not have a pitch angle motor, manually adjust the astrapro to the maximum depression angle.
roslaunch nav_test fake_move_base_blank_map.launch
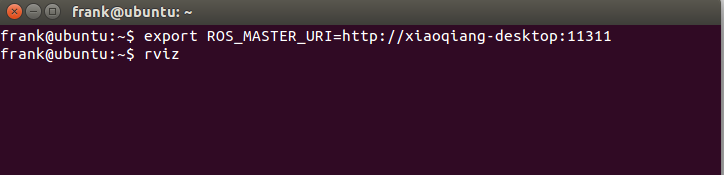
export ROS_MASTER_URI=http://xiaoqiang-desktop:11311
rviz
Note: If Xiaoqiang’s model cannot be displayed, Xiaoqiang model package should be installed locally.
Please insert the kinect data cable into the blue host USB3.0 port of xiaoqiang to ensure the normal operation of the driver. Model 1473 kinect users please refer to the preparation method in tutorial (9).
If xiaoqiang has been moving backwards, it can be seen in rviz that there is a black area in front of xiaoqiang, and the black area has been following Xiaoqiang’s movement. This situation indicates that the kinect installation or kienct angle is not in right. Please check the kinect mounting bracket, remove the kienct film and re-execute the instructions in the tutorial.
Q: Map shows normally and the car can also be remote controlled, although published the target point vai rviz to the car , the car does not move to the target point.
A: In general, this problem is a network setup problem. This tutorial requires the hosts record to be set up between the xiaoqiang and the local machine, and to be able to access each other directly. After setting up the IP record, you can ping each other on the xiaoqiang and local computer to check the network connection. For example type following cmd on local machine
ping xiaoqiang-desktop
Enter the following cmd on xiaoqiang
ping ubuntu # Suppose your computer name is ubuntu
If we cannot ping between the two successfully, then you need check your network settings.
@whut_gao 红外没有距离信息,只有触发和未触发,哪个distance的非零值就以为着红外触发了。
也可以从xqserial_server/StatusFlag话题数据判断,当返回数据是2的时候就是有红外被触发。可以参考这里的代码
