@myzhuang hikey970-lebian9-tf.img 是原本镜像里面带的文件。补丁只是修改uefi,相当于修改后重刷一下系统。
ROS交流群
ROS Group 产品服务
Product Service 开源代码库
Github 官网
Official website 技术交流
Technological exchanges 激光雷达
LIDAR ROS教程
ROS Tourials 深度学习
Deep Learning 机器视觉
Computer Vision
ROS Group 产品服务
Product Service 开源代码库
Github 官网
Official website 技术交流
Technological exchanges 激光雷达
LIDAR ROS教程
ROS Tourials 深度学习
Deep Learning 机器视觉
Computer Vision
Posts made by weijiz
-
RE: hikey 970 debian 镜像(有opencl 和 tensorflow)posted in 技术交流

-
蓝鲸智能机器人新版网站上线啦posted in 蓝鲸智能大事记
2018.9.10
为了更好的服务我们的客户,我们对网站进行了全新的改版。改版后的网站包含了更多的视频信息,大家可以更加直观的了解我们的产品性能。同时增加了在线商店。现在大家可以直接在网站上购买我们的产品了。网站也增加了更加友好的国际化支持,国外用户也可以直接通过网站购买我们的产品。
-
RE: hikey 970 debian 镜像(有opencl 和 tensorflow)posted in 技术交流
@myzhuang 在 hikey 970 debian 镜像(有opencl 和 tensorflow) 中说:
ERROR Read connector status timout,
我没有遇到过这个问题,不太清楚。你可以重刷镜像试试。
-
RE: 订阅摄像头消息gazebo就会崩溃,有人遇到过吗?posted in 技术交流
@holahanqing 在 订阅摄像头消息gazebo就会崩溃,有人遇到过吗? 中说:
/camera/depth/points
/camera/depth/points这个话题是点云数据,并不是图像类型。是不是数据类型不对的原因。
-
ROS轮毂电机驱动发布posted in 蓝鲸智能大事记
2017.11.22
轮毂电机是一种轮子和电机相结合的新型电机。它被广泛应用于电动车,平衡车上面。由于其出色的运动性能和极高的性价比,我们决定开发一款轮毂电机的ROS驱动。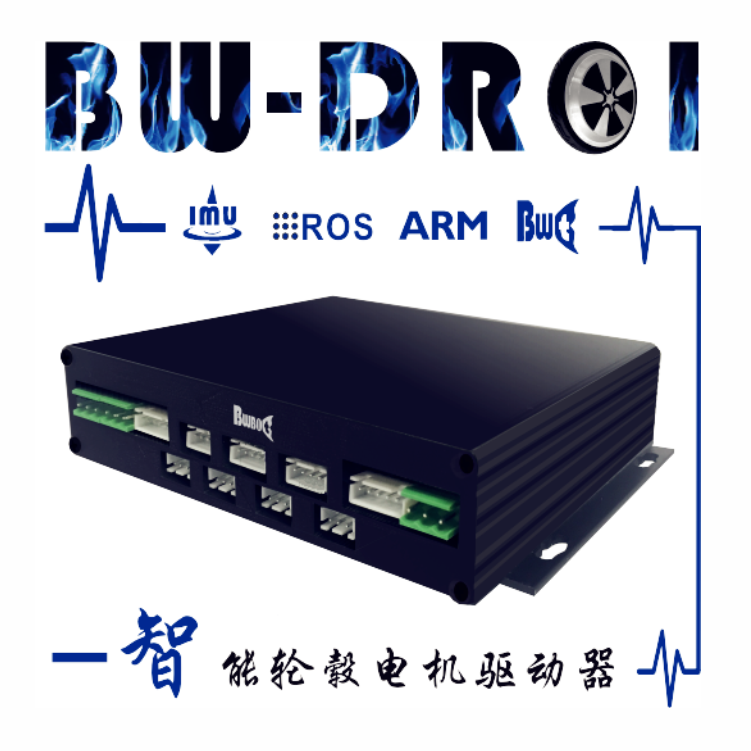
一般的驱动器只提供简单的开环调速功能。我们的驱动器提供闭环的速度控制,控制精度在1%以内。最大功率1080W(单路540W)。工作电压12V到36V(支持锂电池)。尤其在低速条件下,我们的性能远远超过市场上的其他驱动器。不仅如此,我们还提供这款驱动器的ROS驱动程序。这样您可以在ROS中直接控制电机运动。同时此驱动器还提供9轴陀螺仪数据,里程计数据。方便继续开发ROS相关的导航程序。并且此驱动器可以选配红外传感器和超声波传感器。真的是性能强大功能齐全,是机器人开发的首选方案。
淘宝链接:https://item.taobao.com/item.htm?spm=a1z10.1-c.w4004-11026595866.8.56528335UBc6Na&id=559950579276
-
xiaoqiang tutorial (9) use rostopic to control kinect tilt angleposted in 产品服务
use rostopic control kinect tilt angle
Prepared work:
Please check the kinect version, indicated on the kinect base label. For the users of the model1473, due to the defect of the drive (which does not affect other functions of the kinect, only the motor), the following operations need to be performed first, and the model1414 user can directly skip.
ssh login xiaoqiang host
ssh xiaoqiang@192.168.0.xxx -X
freenect-micview
If the following figure appears, close the above command and continue the tutorial

Steps:
1. Open a new window in the local virtual machine, start the freenect_stack driver
ssh login Xiaoqiang host
ssh xiaoqiang@192.168.0.xxx -X
roslaunch freenect_launch freenect-xyz.launch
The normal startup will appear below, if there is a red error (driver defect), please update the
freenect_stackprogram through git pull.
2.Open a new window in the local virtual machine, release the motor angle control command
ssh login Xiaoqiang host
ssh xiaoqiang@192.168.0.xxx -X
rostopic pub /set_tilt_degree std_msgs/Int16 '{data: -20}' -1
If all goes well, you can now see that the elevation of the kinect keeps getting smaller. The
{data: -20}number in the above command represents the angle and can be set to an integer between 30 and -30. Insert the kinect cable into the host’s blue Color usb3.0 port so that kinect can work properly.
-
xiaoqiang tutorial (8) kinect v1 ROS driver test and installationposted in 产品服务
kinect v1 ROS driver test and installation
Xiaoqiang outputs a 12V power supply (DC head, labeled “kinect power supply”) for kinect power supply.
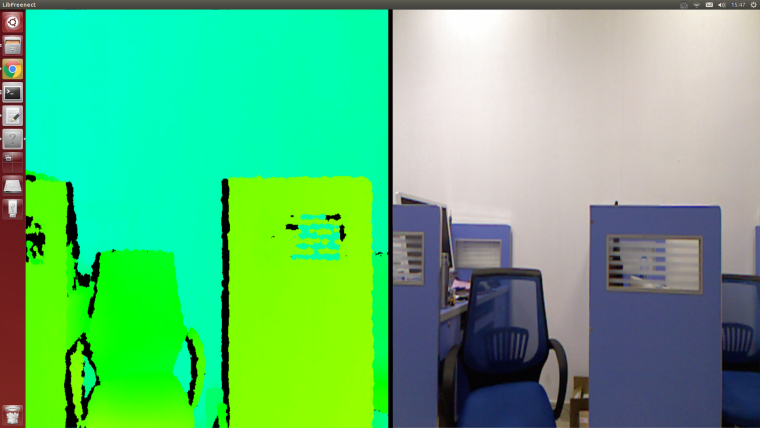
1. libfreenect test
Connect the Xiaoqiang host with monitor and keyboard and open a new terminal input on the Xiaoqiang host
freenect-glviewYou can see the similar figure below

2. ROS drive test
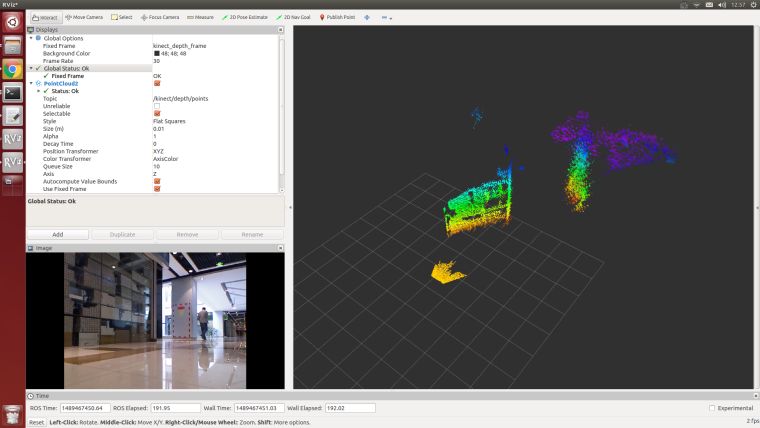
Close the program in step 1, open a new terminal, use freenect_launch to start the relevant kinect node
roslaunch freenect_launch freenect-xyz.launchOpen a new window to open rviz
rvizSelect the content to be displayed, such as kinect rgb image and depth point cloud, the display result is as follows
The settings of kienct functions is in
/home/xiaoqiang/Documents/ros/src/freenect_stack/freenect_launch/launch/examples/freenect-xyz.launch<launch> <include file="$(find freenect_launch)/launch/freenect.launch"> <arg name="camera" value="kinect" /> <arg name="motor_processing" value="true" /> <arg name="audio_processing" value="false" /> <arg name="rgb_processing" value="true" /> <arg name="ir_processing" value="false" /> <arg name="depth_processing" value="true" /> <arg name="depth_registered_processing" value="false" /> <arg name="disparity_processing" value="false" /> <arg name="disparity_registered_processing" value="false" /> <arg name="num_worker_threads" value="4" /> </include> </launch>Turn on or off the feature by setting true or false
3. The following describes the ros driver installation procedure of kienct v1
If you use xiaoqiang system image, then you don’t need to install the following drivers. These drivers were already install.
Need to install three software:
a.libfreenect
b.rgbd_launch
c.freenect_stack
a. libfreenect
First connect the kinect v1 to the xiaoqiang host, then open a terminal and enter the following code
cd Documents

sudo apt-get install git-core cmake freeglut3-dev pkg-config build-essential libxmu-dev libxi-dev libusb-1.0-0-dev

git clone git://github.com/OpenKinect/libfreenect.git
cd libfreenect
mkdir build
cd build

//The key point is, the following configuration will enable kinect audio and solve the installation path problem

cmake .. -DCMAKE_INSTALL_RPATH:STRING="/usr/local/bin;/usr/local/lib" -DBUILD_REDIST_PACKAGE=OFF

make
sudo make install
sudo ldconfig /usr/local/lib64/
sudo freenect-glview
You should see the output image of the kinect now , and then configure the peripheral privilege configuration
sudo adduser $xiaoqiang video
#Please replace xiaoqiang with your own computer's account name
Add a udev rule, first open the 51-kinect.rules file
sudo gedit /etc/udev/rules.d/51-kinect.rulesCopy the contents below and save and exit
# ATTR{product}=="Xbox NUI Motor"
SUBSYSTEM=="usb", ATTR{idVendor}=="045e", ATTR{idProduct}=="02b0", MODE="0666"
# ATTR{product}=="Xbox NUI Audio"
SUBSYSTEM=="usb", ATTR{idVendor}=="045e", ATTR{idProduct}=="02ad", MODE="0666"
# ATTR{product}=="Xbox NUI Camera"
SUBSYSTEM=="usb", ATTR{idVendor}=="045e", ATTR{idProduct}=="02ae", MODE="0666"
# ATTR{product}=="Xbox NUI Motor"
SUBSYSTEM=="usb", ATTR{idVendor}=="045e", ATTR{idProduct}=="02c2", MODE="0666"
# ATTR{product}=="Xbox NUI Motor"
SUBSYSTEM=="usb", ATTR{idVendor}=="045e", ATTR{idProduct}=="02be", MODE="0666"
# ATTR{product}=="Xbox NUI Motor"
SUBSYSTEM=="usb", ATTR{idVendor}=="045e", ATTR{idProduct}=="02bf", MODE="0666"
After logging off the user and reentering the system, you can now enable kinect directly without sudo.
freenect-glviewb. Install rgbd_launch
rgbd_launchcontains generic launch files required by the driver installation package openni_launch or freenect_launch.
There are two main launch files:processing.launch.xml:Install a series of nodelets to process data from the RGB-D driver openni_camera or freenect_camera, You can also set parameters to simplify processing nodelets images.kinect_frames.launch:Install the tf tree for kinect. The file can also be started internally from openni_launch or freenect_launch.
The
rgbd_launchfile contains multiple distributed launch files. But onlyprocessing.launch.xmlcan be modified externally.cd ~/Documents/ros/src git clone https://github.com/ros-drivers/rgbd_launch.git cd .. catkin_makec. Install freenect_stack
cd ~/Documents/ros/src
git clone  https://github.com/BlueWhaleRobot/freenect_stack.git
cd ..
catkin_make
d. Driver installation is complete, you can now use kinect in ROS, for example, in rviz view kinect output point cloud, refer to step 2 at the beginning of this section.
-
xiaoqiang tutorial (7) use PS3 joystick to control xiaoqiangposted in 产品服务
use PS3 joystick to control Xiaoqiang
Principle: This tutorial involves 3 packages, ps3joy is responsible for converting ps3 bluetooth accept signals to standard linux devices (/dev/input/js0). The joy_node node is responsible for converting the above joy device data into the joy data type in ros. turtlebot_teleop_joy is responsible for converting the above joy data topic into motion instructions
/cmd_velSteps:
0. The first time you use the joystick, you need to bind the joystick to the Bluetooth receiver. You can start directly from step 1 if you have bind the device before.
If you bought the joystick and xiaoqiang at the same time, Then we have already bind the device for you.
The binding method refers to
Quick use method step 1in this article1. Start ps3joy and bind the ps3 joystick to the bluetooth receiver
# Make sure the Bluetooth receiver is plugged into the host usb port
sudo bash
rosrun ps3joy ps3joyfake_node.py
The following prompts appear normally
root@xiaoqiang-desktop:~# rosrun ps3joy ps3joyfake_node.py
No inactivity timeout was set. (Run with --help for details.)
Waiting for connection. Disconnect your PS3 joystick from USB and press the pairing button.
If the following error is indicated Press the handle pairing key in the following figure

If the pairing is successful, the upper window will output a result similar to the following
root@xiaoqiang-desktop:~# rosrun ps3joy ps3joyfake_node.py
No inactivity timeout was set. (Run with --help for details.)
Waiting for connection. Disconnect your PS3 joystick from USB and press the pairing button.
Connection activated
2. Start joy_node and turtlebot_teleop_joy
roslaunch turtlebot_teleop ps3fakexiaoqiang_teleop.launchAfter the normal start as shown in the figure below

ps3fakexiaoqiang_teleop.launchfile content is as follows<launch> <node pkg="turtlebot_teleop" type="turtlebot_teleop_joy" name="turtlebot_teleop_joystick"> <param name="scale_angular" value="0.4"/> <param name="scale_linear" value="0.4"/> <param name="axis_deadman" value="10"/> <param name="axis_linear" value="1"/> <param name="axis_angular" value="0"/> <param name="axis_enbar" value="12"/> <param name="axis_disenbar" value="14"/> <remap from="turtlebot_teleop_joystick/cmd_vel" to="/cmd_vel"/> <remap from="turtlebot_teleop_joystick/joy" to="/joy"/> </node> </launch>The parameters in the above launch file correspond to: Linear speed maximum (scale_linear)、Angular speed maximum (scale_angular),Throttle key (axis_deadman)、Forward and backward axis (axis_linear)、Left and right shafts (axis_angular),Platform infrared enable key (axis_enbar),Platform infrared close button (axis_disenbar).
3. Hold down the handle throttle key (key 10 in the figure below) and now use the left pusher to control the platform’s back and forth movement and steering (-1、+1 rocker in the image below)


According to these button numbers, the relevant parameters in the launch file can be modified to change the button mapping relationship
Pattern play:
Purchase ps3 mobile phone holder, Android mobile phone loaded Xiaoqiang picture app, so you can achieve remote control.

-
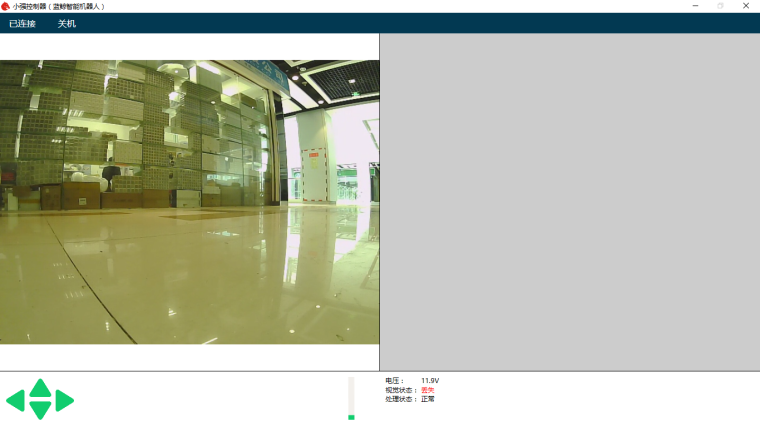
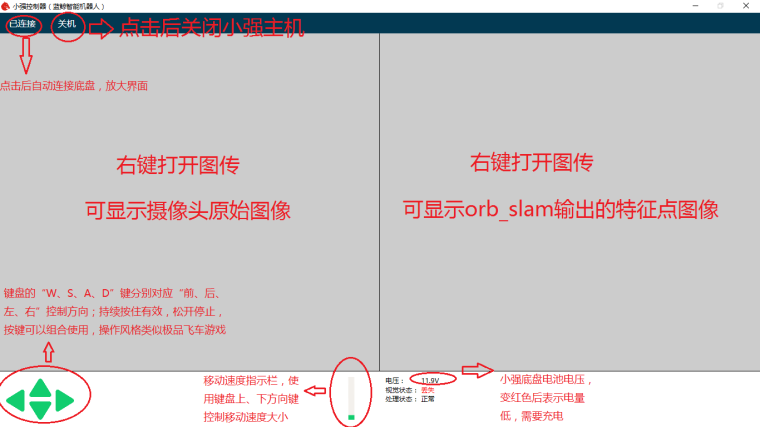
xiaoqiang tutorial (6) xiaoqiang remote control Windows clientposted in 产品服务
xiaoqiang remote control Windows client
The Windows client has merged with Galileo navigation system client, please refer toGalileo navigation system user manualThe software interface is shown below
Software installation package download Download and double click to install. Follow the instructions and click next all the way.
The first time you start the client, you will see the following prompts. Please tick “Private network and public network” and click to select “Allow access.”
Troubleshooting
Q: Unable to connect after app launched
A: It may because Xiaoqiang and your computer are not in the same LAN. It is also possible that Xiaoqiang’s server-side program does not start. You can entersudo service startup restartto restart the server and try again.Q: Unable to remote control after successful connection
A: Check whether driver is working properly. Check whether the serial port USB of the xiaoqiang is properly connected. Then enterrostopic echo /system_monitor/report,If the voltage shows normal, then the platform is normal. If not you can try to restart your service.sudo service startup restart. If the voltage is normal but still can’t move, check if infrared sensors triggered. The infrared sensor will glow red when triggered.Q: No video transmission after successful connection
A: Check if the camera USB is connected properly. Then restart the service and try again.”sudo service startup restart”。 enterrostopic echo /system_monitor/report,If imageStatus is True, shows that the image data is normal. If there is still no image displayed at this time, the client installation is abnormal. Please check the installation steps of the client.
-
xiaoqiang tutorial (5) xiaoqiang remote control app for Androidposted in 产品服务
xiaoqiang remote control app Android version
Client with remote control and small screen image display function xiaoqiang-with-control.apk
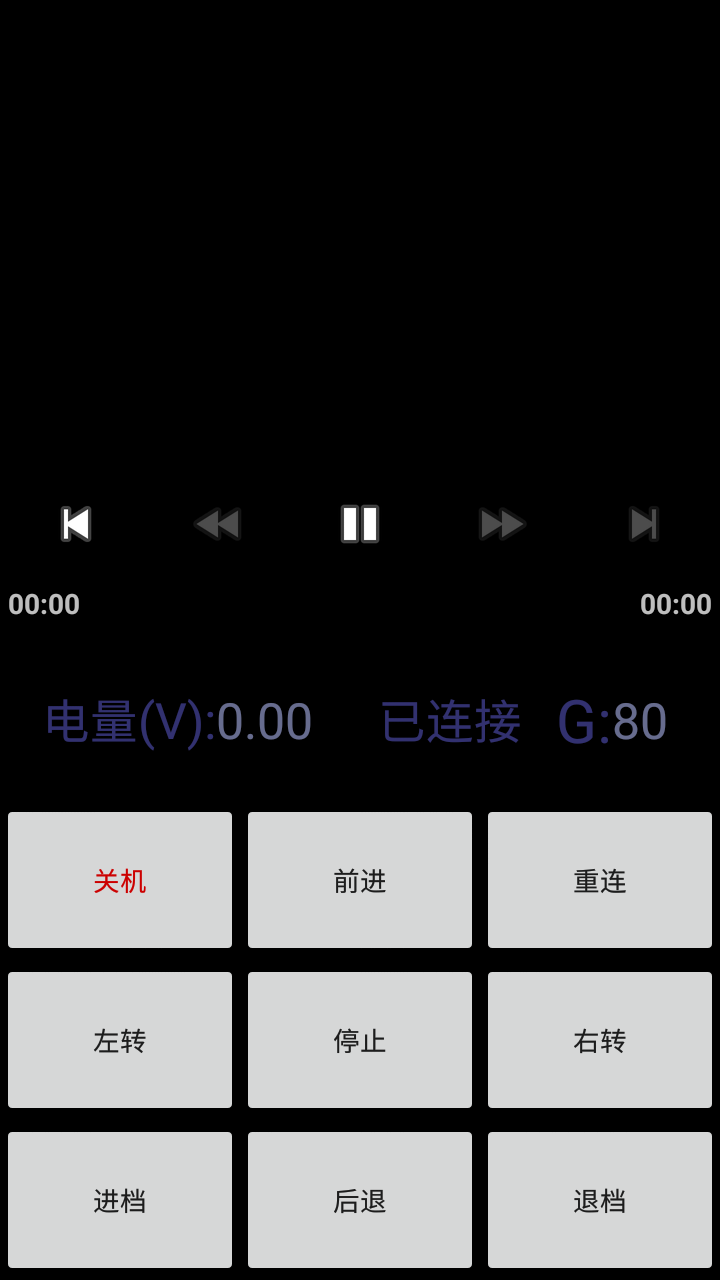
Client without the remote control function, with full screen display xiaoqiang-no-control.apk
Usage:
- Ensure that Xiaoqiang and the remote control handset are in the same LAN
- Start the server program on Xiaoqiang
- Open the app. If everything is normal, you can see Xiaoqiang’s voltage display and Xiaoqiang image data. If there is no data you can try clicking the reconnect button.
Troubleshooting
Q: Unable to connect to xiaoqiang after app launched
A: It may be because Xiaoqiang and your phone are not in the same LAN. It is also possible that Xiaoqiang’s server-side program does not start. You can entersudo service startup restartto restart the service program and try again.Q: Unable to remote control after successful connection
A: Check whether the driver is operating normally. Check whether the serial port USB of xiaoqiang is properly connected. Then enterrostopic echo /system_monitor/report. If the voltage is normal, then the platform is normal. If the voltage does not display properly, restart the service and seesudo service startup restart. If the voltage is normal but still can’t move, check if infrared sensors triggered. The infrared sensor will glow red when triggered.Q: No video transmission after successful connection
A: Check if the camera USB is connected properly. Then restart the service and try againsudo service startup restart
-
xiaoqiang tutorial (4) Inertial navigation testposted in 产品服务
inertial navigation test
In the previous tutorial, we have maked a 3D model of xiaoqiang, we will start to test xiaoqiang’s inertial navigation function. The inertial navigation here is to use Xiaoqiang’s own inertial sensors (acceleration and gyroscope) and encoder information to locate. The required ROS packages are:
- Driver xqserial_server
- Robot model package xiaoqiang_udrf
- Inertial Navigation Test Package nav_test.
Below is the final result of the tutorial.
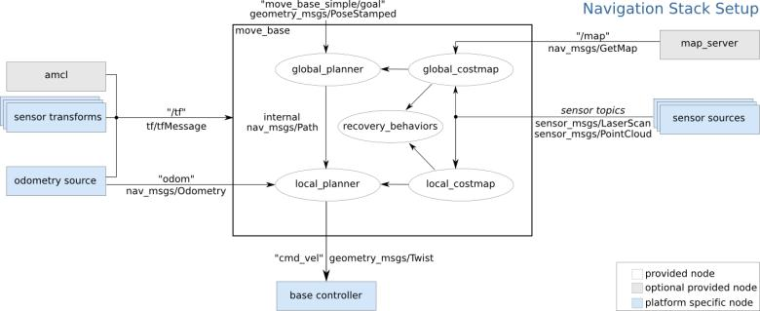
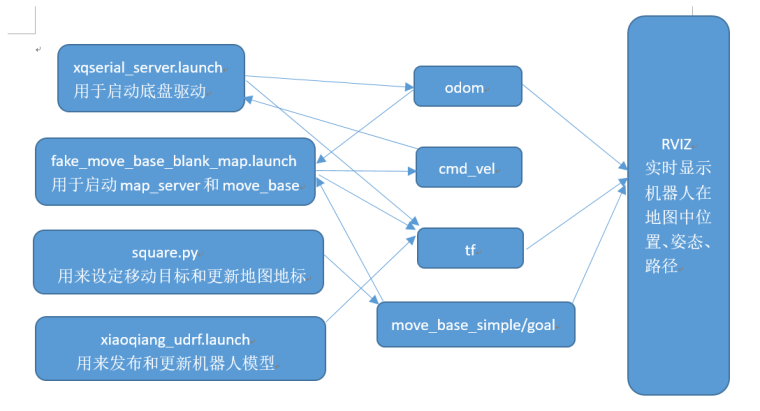
the structure of ROS navigation stack is shown in the following two figures: If you are not familiar with the ROS navigation stack, please move to this tutorial
1. remote operation on Xiaoqiang host
Please ensure that Xiaoqiang has started normally. Xiaoqiang host will automatically run the three software packages mentioned after normal startup. You don’t need to launch the corresponding launch file manually. If you don’t have the three packages installed, please install and upgrade these three software packages yourself. Then update the startup task (please refer to the robot_upstart tutorial) and restart it.
a. Open a new terminal and start the navigation program
ssh -X xiaoqiang@192.168.xxx.xxx
# Restart the service program, some program may not be running
sudo service startup restart
roslaunch nav_test fake_move_base_blank_map.launch
If there is an error saying “You must specify at least three point for the robot footprint”, Just ignore it. This is because
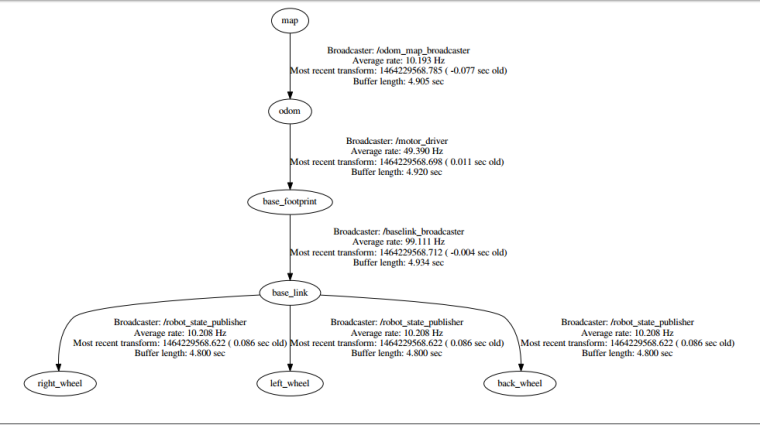
foot_printrequires setting a shape, so at least three points are required.foot_printis the outline shape of the robot. This parameter is used to avoid obstacles. Xiaoqiang’sfoot_printsets a circle, so there is no need to specify three points. If the tf tree that appears is not the same as the following figure, please check whether the drive is running normally.b. Open a new terminal and check if all tf are in place
ssh -X xiaoqiang@192.168.xxx.xxx
rosrun tf view_frames
evince frames.pdf
If the output looks like following
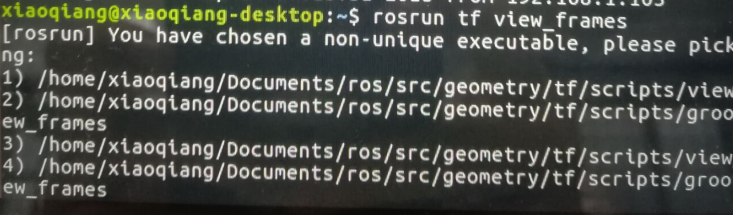
Follow the prompts to select one
view_frame.Normal will show the following picture
2. Operation completed on the local machine
The local machine must be a Ubuntu system with corresponding ROS installed. Please refer to Section 1.2 of Tutorial (1) to install Xiaoqiang System Image. At the same time, it is guaranteed to be in the same local area network as Xiaoqiang. Because it is necessary to use rviz to display the Xiaoqiang pose and path trajectory in rviz on the local window (the rviz cannot be directly opened in ssh), a distributed network configuration of ROS is needed, and the robot model package
xiaoqiang_udrfis also required to be installed on the local machine. In summary: The local machine opens its own rviz, receives and displays the topic on the Xiaoqiang host, and the Xiaoqiang model data is obtained directly from the local. The specific process is as follows:a. Open a terminal in the local, add Xiaoqiang’s ip in the local hosts file
sudo gedit /etc/hosts
# Add to
xxx.xxx.xxx.xxx xiaoqiang-desktop  # Please change xx to actual ip
b. Open a new terminal input
export ROS_MASTER_URI=http://xiaoqiang-desktop:11311
# Continue to execute
rostopic list
If you can see Xiaoqiang’s topic, it means the configuration is successful.
d. Users who installed Xiaoqiang system image do not need perform this step. Install the model package, update the local ROS package environment variable, because the model data needs to be read from the local
mkdir  ~/Documents/ros/src
cd  ~/Documents/ros/src
catkin_init_workspace
git clone https://github.com/BlueWhaleRobot/xiaoqiang_udrf.git
#Xiaoqiang pro user switches to the master branch
cd xiaoqiang_udrf
git checkout master
#Xiaoqiang mini user switches to mini branch
cd xiaoqiang_udrf
git checkout mini
# xiaoqiang XQ5 user switchs to lungu branch
cd xiaoqiang_udrf
git checkout lungu
# Completion of the installation
cd ..
cd ..
catkin_make
e. Open the rviz.
export ROS_MASTER_URI=http://xiaoqiang-desktop:11311
source ~/Documents/ros/devel/setup.sh
rviz
When the window opens, click on file->open in the upper left corner and select the
/home/xiaoqiang/Documents/ros/src/nav_test/config/nav.rvizfile in Xiaoqiang. At this time, the interface should be displayed as shown below. Please refer to the previous tutorial for how to access the files on the Xiaoqiang host.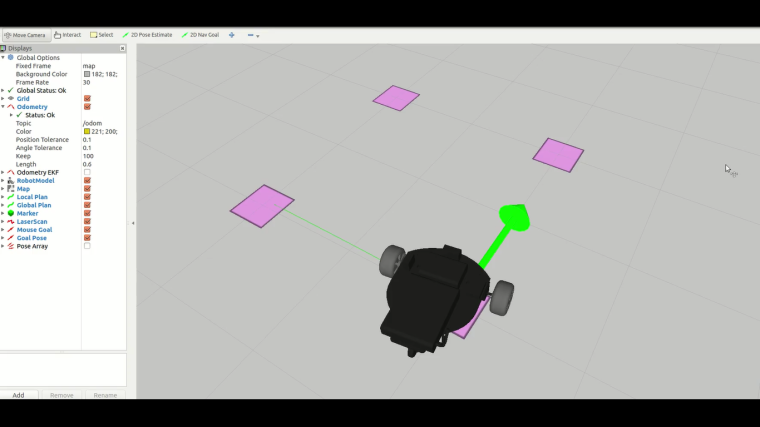
3. Complete the last operation in the remote host ssh window
rosrun nav_test square.pyIf Xiaoqiang cannot move, check if the platform driver is working properly. You can enter rostopic echo /system_monitor/report If there is a voltage display, the platform drive is normal.如If it still cannot be moved, you can check whether Xiaoqiang infrared sensor is triggered or not. The infrared sensor will glow red when triggered.
4. Now you can see the video effect at the beginning of the article in rviz, enjoy it!
-
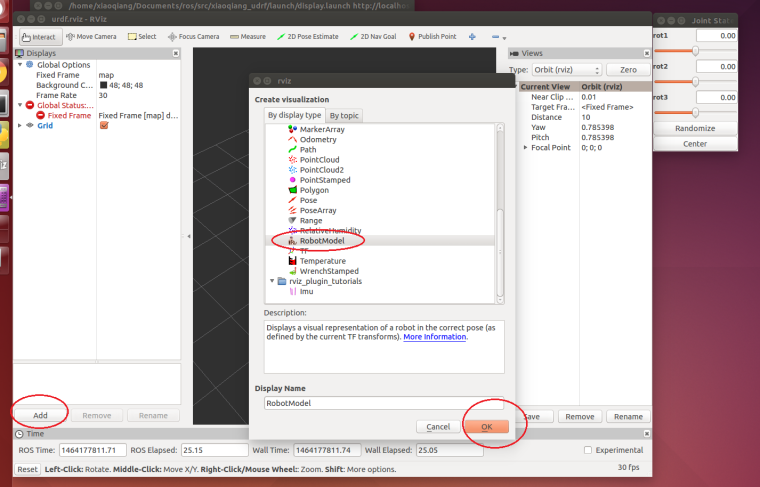
xiaoqiang tutorial (3) Displaying Xiaoqiang Robot Model in rvizposted in 产品服务
Displaying Xiaoqiang Robot Model in rviz
It is a cool thing to display the current pose of the robot in real time. With rviz, you can easily achieve this goal in ROS. Look at the results:
The Xiaoqiang model package located at
Documents/ros/src/xiaoqiang_udrfand can also be downloaded from our open source repository on Github.# Connect the Xiaoqiang host to the monitor and keyboard, and after booting, open the terminal # stop the startup task first sudo service startup stop roscore # Open a new terminal on Xiaoqiang host, start this package roslaunch xiaoqiang_udrf display.launchNote that this process requires a graphical interface, so there is no way to operate through a remote ssh connection. If you must use ssh connection, you can add
-X(note the capital) option when connecting, but the experience is not good and is not recommended. It is recommended to operate through VNC. VNC installation method can refer to this article.If you want to open the model package remotely, you need to install Xiaoqiang's model package locally. For users using the Xiaoqiang system image, Xiaoqiang's model package has been installed in advance.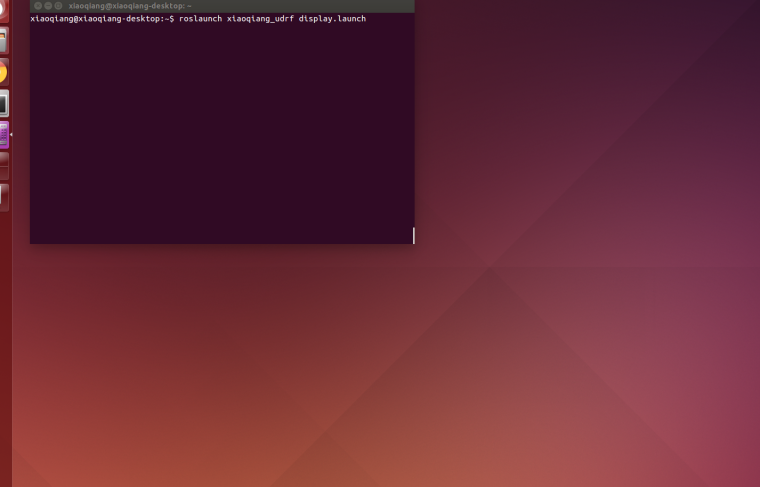
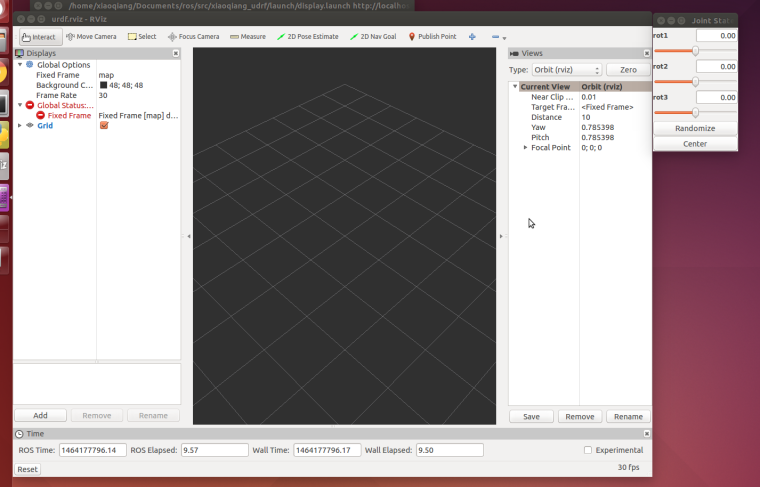
At this point, there is no thing to display, you need to add rviz display items
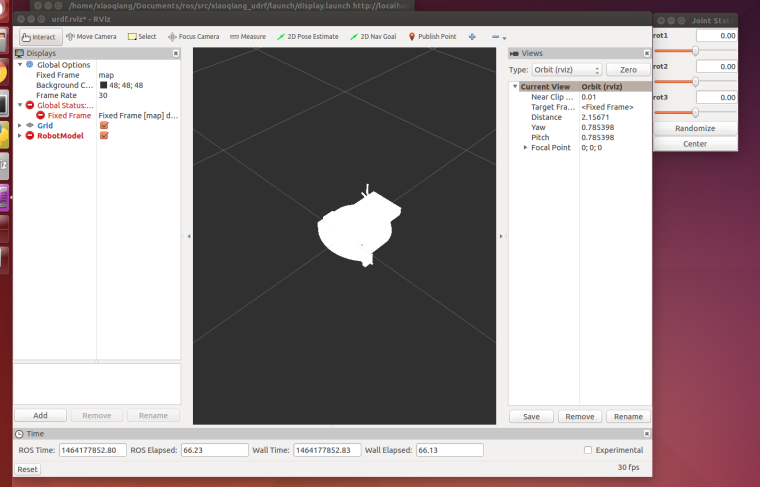
There is still a problem, the entire model is transparent and whitish, this is because the global coordinate system
fixed framein the rviz is not set properly, After map is changed tobase_link, it will display normally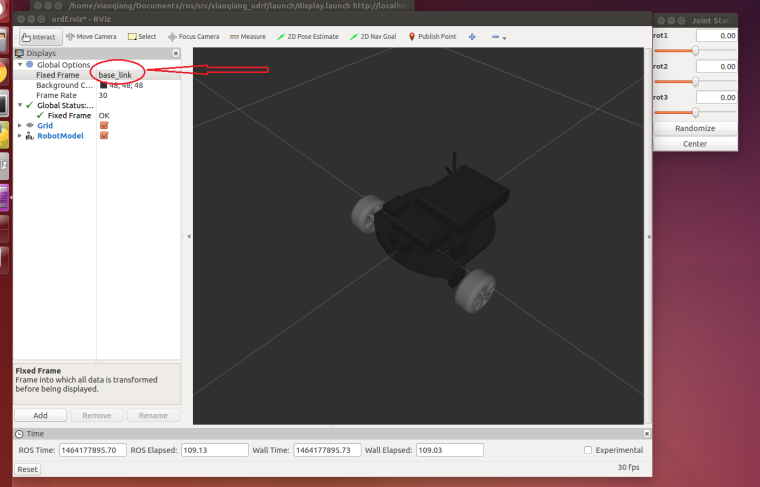
Now operate the slider in the upper right corner to turn the corresponding wheel.
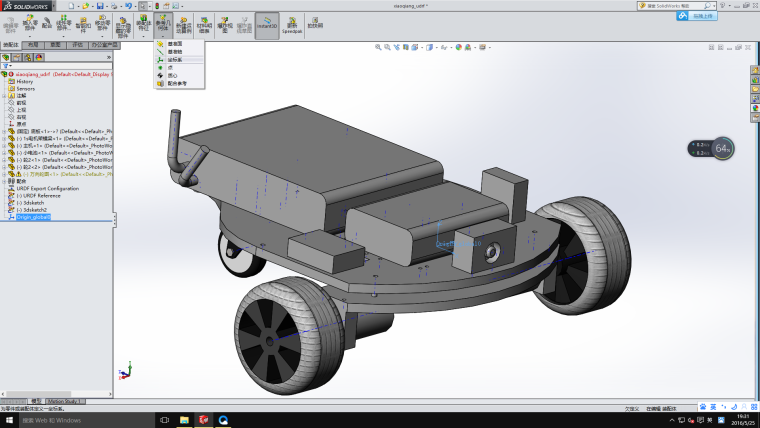
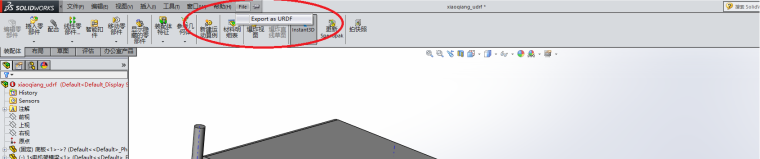
Above we simply demonstrated the use of rviz to display the urdf model. The following section will describe in detail the whole process of making urdf model with solidworks under windows system.
First use solidworks to create the platform model, download and install the solidwork to urdf plug-in.
After making a model, you need to add a coordinate system. This coordinate system will be used as the reference coordinate system of the entire urdf model (ie, the base_link frame in ROS).
Open urdf plugin
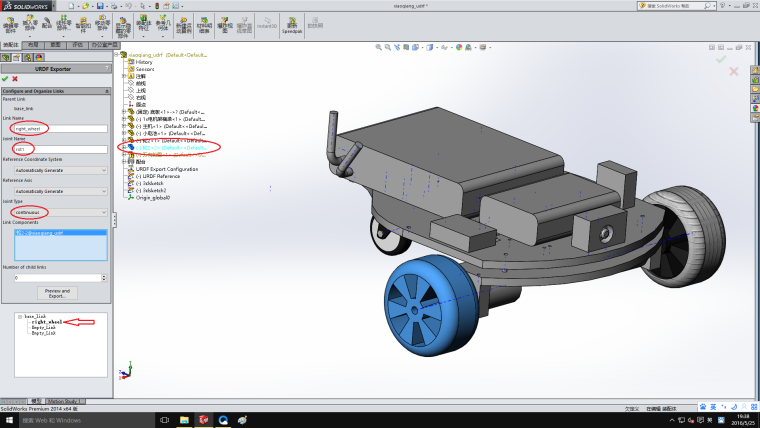
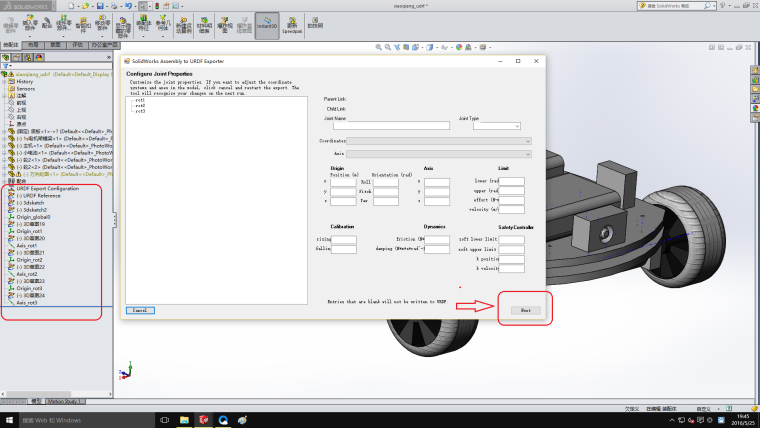
Xiaoqiang has two driving wheels and one driven wheel, so the whole model needs 3 links, 3 joints. First edit the
base_link, pay attention to the global coordinate system above, the red area in the picture is the item you need to click or modify.
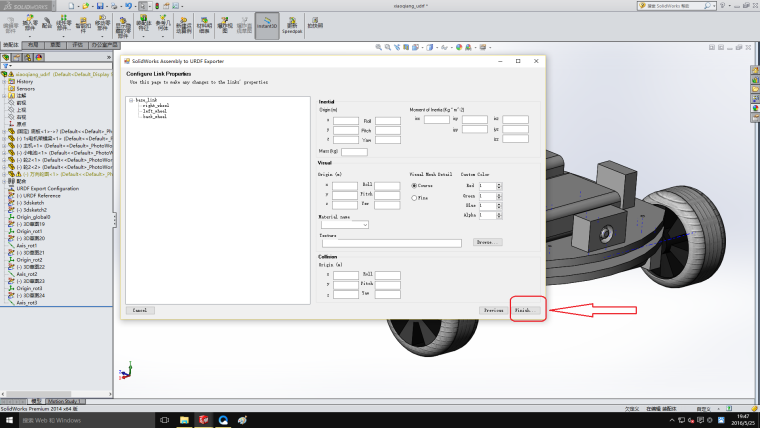
Then right wheel
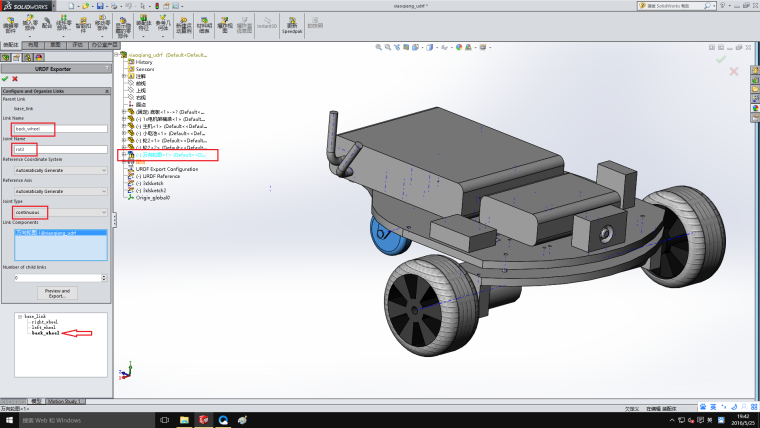
Continue the revolver and rear wheel

All settings are now complete, start exporting
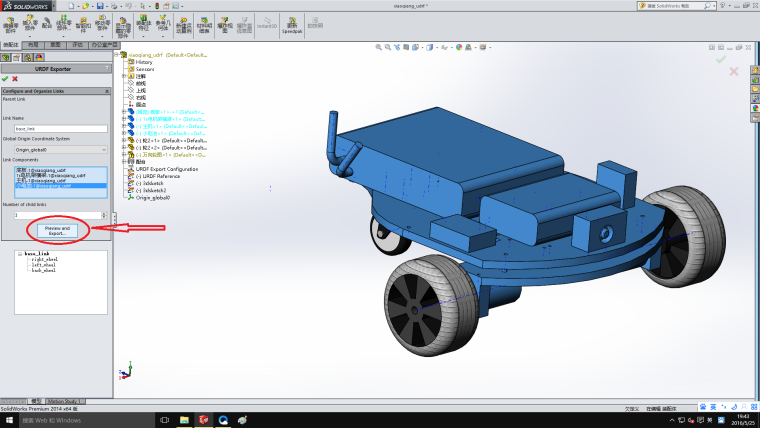
All the way next and ok go
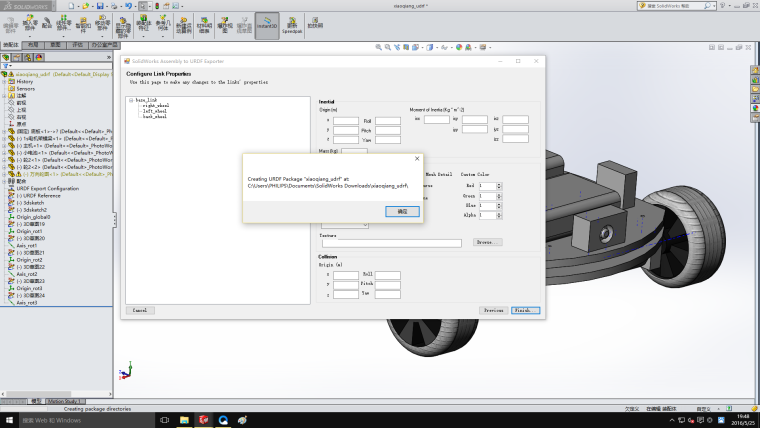
Now that we have obtained the robot’s urdf file, the entire generated folder is a ROS package. Modify the display.launch file in the launch folder and change false to true
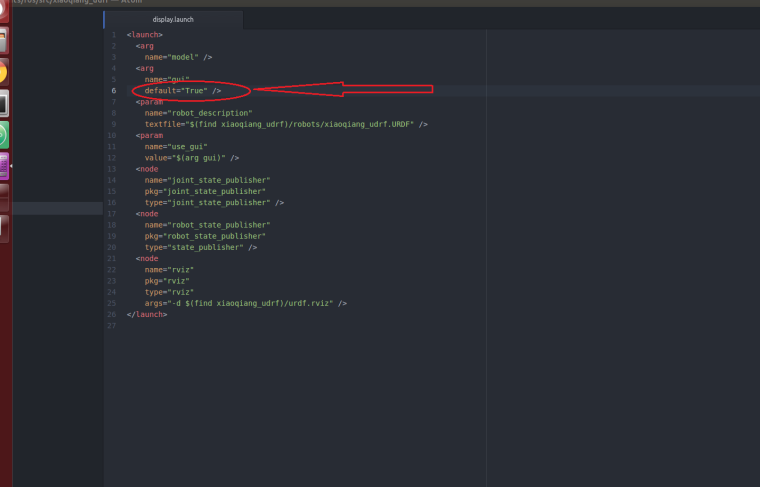
Copy this ros package to the ROS workspace. After running catkin_make, it can be tested and used by the method at the beginning of this article.
-
xiaoqiang tutorial (2) Bluewhale Robot Open source code repository usage and ROS startup task configurationposted in 产品服务
Bluewhale Robot Open source code repository usage and ROS startup task configuration.
Some of Xiaoqiang’s software source code is shared with Bluewhale Robot’s open source code repository,Anybody can freely download or use it for futher development.
For Xiaoqiang users, the software in the open source Code repository can be directly git cloned into Xiaoqiang’s ROS working directory, and then can be compiled and used directly with ROS’s
catkin_make. Xiaoqiang’s ROS working directory is:/home/xiaoqiang/Documents/ros/srcThe following will use the startup package in the open source repository as an example to demonstrate the complete use of the open source repository
1. Startup package introduction
After the Xiaoqiang host starts up, it will automatically start the Linux service script named startup. When the service script runs, it will start the replica which is registered in ubuntu system by
startup.launchfile. Therefore, by modifying thestartup.launchfile in the startup package, and then registering this file as a startup service in the ubuntu system, we can control the booting tasks of the Xiaoqiang host.2. Download and install startup package on Xiaoqiang host
a. In the local remote control terminal ssh connection Xiaoqiang host, refer to the configuration of the previous tutorial
ssh xiaoqiang@192.168.x.xb. Enter Xiaoqiang’s ROS working directory to see if there is a startup folder
cd Documents/ros/src/
ls
If it exists, it indicates that the startup package has been installed. You can directly perform the following third step. If you want to update the startup package synchronously with the open source repository, enter the following command:
cd startup
git stash
git pull
cd ..
3.Modify the startup.launch file in the launch folder in the package
Using the vscode editor installed in the previous tutorial, Edit this file directly on the local machine(If you need to remotely access Xiaoqiang’s host file directory, please refer to the previous basic operation tutorial to configure.)
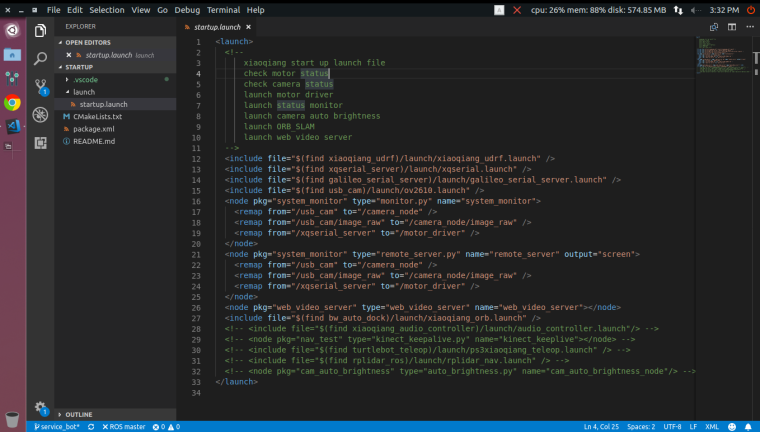
In the arrow area above, add or delete the ROS launch file and ROS node that you need to launch. These items will be added to the boot of the Xiaoqiang host in the following. Xiaoqiang will automatically run these items when booted next time. Finally, save and exit.
4.Register the startup.launch file as a startup startup service on Xiaoqiang host
Please continue to enter in the ssh window in the second section above.
a. First stop and delete the previously registered startup service
sudo service startup stop
rosrun robot_upstart uninstall startup
b. Re-register startup service
rosrun robot_upstart install startup/launch/startup.launch
sudo systemctl daemon-reload && sudo systemctl start startup
5.Remotely restart Xiaoqiang’s host and check if the boot startup item is loaded normally
Then enter the ssh window above
a. Send a reboot command
sudo shutdown -r nowb. Start a new ssh connection
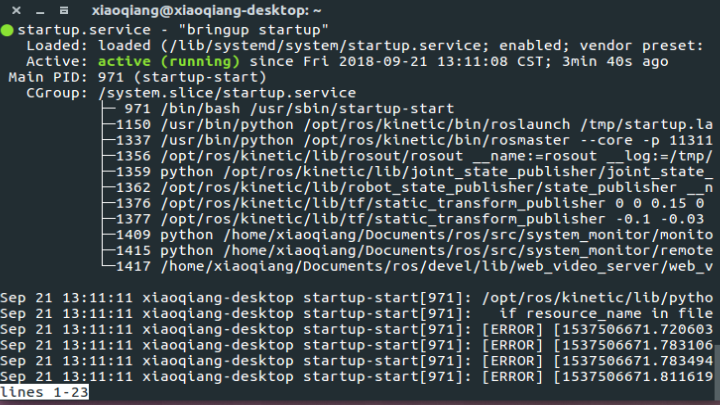
ssh xiaoqiang@192.168.x.xc. Check the status of the startup service
sudo service startup statusNormally, it will show startup start/running as shown in the figure below.
d. You can also further see if the related topic has been published
rostopic list
-
xiaoqiang tutorial (1) Basic operation introduction and remote control in LANposted in 产品服务
Basic operation introduction and remote control in LAN
before the start
The following tutorial focuses on the use of various features of Xiaoqiang and does not include the teaching of ROS. If you are a beginner of ROS, follow up on the ROS basics while following the tutorials. Please don’t just follow our tutorial and enter instructions. Understand the specific meaning of each command please. When you have problems, you should also be good at finding reasons by yourself, which will be helpful for future work and study. If you haven’t understood about tutorials or ROS, please feel free to ask questions in slack.
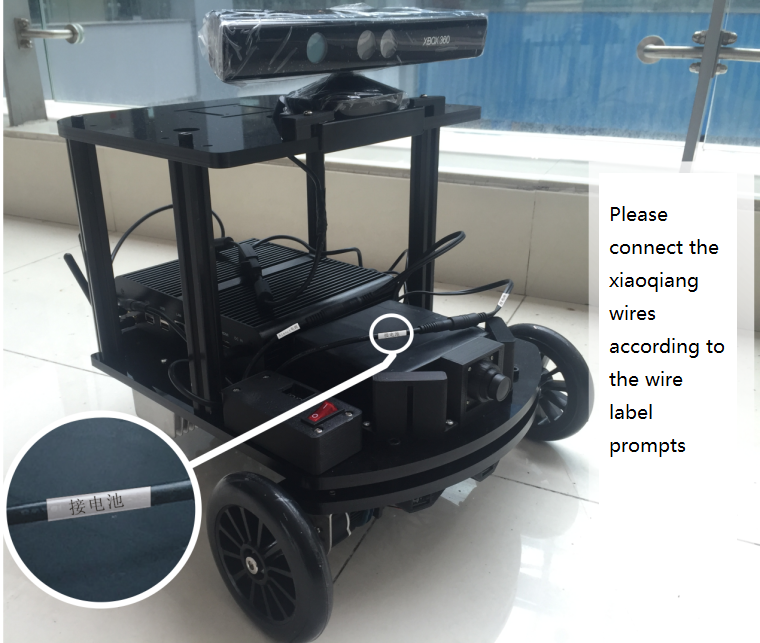
First of all, please connect the xiaoqiang wires according to the wire label prompts. The complete structure is shown in the figure below.
1.Configure the Xiaoqiang network
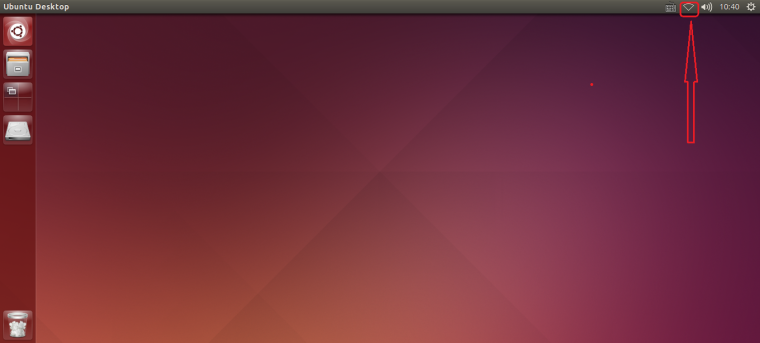
First connect Xiaoqiang’s host computer with monitor(Xiaoqiang Pro users please use the included HDMI to VGA adapter to connect, Xiaoqiang Mini users please use vga directly), The mouse and keyboard connected to the host computer. Then turn on the host computer and enter the Ubuntu system.
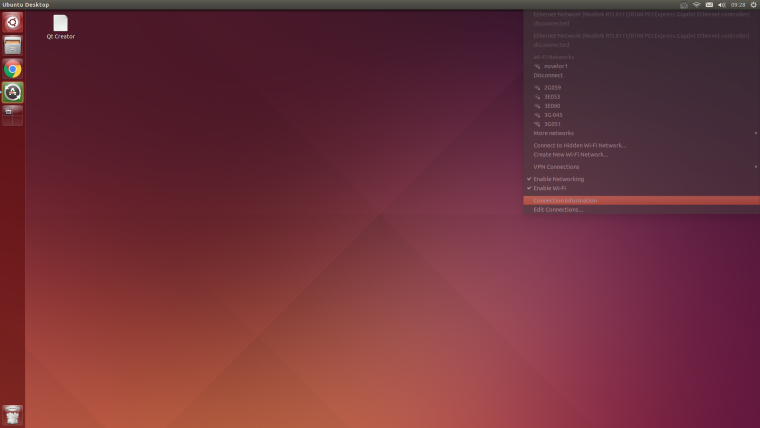
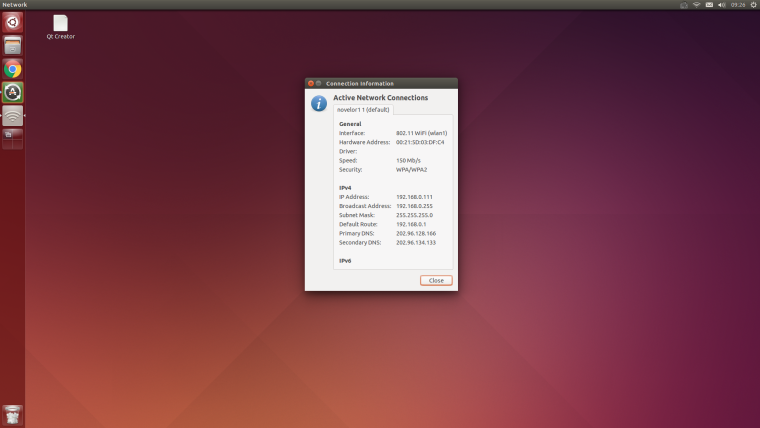
xiaoqiang's default password is xiaoqiangClick on the location of the icon below and select the desired wireless network
After accessing the network, click on the marked position in the figure below to get Xiaoqiang’s actual ip address. Follow-up tutorials will use this ip information frequently.
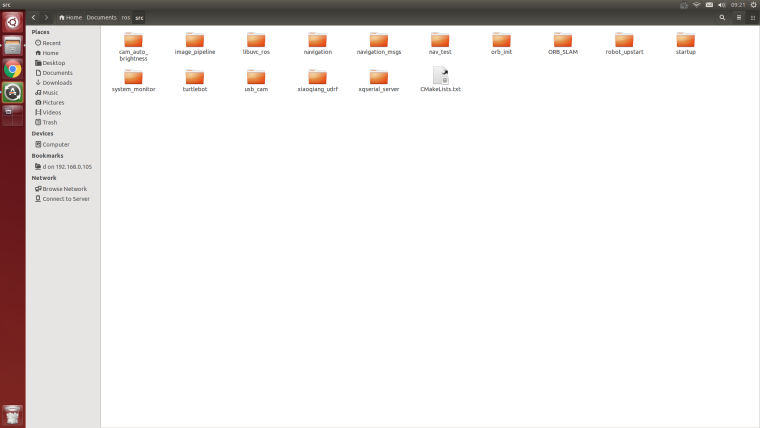
Xiaoqiang’s ROS default working directory is here
Now that Xiaoqiang has been configured, the keyboard, mouse, and monitor can be unplugged after power off. The next time Xiaoqiang is powered on, it can be used directly.
2. Local configuration
The local remote control end is preferably an x86 host with ubuntu 16.04 64 bit operating system installed. If you only have a windows platform, you can install the vmware virtual machine. Download Vmware Player from here , and then install ubuntu in the virtual machine. Mirror download and installation tutorial, it is recommended to install Xiaoqiang iso image(already configured ROS). Finally, ensure that the virtual machine be on the same LAN as Xiaoqiang.
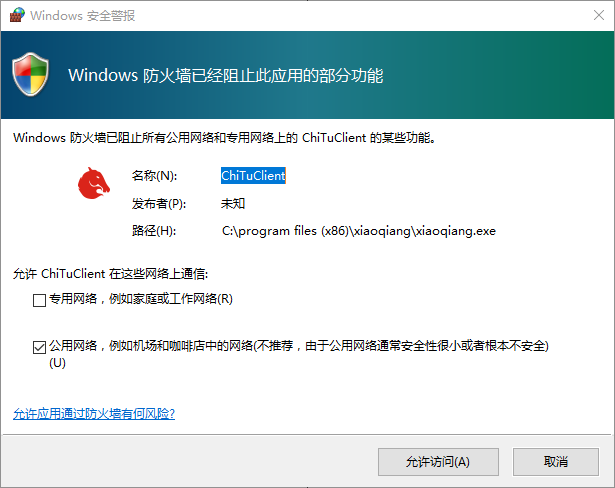
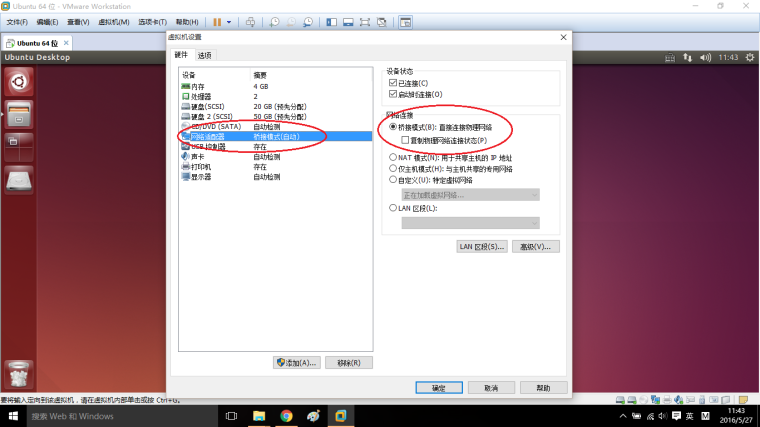
Note The virtual machine NIC is to be set as a bridge, as shown in the following figure. Otherwise the virtual machine will not be able to link the xiaoqiang. If you are unable to connect to xiaoqiang, you can turn off your computer’s firewall and try again.
Start Ubuntu system configuration after system deployment
a.Install
ssh, screen, if you install Xiaoqiang mirror please skip this operationsudo apt-get install ssh screenb.Install ros kinetic, if you install Xiaoqiang mirror please skip this operation, the official tutorial
c.Users who installed Xiaoqiang system image, please turn off startup service to avoid conflicts with Xiaoqiang
sudo service startup stop
rosrun robot_upstart uninstall startup
d.Users who installed Xiaoqiang mirror, please update Xiaoqiang_udrf package according to Xiaoqiang model(Pro?mini)
cd ~/Documents/ros/src/xiaoqiang_udrf
git stash
git pull
# Xiaoqiang pro user, please switch to the master branch
git checkout master
# Xiaoqiang mini user, please switch to mini branch
git checkout mini
e.Because the follow-up needs to frequently change the files on the Xiaoqiang host, we will now add the Xiaoqiang host remote directory to the local computer so that the file on the Xiaoqiang host can be graphically operated locally (the Xiaoqiang host is equivalent to the external hard disk of the local ubuntu system).
Click on the icon in the figure below to add the remote directory
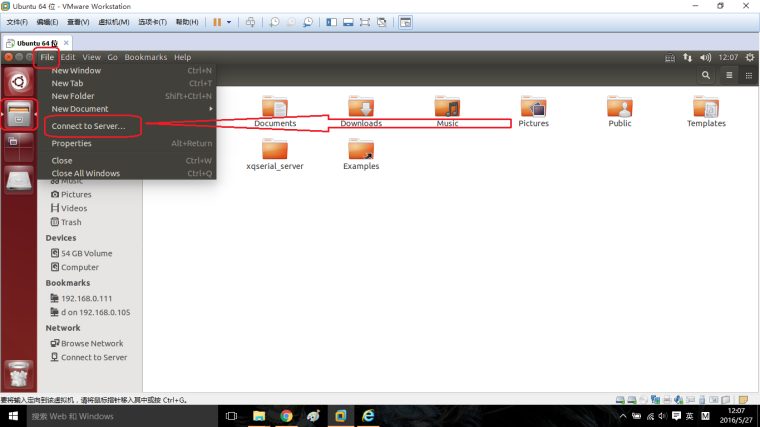
Enter Xiaoqiang’s remote directory. Replace ip with the actual ip address mentioned above.
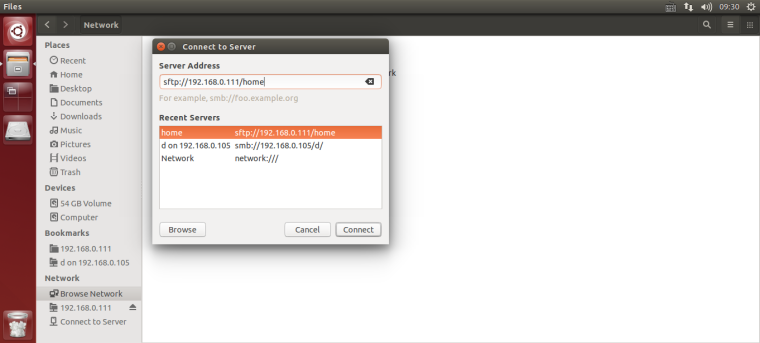
Enter the Xiaoqiang host username and password as prompted.
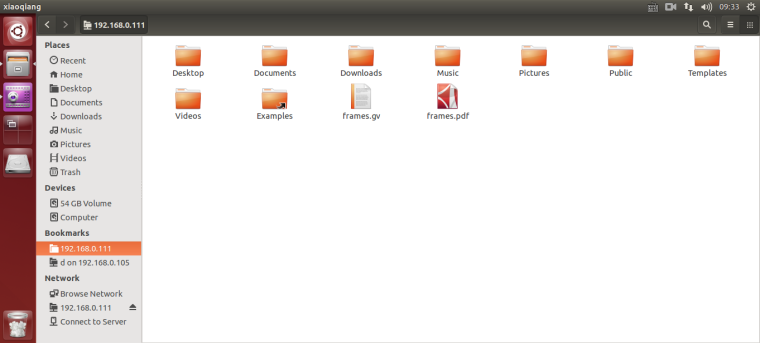
If everything is normal, the home directory of the Xiaoqiang host has been opened. For future convenience, this address can be added to the bookmark.
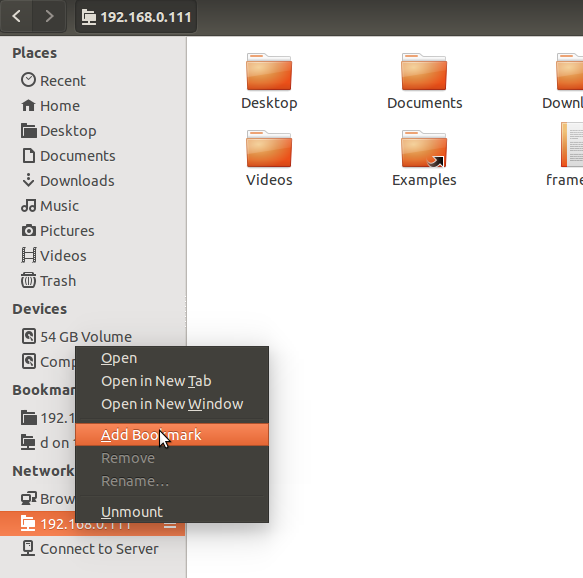
You click on this bookmark directly next time, you will be able to access the home directory of the Xiaoqiang host.
It is recommended to install the vscode editor (already installed in xiaoqiang system image), and it is convenient to code and edit the software package on the Xiaoqiang host.

e.Now that you have the full development and use environment of Xiaoqiang, for example, ssh logs in to the Xiaoqiang host and begins to use the keyboard to remotely control Xiaoqiang’s movement.
-
Open a terminal on the local machine
-
Connect to xiaoqiang via ssh, replace xxx with actual ip
ssh xiaoqiang@xxx.xxx.xxx.xxx -
Start remote program
rosrun nav_test control.py -
You can start controlling the movement of Xiaoqiang through the arrow keys. Spacebar is the stop button. Press
Ctrl + Cto exits the program.
Xiaoqiang’s mobile control is achieved by issuing a topic named
/cmd_vel,This topic is the Twist type under geometry_msg, Its release method please refer to ros official document. The control.py source code on Xiaoqiang is also a good reference example.FAQ
Q: The car can only go forward and not back, or can only move back.
A: Check whether the car’s infrared sensor is triggered and the sensor will light up after triggering. After the infrared trigger, the car cannot move in the corresponding direction.
-
-
xiaoqiang quick start guideposted in 产品服务
Quick start
Start Using
This chapter describes how to quickly use the platform. If you are not familiar with the ROS system and Ubuntu system, please read the first tutorial of the second chapter.
Set up the network
First, connect monitor to Xiaoqiang’s host pc(Xiaoqiang Pro users please use the included HDMI to VGA adapter to connect, Xiaoqiang Mini users please use vga directly)。Xiaoqiang’s default password is
xiaoqiang,Please change the default password。Enter the OS and set up Xiaoqiang’s wifi network connection。It is recommended to set up the router so that Xiaoqiang can use static ip, which is convenient for future connections. Setting up static IP tourial.Product assembly
The main part of Xiaoqiang is shown in the figure below.
Place the battery flat on the free area in front of the host (the battery is blocked by two small black blocks).Connect the platform power cord according to the wire label. Installing computer host wifi antenna. USB camera and platform USB communication cable can be connected to the host’s USB interface
State check
After the assembly is complete, you can start using Xiaoqiang. Turn on the Xiaoqiang host computer switch and wait for the host blue light to turn on. Xiaoqiang left power data display is normal(The normal range of battery voltage cannot be lower than 10V,The normal range of battery voltage can not be less than 10V or it will automatically shut down)
Remote connection through ssh, where xxx.xxx.xxx.xxx is Xiaoqiang’s IP
ssh xiaoqiang@xxx.xxx.xxx.xxxCheck that the program is working properly and execute the following commands
rostopic listNormally, all current ROS topics will be displayed.
/ORB_SLAM/Camera
/ORB_SLAM/Frame
/camera_node/image_raw
/orb_scale/scaleStatus
/rosout
/rosout_agg
/system_monitor/report
/tf
/usb_cam/brightness
/xqserial_server/Odom
/xqserial_server/Power
If the topic is not displayed properly, you can try to restart the service.
sudo service startup restartCheck system status
rostopic echo /system_monitor/reportIf it is normal, the display is as follows
imageStatus: True
odomStatus: True
orbStartStatus: False
orbInitStatus: False
orbScaleStatus: False
brightness: 0
power: 12.34432
Where imageStatus indicates whether the camera is working properly. odomStatus indicates whether the underlying driver is working properly. The three Orb-related variables are visual navigation-related states that can be temporarily ignored(If you are interested in this area, you can communicate in the forum). brightness is the brightness of the camera. Power is the voltage value of the current battery, If the voltage cannot be read, 0 is displayed.
remote control
Connect through ssh
ssh xiaoqiang@xxx.xxx.xxx.xxxStart remote control program
rosrun nav_test control.pyNow you can use the arrow keys to control the movement of Xiaoqiang. Spacebar is stopped. Ctrl + C exits the program.
Software overall structure and description
Xiaoqiang’s software is built on ROS. The program mainly contains the driver, navigation algorithm and slam algorithm. For robots, the software is a whole, and the dependence of each part is relatively high. For ease of management, The basic functions in the system are operated by one service. That is, the startup service mentioned earlier. This service starts the driver package and camera. Startup package is located
/home/xiaoqiang/Documents/ros/src/startup. This service is automatically started when the system starts. If you want to change the content of this service, you can modify the launch file in this package. For detailed operations, please refer to here. The system’s navigation program uses the navigation package that comes with ROS. However, the navigation parameters are modified according to Xiaoqiang’s own parameters. Navigation parameters have a great influence on the performance of navigation. You can also try to modify the parameters yourself to improve performance. The slam algorithm uses ORB_SLAM. This algorithm is currently not available in the actual production environment, but its use performance is also very good. The last is some tool software. For example, nav_test control.py related to control platform movement.,System monitor that shows the system status.ROS Primer
Learning ROS for Robotics Programming - Second Edition.pdf. This tutorial is very basic and comprehensive, Although taking the Hydro version as an example, But it is also fully compatible with the Kinetic version, In the code example in the book, just replace the string
hydrowithkinetic. Please read the second and third chapters of this book in detail.
-
RE: 一个简单的服务监控程序posted in 技术交流
@日月 需要在linux机器上安装mono-develop,用它编译出可执行文件。然后自己写一个service文件。比如下面这样
[Unit]
Description=Sharplink Service
After=basic.target

[Service]
WorkingDirectory=/home/services/sharplink/SharpLink/bin/Release
ExecStart=/usr/bin/cli /home/services/sharplink/SharpLink/bin/Release/SharpLink.exe
Restart=always

[Install]
WantedBy=basic.target
详细的可以搜一搜systemd的service怎么管理。
这个软件用起来还有些问题,比如邮件发送太频繁了,可能服务并没有down,只是卡了一下都会收到邮件。
-
使用wstool管理小强的工作空间posted in 产品服务
wstool是一个ros中用于管理工作空间的工具。ws就是workspace的缩写。
wstool通过rosinstall文件记录工作空间的软件信息。小强相关的rosinstall文件被整理在xiaoqiang-rosinstall软件源中。使用起来十分方便。下面是xiaoqiang-rosinstall软件源的使用说明。
ROS Installs
此软件源包含了小强相关的rosinstall文件。方便用户通过wstool工具对自己的工作空间进行管理。比如软件的更新,恢复出厂软件设置等等。
文件说明
文件 说明 xq4-pro.rosintall 小强XQ4 Pro 工作空间文件 mini.rosinstall 小强 mini 工作空间文件 xq5.rosinstall 小强 XQ5 工作空间文件 如何使用
创建工作空间
mkdir -p catkin_ws/src
cd catkin_ws/src
wstool init
如上操作会在 catkin_ws/src 文件夹内创建一个.rosinstall文件。这个文件是wstool工具用来记录工作空间的软件信息的文件。catkin_ws为示例的工作空间路径。
添加rosintall文件
cd ~/Documents
git clone https://github.com/bluewhalerobot/xiaoqiang-rosinstall.git
cd catkin_ws/src
# 此处以xiaoqiang xq4 pro 的工作空间为例。请根据你的版本选择不同的rosinstall文件
wstool merge ~/Documents/xiaoqiang-rosinstall/xq4-pro.rosinstall
以上操作会将对应的rosintall文件内容添加到本地工作空间的rosinstall文件中。
添加rosinstall只需要第一次执行。如果已经添加过了,之后就不需要再添加了。更新软件
wstool status
wstool update
如果有更新失败的软件包,说明本地文件发生了更改。如果想要获取到原版的小强程序可以直接把本地软件包删除。然后再次运行
wstool update。查看自己修改过哪些文件
wstool status此指令会列出小强工作空间中左右被修改的文件。
-
hikey 970 debian 镜像(有opencl 和 tensorflow)posted in 技术交流
最近(2018.8.30) LeMaker发布了一个新的 Hikey 970 debian镜像。此镜像增加了HDMI支持,稳定性也提高了。同时增加了OpenCL和Tensorflow(只有python3.5)支持。此 Tensorflow 应该是进行了优化的,具体的是不是用到了NPU还不确定。经过我自己的测试此 Tensorflow 的速度比我自己安装的速度要快一倍。但是此镜像仍然不支持自带的蓝牙。
下面是安装和使用方法
下载镜像
从上面链接下载镜像并解压
tar -xzvf hikey970-lebian-9.tar.gz刷入镜像
把hikey 970板子开关拨至 on off on off。链接USB线,并给板子上电。然后自己的电脑上执行下面的指令开始刷机
./flash-all-binaries.sh等待刷机完成
刷入分区补丁
默认的系统分区很小,所以需要打一个补丁,之后可以调整系统分区到60G。
从上面的的下载地址下载补丁,之后解压。
把解压后的内容复制到刚才的 hikey970-lebian-9 文件夹内。然后执行
sudo fastboot flash boot boot-hikey970.uefi.2.img
sudo fastboot flash userdata hikey970-lebian9-tf.img
等待程序执行完成
启动系统
断开板子的电源,然后把开关拨至on off off off。给板子连接上鼠标键盘网线和显示器。然后给板子上电。
等待系统启动完成。正常情况下应该可以看到登陆界面。用户名和密码都是shunya。调整分区
运行下面的指令调整分区
sudo resize2fs /dev/sdd15这样能够把系统分区扩展到20G,剩下的需要用gparted扩展
sudo apt-get install gparted
sudo gparted-pkexec # 注意此指令只能再外接显示器的情况下才能运行
选择60G的硬盘,然后把未分配的空间全部扩展到最后一个分区。
shunya@hikey970:~$ df -h
Filesystem      Size  Used Avail Use% Mounted on
/dev/root        53G  7.5G   44G  15% /
devtmpfs        2.8G     0  2.8G   0% /dev
tmpfs           2.9G     0  2.9G   0% /dev/shm
tmpfs           2.9G   25M  2.8G   1% /run
tmpfs           5.0M  4.0K  5.0M   1% /run/lock
tmpfs           2.9G     0  2.9G   0% /sys/fs/cgroup
tmpfs           577M     0  577M   0% /run/user/107
tmpfs           577M     0  577M   0% /run/user/1000
可以看到系统空间已经增大到53G了。
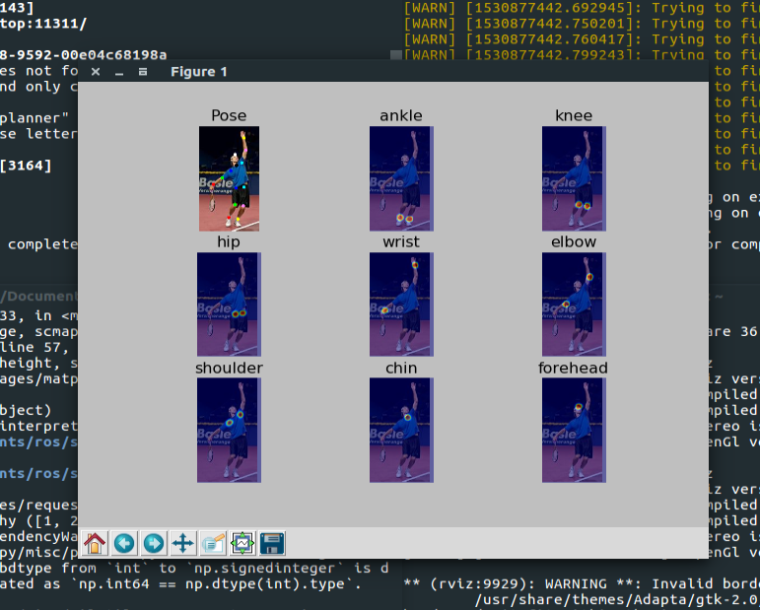
测试tensorflow
系统默认安装了Python 3.5的 tensorflow。下面用 pose-tensorflow 来测试一下。这个软件是一个利用 tensorflow 识别人体关键位置的程序。
下载程序
git clone https://github.com/eldar/pose-tensorflow安装依赖
pip3 install scipy scikit-image matplotlib pyyaml easydict cython munkres下载模型
# Download pre-trained model files
$ cd models/mpii
$ ./download_models.sh
$ cd -
运行模型
# Run demo of single person pose estimation
$ TF_CUDNN_USE_AUTOTUNE=0 python3 demo/singleperson.py
正常应该会显示下图
-
RE: 小强ROS机器人教程(27)___bw_auto_dock自动充电功能包的使用和实现原理posted in 产品服务
@caom26 这是由于缺少geometry_msgs包
sudo apt-get install ros-kinetic-geometry-msgs这个是kinetic版本的指令,如果不是kinetic版本需要根据版本进行修改。
如果有其他提示缺少软件包的情况也要对应安装。
也可以加入qq群538456117,交流