Navigation

    蓝鲸ROS机器人论坛

    • Register
    • Login
    • Search
    • Categories
    • Tags
    • Popular
    1. Home
    2. weijiz
    3. Posts
    ROS交流群
    ROS Group
    产品服务
    Product Service
    开源代码库
    Github
    官网
    Official website
    技术交流
    Technological exchanges
    激光雷达
    LIDAR
    ROS教程
    ROS Tourials
    深度学习
    Deep Learning
    机器视觉
    Computer Vision
    • Profile
    • Following 0
    • Followers 11
    • Topics 248
    • Posts 705
    • Best 11
    • Groups 1

    Posts made by weijiz

    • Google lidar slam algorithm Cartographer installation and bag package demo test

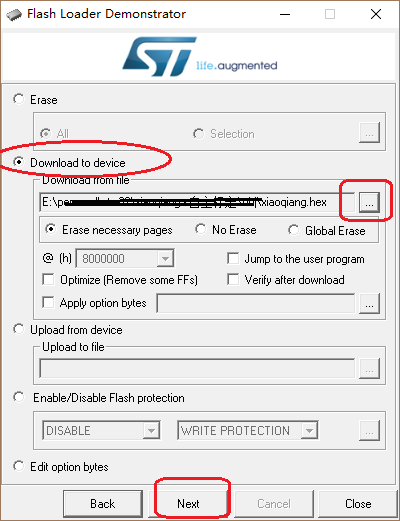
      Cartographer is a set of laser radar slam algorithm that was open sourced by Google in September 2016. Its precision and effect are among the best in the industry. This article will demonstrate how to use the ROS JADE version. First go to the tutorial demo video click to watch

      Steps:

      1. Installation dependency package
      # Install the required libraries that are available as debs.
      sudo apt-get update
      sudo apt-get install -y \
          cmake \
          g++ \
          git \
          google-mock \
          libboost-all-dev \
          libcairo2-dev \
          libeigen3-dev \
          libgflags-dev \
          libgoogle-glog-dev \
          liblua5.2-dev \
          libprotobuf-dev \
          libsuitesparse-dev \
          libwebp-dev \
          ninja-build \
          protobuf-compiler \
          python-sphinx


      2.Install ceres solver

      cd  ~/Documents
      git clone https://github.com/BlueWhaleRobot/ceres-solver.git
      cd ceres-solver
      mkdir build
      cd build
      cmake ..
      make -j
      sudo make install


      3.Install cartographer

      cd  ~/Documents
      git clone https://github.com/BlueWhaleRobot/cartographer.git
      cd cartographer
      mkdir build
      cd build
      cmake ..
      make -j
      sudo make install


      4.Install cartographer_ros

      cd ~/Documents/ros/src   # Please modify the path to your own ROS catkin workspace
      git clone https://github.com/BlueWhaleRobot/cartographer_ros.git
      cd ..
      catkin_make
      

      5.The installation is complete, start downloading the bag file for testing

      Click the link below to download the file and save it to your desktop.

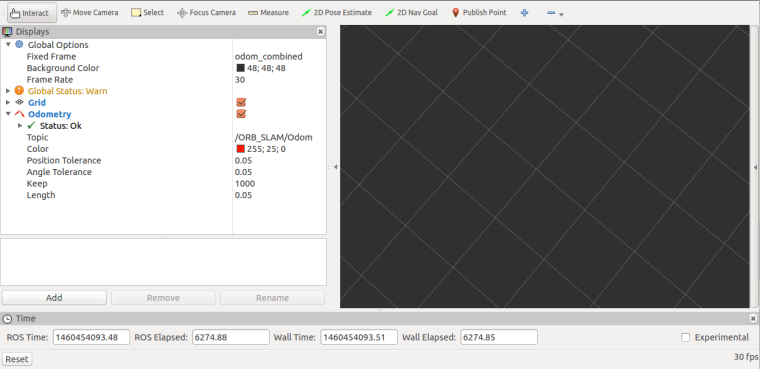
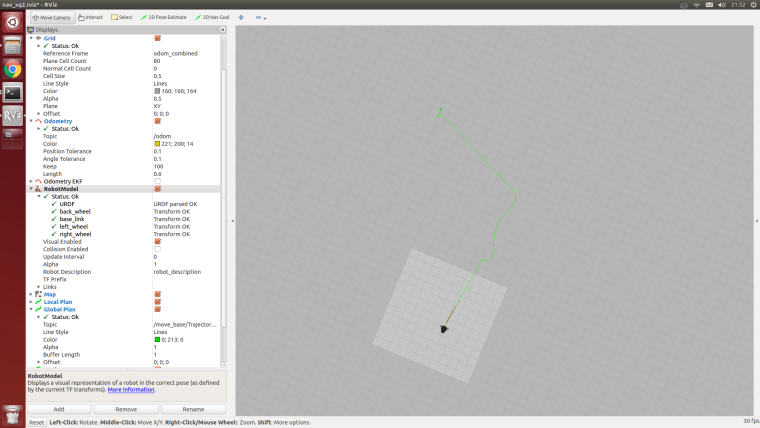
      6.Start the demo, you can see rviz start and start to build

      According to the computing power of the personal platform, the complete running time of this demo is generally between half an hour and one hour.

      roslaunch cartographer_ros demo_backpack_2d.launch  bag_filename:=${HOME}/Desktop/cartographer_paper_deutsches_museum.bag
      

      7.Save the map and end the test

      rosservice call /finish_trajectory "stem: 'test'"
      

      0_1537593736027_bd238d15-03bd-47b1-a12a-0697d46bb62c-image.png

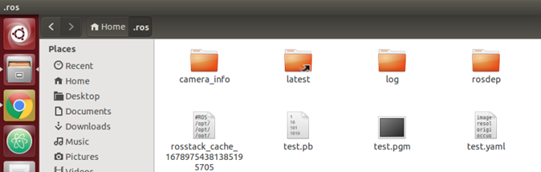
      The created map file will now be generated in the .ros folder in the home directory. These two files (pgm and yaml) can be loaded in the map_server in ros.

      posted in 产品服务
      weijiz
      weijiz
    • Xiaoqiang's remote assistance function

      In order to provide you with better service, Xiaoqiang, which was released after June 2016, has remote assistance software installed by default. Through this software our technicians can connect directly to your Xiaoqiang to solve technical problems for you. Of course, you can also use your remote assistance to control your own Xiaoqiang more conveniently. The following describes the specific use of Xiaoqiang’s remote assistance function.

      Confirm if remote assistance has been activated

      Execute htop at the terminal

      0_1537584414794_908a7249-f506-4f44-860e-11f1ef9cc362-image.png

      If you can see that the thread called SharpLink is running, then the remote assistance has already started. You can also confirm the status of the program and execute the instructions in a simpler way.

      sudo service sharplink status
      

      If the terminal displays:

      0_1537860411107_182344ca-9e98-4899-b69d-2ef3c76d51e5-image.png

      This indicates that the program has been executed normally.

      Remote connect to Xiaoqiang

      Check your ID
      Each xiaoqiang has an unique ID, please don't tell others. Because if you don't change the default password and someone knows your ID, then he can easily manipulate your xiaoqiang.

      The method of viewing the ID is also very simple, in the terminal execution

      sudo service sharplink restart
      bwgetid
      

      and the output would be

      D70101972AB9B7E674290A25485B3752EDA236F65EF2C4AC7E738390DA61903565E68B8C431B
      

      This very long string is your ID.

      If you would like us to provide remote assistance, just send this ID to our staff.

      Remote connect to your xiaoqiang

      After remembering your own ID, as long as your xiaoqiang has connected to the Internet, you can control it anywhere at any time, not by the LAN restrictions.

      First install Sharplink on your PC, which is cross-platform, both Linux and Windows can be installed. The specific method of installation is in the introduction of the project.

      After the installation is complete, the terminal executes

      ./SharpLink.exe 9999 [Your ID] 127.0.0.1 22
      

      This command maps the local 9999 port to the 22 port of xiaoqiang. Just connect to the local 9999 port and you’ll be connected to xiaoqiang’s 22 port. Of course you can also change 9999 to your preferred port.

      Now enter the following commands on local computer

      ssh -p 9990 xiaoqiang@127.0.0.1
      

      Wait for the connection to complete, then you can control the xiaoqiang.

      Enable and disable remote assistance

      If you want to disable remote assistance

      sudo systemctl disable sharplink
      

      if you want to enable remote assistance

      sudo systemctl enable sharplink
      
      posted in 产品服务
      weijiz
      weijiz
    • How Ubuntu sets static IP

      When searching for “Set Static IP” on the network, the results appear are set by modifying the file. This way it is easy to make the computer’s network unusable. It is recommended to use the following method to modify.

      The basic way of IP allocation

      The way IP is allocated is generally determined by the router. The router has two modes: DHCP mode and static IP. DHCP is a dynamic way of assigning IP. The default router is this mode. In this mode, the computer can also set its own static IP. Of course, there is no guarantee that it will succeed. For example, the IP set by yourself may be occupied by others. It is also possible that the router will not assign you the IP you set because of the confusion. Let’s talk about the various methods of setting static IP.

      Several ways to set static IP

      1. For router settings, setting up a static IP through a router is the easiest way. However, the premise is that you must have the management rights of the router, and the router should also support this setting function. First enter the address of the route in the browser and enter the management interface of the router.

      0_1537584263017_c9ac434a-a785-4269-a0c9-32c09f8b922e-image.png

      There are IP and MAC binding options in application management. Different router settings interface is different, you can find the specific location of this function.

      0_1537584278008_14b7f63d-997e-4081-a47b-a313935b8214-image.png

      Here you can set up a static IP.

      0_1537584291533_06384c5b-99d6-49cd-8415-e5bcc5d9d094-image.png

      1. Make settings on the computer After the computer is connected to the network, open the computer’s network manager and select your current network link, select Edit.

      0_1537584306566_97ff454d-fffa-48a6-a97a-cd50a1de696c-image.png

      0_1537584312402_b4c6f1b1-7d2c-4ad5-868c-6d6147b3bb56-image.png

      Click on IPv4 settings

      0_1537584324518_8e0f2d59-a617-4026-8200-d4c1c2426592-image.png

      Set up as shown below

      0_1537584337519_1631695e-5a91-496c-8d04-2e4d87645ae5-image.png

      192.168.0.199 is the local IP you want to set, so you can’t repeat it with other IPs on the LAN. 192.168.0.1 is the address of the router. This should be adjusted according to your own network conditions. After the setting is completed, click Save to open, then disconnect the network and reconnect. It will take effect only after reconnecting.

      0_1537584352648_98b8c913-ab41-43fb-91d0-14f024cd6c1e-image.png

      Enter ifconfig to view the current network information, you can find that my wireless network has been set to the IP just now.

      posted in 产品服务
      weijiz
      weijiz
    • Bluewhale ROS system image released

      This article lists all published Bluewhale ROS system images, users can choose according to their needs. The Bluewhale ROS system image is the image of the ROS system created by Bluewhale Robot based on Ubuntu ROS.
      It contains the ROS system and some common ROS packages. Ideal for ROS learning and developers. After the installation of the system is complete, you do not need to install and configure ROS. You can use it directly. The Bluewhale ROS image is also the system image of Xiaoqiang and can be installed directly on Xiaoqiang.

      Note: It's recommended to use Vmware Player

      System configuration requirements

      Minimum memory 1.5G recommended 2G, storage space at least 30G.

      Latest Kinetic Image

      xq_os_v2.0.8-2018-09-11.iso (kinetic version) can be used on Xiaoqiang Pro and your own computer.
      Download Address
      md5: 0a2d98bbf93d9556163df26fe42a072c

      xq_os_lungu_v2.0.5_2018-7-8 (kinetic version) can be used on Xiaoqiang XQ5 and can your own computer.
      Download address
      md5: 6e4dda157e2b96bf271f5f4e33e181e2

      xq_os_v2.0.6_mini_2018-07-19 (kinetic version) can be used on Xiaoqiang mini and your own computer.
      Download Address
      md5: 8696d1e74a10123568db0dab2c6e1e01

      Latest Jade Image

      xq_os_v1.0.3_2017-10-31 Can be used on Xiaoqiang Pro and your own computer
      Download Address
      md5: afbf1c8026733c4f8063778846c84e9b

      xq_os_v1.0.4_mini_2017-11-17 can only be used on Xiaoqiang mini
      Download Address md5: e874c78088211dff3feabd92f86275e7

      Precautions:

      After the download is completed, you must check md5 to confirm the integrity of the file. Note that when installing the image, the user name can only be xiaoqiang, otherwise there will be problems.

      Image installation method

      Install in a virtual machine

      Open the virtual machine software. Download link
      Click the create button to start creating a virtual machine. Note: please select Ubuntu 64 when select system.

      0_1537583952946_33415e59-eef1-4122-b5c2-048d17a8fd59-image.png

      According to the settings on the image, click Next when finished.

      0_1537583969421_83300551-5622-428c-8c02-ecd7ecf0b9f4-image.png

      Memory is recommended to be set to 2G, if memory is too small, system may not able to start.

      0_1537583983810_d61a29bb-57db-4034-959e-87578c285abd-image.png

      0_1537583990875_99e26d59-8b02-4288-b5be-f82722f91f01-image.png

      0_1537583998267_dcb3cba0-001b-445b-b447-e2a7609b8d72-image.png

      0_1537584006548_26a962a6-a28e-42b6-b6ed-708cbdf30d39-image.png

      After setting is complete, click the Settings button above. In the popup dialog, select Storage. Then click the CD icon on the right of the storage interface to set the image file.

      0_1537584025338_93d87a38-284b-42cb-a734-a69f1501c8f3-image.png

      After the setting is completed, click the start button on the main screen. Waiting to load the system’s selection interface.

      0_1537584038958_744b45fd-b6b4-4ea7-a087-4baa9c54ac0e-image.png

      If you want to install the system, select the second option, then press Enter to confirm. Wait for the system installer to load. This process is related to your machine’s performance. If the machine’s performance is poor, it may take longer to load.

      0_1537584056029_554aa399-42ff-4479-ae35-df80940ae805-image.png

      After the loading is complete, set the user information, note that the username can only be xiaoqiang, hostname can be set at will.

      0_1537584070086_e4352d92-12cb-4409-9a1a-890ef2edece9-image.png

      Click Next to enter the partition interface. Select the hard disk you want to install and click the Delete button.

      0_1537584081893_13263742-6900-49fc-a646-aa27c6a0d417-image.png

      Select the new partition in the hard disk again.

      0_1537584093765_7300af68-85aa-48d8-9fb1-a41c19b32acd-image.png

      Click the arrow to go to the next.

      0_1537584106397_89c3671d-577d-43e3-bc6e-ddc465e663b2-image.png

      Select the newly created partition again, set the mount point on the right, click the arrow again to enter the next step.

      0_1537584120797_d7739de3-7e92-4d00-99b0-467cdd99733e-image.png

      Note: please check transfer user configuration files

      Click on the next lower right corner to continue. If you still want to set up other partitions, follow the above steps.

      0_1537584133195_af43a8d6-4a72-43c7-a00f-d6e4e295367a-image.png

      Wait for the system to restart after the installation is complete.

      Install on actual computer

      The installation process is generally the same as the installation of Ubuntu. Here’s how to use USB disk to install the system. First you need to prepare a blank partition on your hard disk to install the system. Then download ultroiso . Download address. Insert your USB disk into your computer. Open iso file with software. In the menu bar, select Start -> Write Disk Image, the popup interface is as follows.

      0_1537584164843_89d14f9a-94c9-4f7b-9ab3-e6b6165b1ff3-image.png

      Click Write and wait for the write to complete.

      After writing, insert the USB disk into the computer where you want to install the system. Enter the BIOS option at startup and select Boot from USB drive. The subsequent installation process is basically the same.

      Note that in the partition, set boot as a separate partition, and then select the grub installation location. Otherwise, the system cannot be started after the installation is complete. There are also differences between partitions for different boot modes. Start with grub to give /boot a separate partition, boot with uefi to give /boot/efi a separate partition

      Download The Virtual Machine

      posted in 产品服务
      weijiz
      weijiz
    • Recalibrate the chassis IMU

      Sorry: This tutorial is for users who purchased after September 2016

      Applicable situation:

      Before shipment, each chassis IMU has been calibrated, and theoretically normal use does not require recalibration. If after a long period of use of the chassis, it is found that the odom angle at the output of the chassis begins to have a serious flow, follow the steps below to recalibrate the chassis IMU.

      Steps:

      1. Place the chassis horizontally stationary, the following calibration process can not move or hit the chassis.

      2. In the local virtual machine ssh login, enter the following command.

      ssh xiaoqiang@192.168.0.xxx   -X
      rostopic echo /imu_cal
      
      1. Open a new window in the local virtual machine and login to the host again. Enter the following command:
      ssh xiaoqiang@192.168.0.xxx   -X
      rostopic pub /imu_cal std_msgs/Bool '{data: true}' -1
      
      1. Wait 10 seconds. When the window in step 1 shows the following figure, it indicates that the calibration procedure has been started. Please terminate the topic issue command in step 2.

      0_1537583834355_84a879a9-6b30-4fae-92db-d858df906c05-image.png

      1. Wait 2 minutes, IMU re-calibration is completed, now you can continue normal use without restart.
      posted in 产品服务
      weijiz
      weijiz
    • Upgrade chassis ros driver package xqserial_server

      1.ssh login Xiaoqiang host, enter Xiaoqiang ros working directory

      ssh xiaoqiang@192.168.xxx.xxx   #请将xxx.xxx换成实际ip
      cd Documents/ros/src/
      
      1. Enter ros driver package xqserial_server, update software
      cd xqserial_server/
      git stash
      git pull
      cd ..
      cd ..
      catkin_make
      
      1. Restart ros node, update completed
      sudo service startup stop
      sudo service startup start
      
      posted in 产品服务
      weijiz
      weijiz
    • Xiaoqiang Bottom Driver Firmware Download and Upgrade Methods

      Users received Xiaoqiang after March 11, 2017. Please refer to this post to upgrade the firmware. If you cannot upgrade, please ask for customer service before using the following method. Manually upgrade risk, please consult customer service before operation.

      Xiaoqiang v4_3.hex ,Right click “Save As…” and download it as xiaoqiang.hex

      The firmware is an ordinary hex file and supports any stm32 downloader. After stm32 is burned, please complete the host computer update operation according to the upgrade chassis ros driver package xqserial_server. Finally recalibrate the chassis IMU according to this tutorial.

      The following describes the use of Xiaoqiang’s own method of using USB to serial port to write stm32. After this upgrade, you can use the simple upgrade method in this post.

      1. Find a Windows computer, download and install this stm32flash software

      flash_loader_demo_v2.8.0.exe , right click “Save as…” to start download

      1. After power off the chassis, remove the VMOT GND wire on the middle of the green motor driver board, slowly pull out the stm32 core board on the chassis, and then adjust the two short caps on the board according to the following figure.

      0_1537583526573_cd686f72-415f-4f85-8df4-1e509952c581-image.png

      0_1537583536557_ecd8118c-6c27-4452-ba25-ea5dd13ba183-image.png

      1. Insert the stm32 board after adjustment in the second step into the chassis. Note that the pins need to be fully aligned with the chassis, and then the chassis is powered on.

      2. Unplug the usb head of the USB to serial port module on Xiaoqiang from the host computer and insert it into the windows computer. Open the Flash Loader Demo program from the Start Programs menu. All Programs->STMicroelectronics->Demonstrator GUI, the following interface appears.

      0_1537583559874_47aef954-4922-4b27-b80a-152769420bba-image.png

      1. Select the default settings, always point next (If you click next failure, re-power the chassis and try again), the following interface appears:

      0_1537583575156_30bc57b0-975a-4141-b54e-ce6e76067255-image.png

      1. Select Download to device, select the hex file provided above, click Next to start the download.

      0_1537583588645_1727a520-693c-4a13-ad24-a3c3ee2a6282-image.png

      0_1537583594284_f023947b-b5d1-47ed-bb46-c5642812776b-image.png

      1. After the burning is completed, please close the software, power off the chassis, and insert USB to serial port back to Xiaoqiang’s host computer.

      2. Slowly unplug the stm32 core board on the chassis again, adjust the two shorting caps on the board back to the initial state, insert it back into the chassis (pins need to be fully aligned with the insertion base), the green motor driver board The middle “VMOT GND” wiring is plugged in, stm32 upgrade is completed!

      0_1537583613286_7ac5a85b-beee-4510-8000-81074945b70b-image.png

      1. Chassis re-powered, according to the tips at the beginning of the article to complete the upgrade of the host computer.
      posted in 产品服务
      weijiz
      weijiz
    • Daily maintenance instructions

      Charging instructions

      After disconnecting the battery from the chassis, charge it with the dedicated battery charger. It takes about 5 hours to fully charge the battery, and the indicator will change from red to blue when full. The two output wires of the battery are connected in parallel, so both heads can be used for charging and discharging (the charger has only one male), and the battery supports simultaneous charge and discharge

      Wheel loosening solution

      0_1537583396236_9e5f23be-75b4-4a80-b4cb-e010530e3c12-image.png

      Solution: Re-tighten the screws in the figure above

      posted in 产品服务
      weijiz
      weijiz
    • xiaoqiang tutorial (23) ROS introductions

      Xiaoqiang Homepage

      Learning ROS for Robotics Programming - Second Edition.pdf

      This tutorial is very basic, although the book uses hydro as an example, but also fully compatible with the kinetic version. Just replace the hydro string in the code example in the book with kinetic. After completing the Xiaoqiang tutorial (1), if you are not familiar with ROS, please read Chapters 2 and 3 of this book.

      Xiaoqiang Homepage
      Back To Index

      posted in 产品服务
      weijiz
      weijiz
    • xiaoqiang tutorial (22) Operating 6 DOF robotic arm

      Xiaoqiang Homepage

      6 degrees of freedom robot arm resources. Please read the serial communication protocol of the secondary development part in the resources. Although the following is the usb hid communication method, the command format is the same.

      The following will operate the 6-DOF arm to complete the 3 sets of actions stored on the main control board.

      Control principle: Xiaoqiang host uses the usb to connect the robot master control board, user sends a topic named robot_arm/cmdstring, this topic content is the control command, and the robot_arm node is responsible for sending the topic content to the master control board of the robot arm via USB protocol.

      1. Run the robot_arm node

      rosrun robot_arm move.py
      

      If the result is normal, the robot arm will perform action 0 (the default state), and the command window will show the following

      xiaoqiang@xiaoqiang-desktop:~/Documents/ros$ rosrun robot_arm move.py 
      Opening robot arm device
      Manufacturer: MyUSB_HID
      Product: LOBOT
      Serial No: 8D9823654852
      Run the zero group action
      

      2. Construct robot_arm/cmdstring topic

      robot_arm/cmdstring This topic type is std_msg/String. According to the secondary development data of the robot arm provided above, we can know that the 6-DOF control protocol is represented by an unsigned byte array. Therefore, we slightly modify it here to directly convert the hex value of this array into a string. Packaged into the topic command. The transformation method uses the byte array representation of python to string together the hex encodings of each element in the array, and then replace 0x with \x

      # E.g: [0x55,0x55,0x05,0x06,0x00,0x01,0x00] This control command array, converted to robot_arm/cmdstring content is '\x55\x55\x05\x06\x00\x01\x00'
      # Tip: If you don't understand it, you can use Python's map function to help convert it.
      map(ord,'\x55\x55\x05\x06\x00\x01\x00')
      

      We want to control the robot arm to complete 3 actions. The contents of these three strings are as follows:

      '\x55\x55\x05\x06\x00\x01\x00'
      
      '\x55\x55\x05\x06\x01\x01\x00'
      
      '\x55\x55\x05\x06\x02\x01\x00'
      

      3. Publish motion commands

      Open a new terminal, because it is a demonstration, so we directly using the pub function of rostopic, the above string command packaged into a topic sent to the robot_arm node

      # Action 1:
      rostopic pub robot_arm/cmdstring std_msgs/String '\x55\x55\x05\x06\x00\x01\x00'
      # Action 2:
      rostopic pub robot_arm/cmdstring std_msgs/String '\x55\x55\x05\x06\x01\x01\x00'
      # Action 3:
      rostopic pub robot_arm/cmdstring std_msgs/String '\x55\x55\x05\x06\x02\x01\x00'
      

      4. There is no video for the sport result, you need to operate it yourself. If you feel unsatisfactory with the movement, please refer to our servo control posts: 电机控制与缓动函数

      Xiaoqiang Homepage
      Back To Index

      posted in 产品服务
      weijiz
      weijiz
    • xiaoqiang tutorial (21) get USB camera 30fps 1080p image stream and 120fps VGA resolution image stream

      Xiaoqiang Homepage

      Xiaoqiang’s default USB camera node publishes a 30fps VGA (640*480) image stream that can satisfy most visual tasks. The USB camera hardware can actually output 120fps VGA image stream and up to 30fps 1080p image stream. This article will introduce how to obtain these two type of the image.

      1.Upgrade usb_cam node source code

      Taking into account the USB2.0 bandwidth, output 120fps VGA video and 30fps 1080p video, need to use mjpeg format. For Xiaoqiang’s own USB camera ROS driver package usb_cam, it can not read Xiaoqiang usb camera in mjpeg way, so we need to upgrade usb_cam first. For the upgrade method, please refer to this post

      2.Test 120fps VGA video output

      First please turn off Xiaoqiang’s startup task

      sudo service startup stop
      

      Modify the contents of the ov2610mjpg.launch file in the usb_cam package as shown below

      <launch>
        <node name="camera_node" pkg="usb_cam" type="usb_cam_node">
          <param name="video_device" value="/dev/video0" />
          <param name="image_width" value="640" />
          <param name="image_height" value="480" />
          <param name="framerate" value="120" />  
          <param name="pixel_format" value="mjpeg" />
          <param name="camera_frame_id" value="ov2610" />
          <param name="io_method" value="mmap"/>
        </node>
      </launch>
      

      Launch the above launch file

      roslaunch usb_cam ov2610mjpg.launch
      

      Open a new window to print the published image topic frame rate

      rostopic hz /camera_node/image_raw
      

      Normal output similar to the following figure

      subscribed to [/camera_node/image_raw]
      average rate: 99.497
          min: 0.004s max: 0.016s std dev: 0.00246s window: 98
      average rate: 99.324
          min: 0.004s max: 0.016s std dev: 0.00240s window: 198
      average rate: 99.385
          min: 0.004s max: 0.016s std dev: 0.00236s window: 297
      average rate: 99.247
          min: 0.004s max: 0.016s std dev: 0.00236s window: 396
      average rate: 99.302
          min: 0.004s max: 0.016s std dev: 0.00232s window: 495
      average rate: 99.296
          min: 0.004s max: 0.016s std dev: 0.00231s window: 595
      average rate: 99.249
          min: 0.004s max: 0.016s std dev: 0.00230s window: 694


      The above output shows that the camera frame rate is about 99fps and does not reach 120fps. This is due to the influence of ambient light, which can reach 120 frames if the ambient light is sufficient.

      2.Test 1080p video output at 30fps

      First please stop Xiaoqiang’s startup service

      sudo service startup stop

      Modify the contents of the ov2610mjpg.launch file in the usb_cam package as shown below.

      <launch>
        <node name="camera_node" pkg="usb_cam" type="usb_cam_node">
          <param name="video_device" value="/dev/video0" />
          <param name="image_width" value="1920" />
          <param name="image_height" value="1080" />
          <param name="framerate" value="30" />  
          <param name="pixel_format" value="mjpeg" />
          <param name="camera_frame_id" value="ov2610" />
          <param name="io_method" value="mmap"/>
        </node>
      </launch>
      

      Launch the above launch file

      roslaunch usb_cam ov2610mjpg.launch
      

      Open a new window to print the published image topic frame rate.

      rostopic hz /camera_node/image_raw
      

      Normal output similar to the following figure.

      xiaoqiang@xiaoqiang-desktop:~$ rostopic hz /camera_node/image_raw
      subscribed to [/camera_node/image_raw]
      average rate: 29.986
          min: 0.028s max: 0.039s std dev: 0.00318s window: 30
      average rate: 29.917
          min: 0.028s max: 0.039s std dev: 0.00296s window: 59
      average rate: 29.912
          min: 0.028s max: 0.039s std dev: 0.00292s window: 89
      average rate: 29.853
          min: 0.027s max: 0.042s std dev: 0.00308s window: 119
      average rate: 29.874
          min: 0.027s max: 0.042s std dev: 0.00283s window: 149
      average rate: 29.839
          min: 0.027s max: 0.042s std dev: 0.00282s window: 179
      average rate: 29.849
          min: 0.027s max: 0.042s std dev: 0.00282s window: 202
      

      Xiaoqiang Homepage
      Back To Index

      posted in 产品服务
      weijiz
      weijiz
    • xiaoqiang tutorial (20) get vision odometer and display the xiaoqiang track in the rviz

      Xiaoqiang Homepage

      1.Local ssh preparation section (Xiaoqiang host is the controlled end, local refers to remote control end)

      ssh remote login Xiaoqiang host, the following operation is entered in this ssh window if without special statement

      ssh xiaoqiang@xxx.xxx.xxx.xxx  
      # Please replace xxx.xxx.xxx.xxx with Xiaoqiang's current actual ip address
      # Start multi-window manager
      screen
      

      Screen usage please refer to this tutorial

      Check if the orb_init package has installed

      rospack find orb_init
      

      Delete if it exists

      cd ~/Documents/ros/src
      rm -r orb_init
      

      Download the latest version of orb_init from the Bluewhale Open Source Software Store and install it

      cd ~/Documents/ros/src
      git clone https://github.com/BlueWhaleRobot/orb_init.git
      

      Check whether startup task is running

      sudo service startup status
      

      If runing is displayed, it means normal. If stopped is displayed, then restart it

      sudo service startup start
      # If you want to close this task, you can use this command
      sudo service startup stop
      

      Check system status

      rostopic echo /system_monitor/report
      

      If it is normal, the display is as follows

      imageStatus: True
      odomStatus: True
      orbStartStatus: False
      orbInitStatus: False
      orbScaleStatus: False
      brightness: 0
      power: 12.34432
      

      If it is abnormal, restart the startup task.

      sudo service startup restart
      

      Start ORB_SLAM in another command window in screen

      roslaunch ORB_SLAM ov2610.launch
      

      Return to the previous screen window and wait for ORB_SLAM to start

      rostopic echo /system_monitor/report
      # If ORB_SLAM is started, the following is displayed
      orbStartStatus: True
      

      2.Native local operation section

      This machine has been installed ros jade version of the robot system, the computer operating system is ubuntu14.04, ros can be installed to refer to this tutorial.

      Add this machine to Xiaoqiang’s ros network, open a command line terminal locally, and add Xiaoqiang’s ip in the local hosts file.

      sudo gedit /etc/hosts
      Add to
      xxx.xxx.xxx.xxx xiaoqiang-desktop
      Save and exit
      Please replace xxx.xxx.xxx.xxx with Xiaoqiang's current actual ip address
      

      Join ros LAN

      export ROS_MASTER_URI=http://xiaoqiang-desktop:11311
      rostopic list
      

      If the join is successful, the command line will output the topic on Xiaoqiang’s host. For more information about setting up multiple ros machines online, please refer here.

      Download the rviz configuration file. This configuration file can also be copied directly from the orb_init package on Xiaoqiang’s host to view the output path of the Xiaoqiang vision system.

      Enter in local command line terminal

      rviz
      

      When the window opens, click on file->open in the upper left corner and select the above downloaded configuration file. At this time the interface should appear as shown below

      0_1537582520832_6515f3a5-573b-4a67-8f2a-c3948b8ef493-image.png

      3.In ssh in the screen to open a new window, used to start orb_init Xiaoqiang host, before the start to ensure Xiaoqiang around two square meters of free space, Xiaoqiang will move for some time

      rosrun orb_init orb_scale.py
      

      After orb_init initialization is completed, orb_init cannot be closed. It will continue to output the visual odometer topic. This topic is the content that the local rviz needs to display. At this time, a new window is opened to check the system status.

      rostopic echo /system_monitor/report
      

      If it is normal, the display is as follows

      imageStatus: True
      odomStatus: True
      orbStartStatus: True
      orbInitStatus: True
      orbScaleStatus: True
      brightness: 0
      power: 12.34432
      

      At this point we have already acquired Xiaoqiang’s visual odometer

      4.In ssh in the screen to open a new window, used to control Xiaoqiang move

      rosrun nav_test control.py
      

      Use the arrow keys to control the movement of Xiaoqiang. Spacebar is stopped. Ctrl + C exits the program.

      5.As Xiaoqiang moves, the rviz interface on the local machine will be updated to show Xiaoqiang’s trajectory in real time. Our own test video is here. For more information on how to use rviz, see here.

      Xiaoqiang Homepage
      Back To Index

      posted in 产品服务
      weijiz
      weijiz
    • Xiaoqiang tutorial (19) usage of NLlinepatrol_planner

      Xiaoqiang Homepage

      The NLlinepatrol_planner included with Xiaoqiang’s host is a global path planner for visual navigation. According to Xiaoqiang’s output visual trajectory (for visual trajectory files, please refer to this post), it can output a global path link to Xiaoqiang’s current position and destination target point. It will be demonstrated below using a simulation example. The main idea is: a python script publishes virtual visual odometers and related tf trees. Another python script publishes target points to the move_base node. Finally, the move_base node obtains a global path by calling NLlinepatrol_planner and displays it in rviz.

      1. Configure NLlinepatrol_planner

      To use NLlinepatrol_planner, you need to provide visual trajectory file that NLlinepatrol_planner will read and (transformation parameters) file that is required for the coordinate transformation of the track, both files should be placed in the data folder under NLlinepatrol_planner, the file name is arbitrary, by configuring the related parameters in move_base You can specify the file that NLlinepatrol_planner reads, as explained below.

      0_1537580986505_714f44c3-a806-4a4b-b186-823cd43cd688-image.png

      In the figure above, nav1.csv is the visual trajectory file and TFSettings.txt is the transformation parameter file (the first row is the 9 elements of the rotation matrix, the array elements are arranged in the row of the c language, and the second row is the xyz of the translation vector. Components, the third one is the scale factor)

      2.Make a move_base launch file

      In this tutorial, we have provided the relevant launch file in the launch folder of the nav_test package. The file name is xq_move_base_blank_map2.launch. This launch file can be used as a template during actual use. Please pay attention to the following figure.

      0_1537581045003_d6b7246a-e65e-49c7-bbb7-c78ded924588-image.png

      The launch file will call the xq_move_base2.launch file. The xq_move_base2.launch file is also in the current directory. The contents are as follows:

      <launch>
          <node pkg="move_base" type="move_base" respawn="false" name="move_base" output="screen">
          <param name="base_global_planner" value="NLlinepatrol_planner/NLlinepatrolPlanner"/>
          <rosparam file="$(find nav_test)/config/NLlinepatrol/costmap_common_params.yaml" command="load" ns="global_costmap" />
          <rosparam file="$(find nav_test)/config/NLlinepatrol/costmap_common_params.yaml" command="load" ns="local_costmap" />
          <rosparam file="$(find nav_test)/config/NLlinepatrol/local_costmap_params.yaml" command="load" />
          <rosparam file="$(find nav_test)/config/NLlinepatrol/global_costmap_params.yaml" command="load" />
          <rosparam file="$(find nav_test)/config/NLlinepatrol/base_local_planner_params.yaml" command="load" />
          <rosparam file="$(find nav_test)/config/NLlinepatrol/base_global_planner_params.yaml" command="load" />
        </node>
      </launch>
      

      Through the above, it is found that by setting the value of the base_global_planner parameter to specify the global path planner as NLlinepatrol_planner, it can also be seen that the other parameter configuration files of move_base are stored in the config/NLlinepatrol path in the nav_test package.

      0_1537581122849_f6fc1c88-ee13-4376-a647-9ccd84c4ff96-image.png

      For the above image, the file we need to change is base_global_planner_params.yaml, because the contents of this file correspond to the parameters actually loaded by the NLlinepatrol_planner runtime. The default content is as follows:

      NLlinepatrolPlanner:
          DumpFileName: AnnDump.sav
          strTFParsFile: TFSettings.txt
          TxtFileName: nav1.csv
          ANN_Dump_Bool: false
          connect_distance: 0.3
      

      TxtFileName specifies the name of the loaded visual track file, strTFParsFile specifies the name of the loaded transformation parameter file, and connect_distance sets the maximum distance between the connected points in the visual track file. (The distance between two points after the coordinate transformation is smaller than the value is considered as There is no obstacle between the two points, you can directly connect), ANN_Dump_Bool value is false to load the trajectory and transformation parameters from the txt file, if it is true then load from the dump file specified by the DumpFileName parameter (When using the same visual track file multiple times , start from the dump file after the second time can be accelerated)

      3. Start using after configuration

      A. Because we are virtual running this time, some of the published topics are of no practical significance but conflict with Xiaoqiang’s default ROS driver. So now we need to stop all ROS running instances.

      sudo service startup stop
      roscore
      

      B. Start virtual topic and Xiaoqiang model files

      rosrun orb_init temp.py // Publish odom 
      roslaunch xiaoqiang_udrf xiaoqiang_udrf.launch // Start the model
      

      C. Launch the xq_move_base_blank_map2.launch file produced above

      roslaunch nav_test xq_move_base_blank_map2.launch
      

      D. Start rviz and open the ros/src/nav_test/config/nav_xq2.rviz configuration file

      rviz
      

      E. Launch virtual goal publishing node (based on squre.py modification in inertial navigation)

      rosrun nav_test NLlinepatrol.py
      

      4. Now that the target global path trajectory (green line) has appeared in rviz and you want to test other goal targets, modify the code in NLlinepatrol.py.

      0_1537581365157_ba96895e-5e14-419c-9aba-6b5d29466c05-image.png

      Xiaoqiang Homepage
      Back To Index

      posted in 产品服务
      weijiz
      weijiz
    • RE: 谷歌cartographer使用速腾聚创3d激光雷达数据进行三维建图

      @gahoo 在调用此服务时是否正确设置了调用参数。此时终端是不是有错误提示?
      我把你之前的问题恢复了。如果别人有类似问题也可以做一个参考。

      posted in 激光雷达
      weijiz
      weijiz
    • RE: google激光雷达slam算法Cartographer的安装及bag包demo测试

      @gahoo 你可以在配置文件里面把use_imu_data 设置成false这样就不适用imu了

      posted in 产品服务
      weijiz
      weijiz
    • RE: 谷歌cartographer使用速腾聚创3d激光雷达数据进行三维建图

      @gahoo 没有遇到过这个情况,不太清楚

      posted in 激光雷达
      weijiz
      weijiz
    • xxx is neither a launch file in package nor xxx is a launch file name 错误解决

      ROS使用中会遇到这样的错误。一般是在启动launch文件时出现这个错误。这个错误产生的原因时没有找到你要启动的软件包或者你要启动的launch文件。可能的原因有以下几个

      1. 没有安装对应的软件包
        看看你的src文件夹内是不是有对应的软件包

      2. 软件包名称输入错误
        输入软件包名称和launch文件名称时可以使用tab键自动补全。

      3. 环境变量设置有问题
        在执行roslaunch前是否执行了source /opt/ros/kinetic/setup.bash(以kinetic版本为例)和source你的工作空间。
        如果是通过修改~/.bashrc文件的方式改变环境变量。对应的修改要重新开启一个命令行窗口后才会生效。
        可以通过roscd 你的包来测试一下环境变量是否有问题。如果正常,那么你应该能通过这种方式进入自己的软件包。

      4. 不是一个有效的ROS软件包
        比如自己写的一个ROS包,但是没有添加CMakeLists.txt文件和package.xml文件

      posted in 技术交流
      weijiz
      weijiz
    • RE: google激光雷达slam算法Cartographer的安装及bag包demo测试

      @gahoo 在 google激光雷达slam算法Cartographer的安装及bag包demo测试 中说:

      xiaoqiang_udrf

      从错误提示看你是缺少小强的模型包。那个源是针对小强修改过的。你可以修改配置文件让其不适用小强模型包,也可下载一个小强模型包安装上。
      小强模型包

      posted in 产品服务
      weijiz
      weijiz
    • RE: google激光雷达slam算法Cartographer的安装及bag包demo测试

      @gahoo protobuf最新的3.6.x分支有一个bug。已经更新了编译指令,按照现在的操作应该就可以了。

      posted in 产品服务
      weijiz
      weijiz
    • 如何优雅的从源码安装ros软件包

      当我们从源码安装ROS软件包时经常会遇到一个问题 xxxx-config.cmake没有找到。这是由于这个软件包依赖于其他软件包,但是被依赖的软件包没有安装。一般就要根据xxx-config去推测到底是哪个包没有安装。由于系统版本不一样,软件包推测起来有时也比较困难。而且安装完一个再编译一次,出错再安装,效率非常低。实际上ROS可以自动处理这些问题。下面以velodyne雷达驱动为例说明一下安装方法。

      官方的velodyne只发布到了kinetic版本,melodic版本需要从源码编译。

      首先下载源码到工作空间的src文件夹

      cd [你的工作空间]/src
      git clone https://github.com/ros-drivers/velodyne
      

      使用rosdep自动安装依赖

      cd ..
      rosdep install --from-paths src --ignore-src -r -y
      

      根据提示输入管理员密码,程序开始自动安装依赖。正常终端会如下输出。可以看到rosdep自动安装了libpcap0.8-dev这个包。

      shunya@hikey970:~/ros$ rosdep install --from-paths src --ignore-src -r -y
      executing command [sudo -H apt-get install -y libpcap0.8-dev]
      [sudo] password for shunya:
      Reading package lists... Done
      Building dependency tree
      Reading state information... Done
      The following additional packages will be installed:
        libpcap0.8
      The following NEW packages will be installed:
        libpcap0.8 libpcap0.8-dev
      0 upgraded, 2 newly installed, 0 to remove and 16 not upgraded.
      Need to get 348 kB of archives.
      After this operation, 967 kB of additional disk space will be used.
      Get:1 http://cdn-fastly.deb.debian.org/debian stretch/main arm64 libpcap0.8 arm64 1.8.1-3 [123 kB]
      Get:2 http://cdn-fastly.deb.debian.org/debian stretch/main arm64 libpcap0.8-dev arm64 1.8.1-3 [224 kB]
      Fetched 348 kB in 6s (53.5 kB/s)
      Selecting previously unselected package libpcap0.8:arm64.
      (Reading database ... 143487 files and directories currently installed.)
      Preparing to unpack .../libpcap0.8_1.8.1-3_arm64.deb ...
      Unpacking libpcap0.8:arm64 (1.8.1-3) ...
      Selecting previously unselected package libpcap0.8-dev.
      Preparing to unpack .../libpcap0.8-dev_1.8.1-3_arm64.deb ...
      Unpacking libpcap0.8-dev (1.8.1-3) ...
      Processing triggers for libc-bin (2.24-11+deb9u3) ...
      Processing triggers for man-db (2.7.6.1-2) ...
      Setting up libpcap0.8:arm64 (1.8.1-3) ...
      Setting up libpcap0.8-dev (1.8.1-3) ...
      Processing triggers for libc-bin (2.24-11+deb9u3) ...
      #All required rosdeps installed successfully


      这时候就可以开始编译了

      catkin_make
      

      等待编译完成就可以了。

      posted in 技术交流
      weijiz
      weijiz
    • 1
    • 2
    • 21
    • 22
    • 23
    • 24
    • 25
    • 35
    • 36
    • 23 / 36