@rolandyin https://github.com/BluewhaleRobot/cartographer_ros
ROS交流群
ROS Group 产品服务
Product Service 开源代码库
Github 官网
Official website 技术交流
Technological exchanges 激光雷达
LIDAR ROS教程
ROS Tourials 深度学习
Deep Learning 机器视觉
Computer Vision
ROS Group 产品服务
Product Service 开源代码库
Github 官网
Official website 技术交流
Technological exchanges 激光雷达
LIDAR ROS教程
ROS Tourials 深度学习
Deep Learning 机器视觉
Computer Vision
Posts made by weijiz
-
RE: 谷歌cartographer使用速腾聚创3d激光雷达数据进行三维建图posted in 激光雷达

-
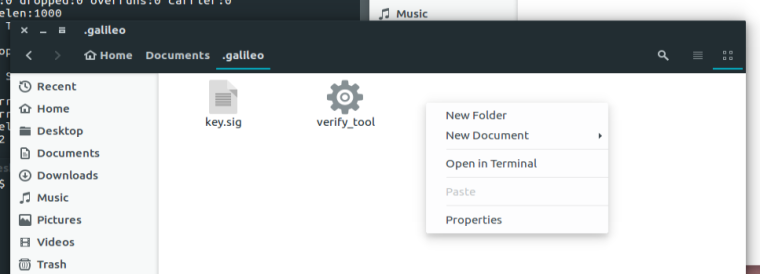
如何获取伽利略证书posted in 产品服务
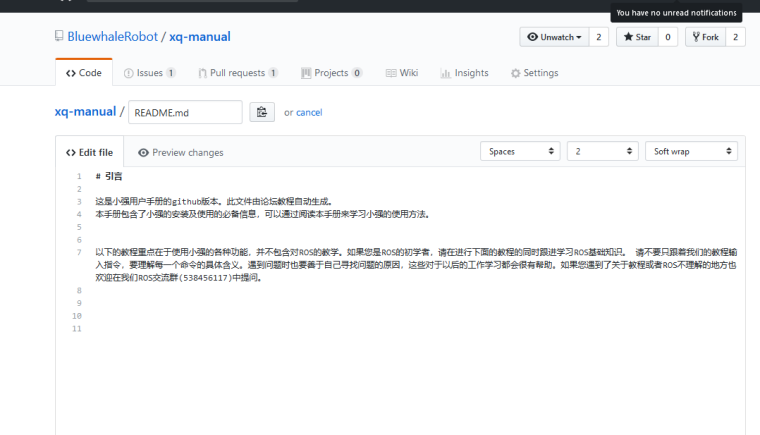
伽利略导航系统在运行时会检查证书。小强用户可以向管理员免费索取。下面介绍一下证书的获取和使用方法
获取证书
通过QQ联系管理员(1024313822),在自己的小强上运行ifconfig,并把结果截图发给管理员
管理员之后会给你发送证书文件
证书的使用
把证书文件
key.sig文件放入Documents/.galileo文件夹里面。然后运行此文件夹中的verify_tool文件。注意.galileo是一个隐藏文件夹。可以通过按 Ctrl + H显示隐藏文件夹。
在此文件夹按住shift同时点击鼠标右键,在菜单中选择Open in Terminal
输入
./verify_tool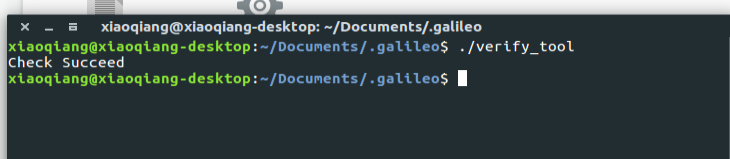
如果证书没问题,就会有如上的输出。
常见的问题
Q: 证书验证失败
A: 小强Pro用户需要保证的自己的网络设备有enp2s0设备。在有些特殊情况下,有时候会没有对应的网络设备。可以参照这里的文档添加udev规则修改网络设备名称。比如对于小强mini用户可以创建
/etc/udev/rules.d/70-persistent-net.rules文件。在文件中添加SUBSYSTEM=="net", ACTION=="add", DRIVERS=="?*", ATTR{address}=="00:e0:4c:68:4a:ff", ATTR{dev_id}=="0x0", ATTR{type}=="1", NAME="enp2s0"其中
00:e0:4c:68:4a:ff替换成自己的mac地址。修改完后重启生效。Q: 需要什么版本的系统
A: 目前只支持Ubuntu 16.04。对于14.04以及比较老的系统需要更新系统后使用。更新系统请参考这里
-
RE: 在Android中使用ROSposted in 技术交流
@bitliuyu 在 在Android中使用ROS 中说:
lass<android.app.AppComponentFactory>
从错误看不像是gradle的设置问题。你可以把你的代码发github上,我给你看看。
-
提Pull Request得衬衫活动posted in 讨论区
Github开展了一个提Pull Request得衬衫的活动。简单说就是在10月份内在开源项目提够5个Pull Request就可以送衬衫。
活动页面但是提Pull Request是什么?提交会不会很困难?
简单说就是给开源项目贡献代码。我们的小强文档实际上也是一个开源项目。各位同学在使用小强,学习教程的时候如果觉得文档有错误或者有需要优化的地方可以直接进行修改。修改提交后就可以算为一个Pull Request了。
下面是这个活动的具体参与方法。
-
在Android中使用ROSposted in 技术交流
由于ROS提供了Android的对应的开发库,我们可以方便的在Android中开发相应的ROS客户端程序。下面介绍一下在Android中使用ROS库的方法。
1. 开发环境配置
Android的开发一般使用Android Studio. 其ROS相关的配置方式可以有两种。一种是在ROS环境中使用,另一种是给普通的Android App添加上ROS的依赖库。第二种方式可以在开发机器没有安装ROS的条件下进行开发。由于我使用Windows系统开发Android,所以这里使用第二种方式。
1.创建Android App项目
首先在Android Studio中创建一个普通的Android App
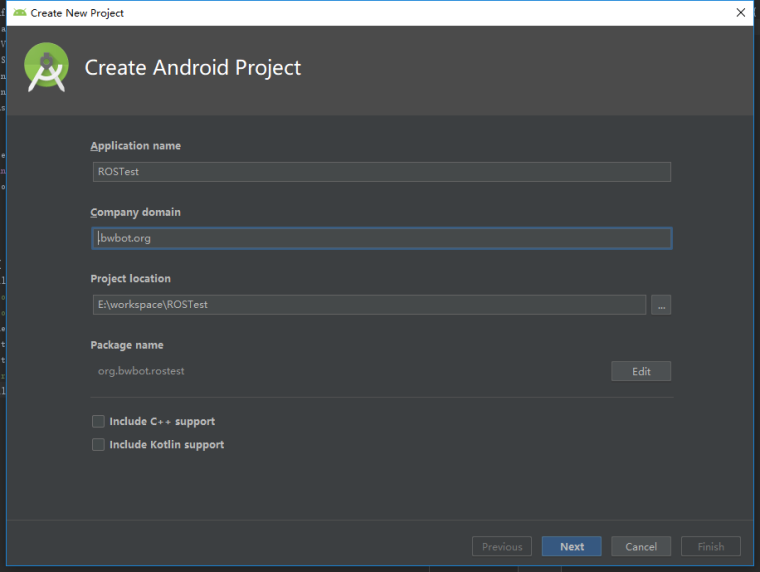
设置好项目名称后点击Next
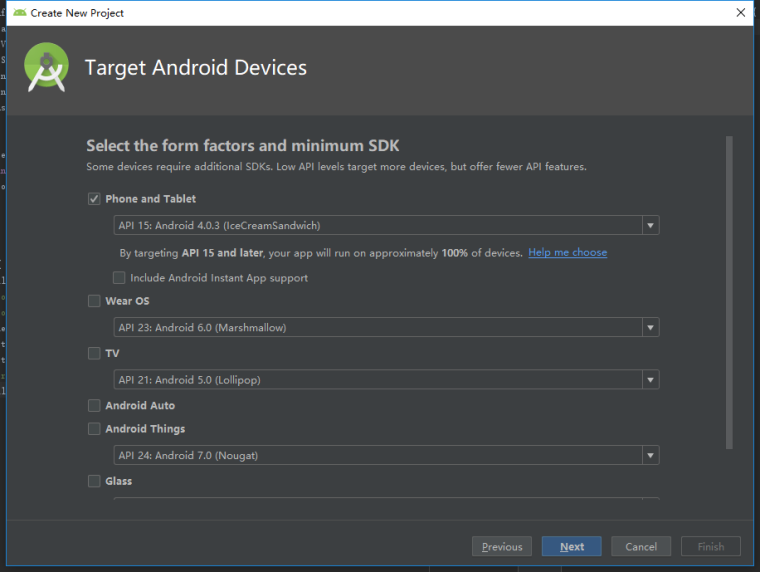
继续点击Next
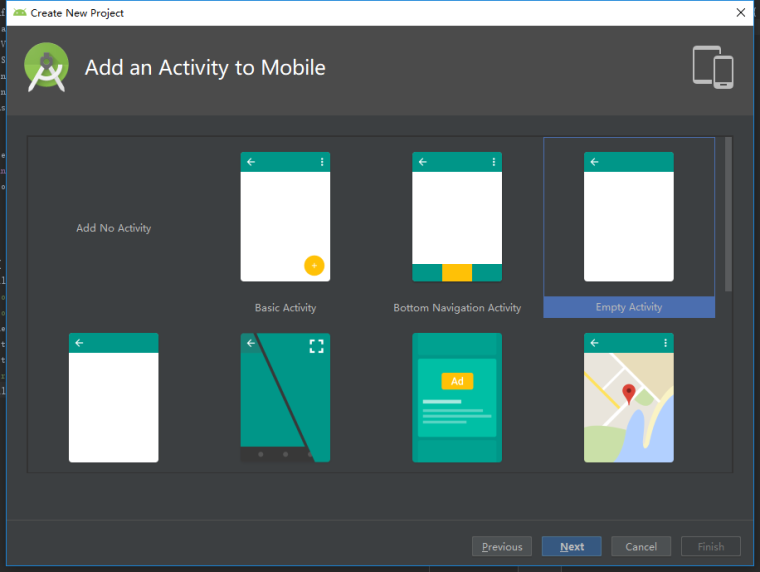
选择Empty Activity后点击Next
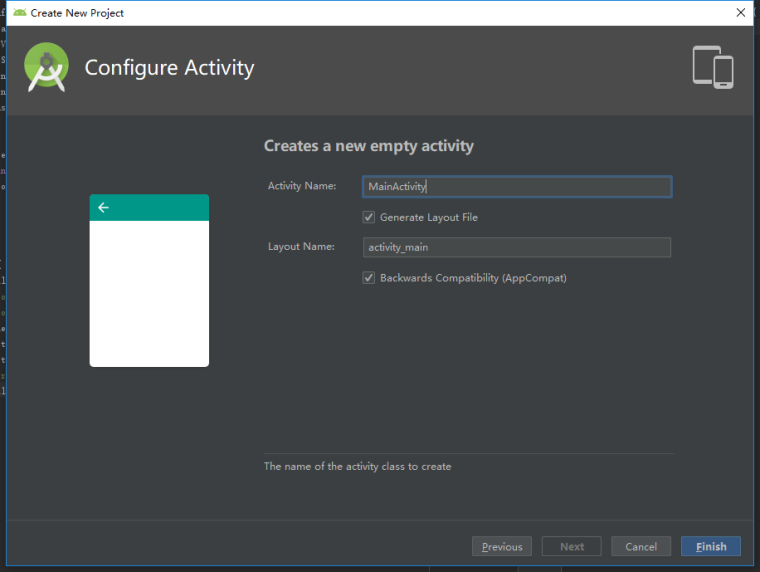
然后点击Finish
等待项目Sync完成。
2.修改build.gradle文件
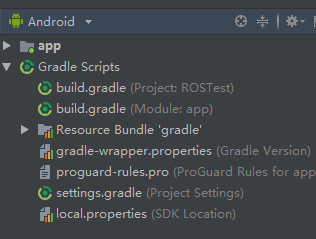
项目Sync完成之后,在项目左侧的文件列表内会有两个build.gradle文件。其中一个是Project的,另一个是Module的。
首先修改Project的build.gradle文件
把文件中的
buildscript {
    repositories {
        jcenter()
    }
    dependencies {
        classpath 'com.android.tools.build:gradle:2.2.3'

        // NOTE: Do not place your application dependencies here; they belong
        // in the individual module build.gradle files
    }
}
修改为
buildscript {
  apply from: "https://github.com/rosjava/android_core/raw/kinetic/buildscript.gradle"
}
然后在文件中添加
subprojects {
    apply plugin: 'ros-android'

    afterEvaluate { project ->
        android {
            // Exclude a few files that are duplicated across our dependencies and
            // prevent packaging Android applications.
            packagingOptions {
                exclude "META-INF/LICENSE.txt"
                exclude "META-INF/NOTICE.txt"
            }
        }
    }
}
然后修改Module的build.gradle,在dependencies 中添加ros依赖
...
dependencies {
    ...
    // You now now add any rosjava dependencies, like so:
    compile 'org.ros.android_core:android_10:[0.3,0.4)'
}
...
同时把dependencies 中的 全部implementation修改为compile。注意修改时的大小写。
把文件中的compileSdkVersion版本设置为25
targetSdkVersion也设置为25
把 com.android.support:appcompat-v7:27.1.1也修改成25的版本最后修改完成的文件如下面所示
apply plugin: 'com.android.application'

android {
    compileSdkVersion 25
    defaultConfig {
        applicationId "org.bwbot.rostest"
        minSdkVersion 15
        targetSdkVersion 25
        versionCode 1
        versionName "1.0"
        testInstrumentationRunner "android.support.test.runner.AndroidJUnitRunner"
    }
    buildTypes {
        release {
            minifyEnabled false
            proguardFiles getDefaultProguardFile('proguard-android.txt'), 'proguard-rules.pro'
        }
    }
}

dependencies {
    compile fileTree(dir: 'libs', include: ['*.jar'])
    compile 'com.android.support:appcompat-v7:25.4.0'
    compile 'com.android.support.constraint:constraint-layout:1.1.3'
    testCompile 'junit:junit:4.12'
    androidTestCompile 'com.android.support.test:runner:1.0.2'
    androidTestCompile 'com.android.support.test.espresso:espresso-core:3.0.2'
    compile 'org.ros.android_core:android_10:[0.3,0.4)'
}
3.修改AndroidManifest.xml文件
此时如果编译项目会出现下面的错误
Manifest merger failed : Attribute application@icon value=(@mipmap/ic_launcher) from AndroidManifest.xml:7:9-43
	is also present at [org.ros.android_core:android_10:0.3.3] AndroidManifest.xml:19:9-36 value=(@mipmap/icon).
	Suggestion: add 'tools:replace="android:icon"' to <application> element at AndroidManifest.xml:5:5-19:19 to override.
此时需要修改AndroidManifest.xml文件在application项目中做如下修改
<application xmlns:tools="http://schemas.android.com/tools"
        tools:replace="android:icon"
        ...
为了能够正常使用还需要给app添加网络权限。在AndroidManifest.xml文件中添加
<uses-permission android:name="android.permission.INTERNET"/>最后的AndroidManifest.xml文件如下
<?xml version="1.0" encoding="utf-8"?>
<manifest xmlns:android="http://schemas.android.com/apk/res/android"
    package="org.bwbot.rostest">
    <uses-permission android:name="android.permission.INTERNET"/>
    <application
        xmlns:tools="http://schemas.android.com/tools"
        tools:replace="android:icon"
        android:allowBackup="true"
        android:icon="@mipmap/ic_launcher"
        android:label="@string/app_name"
        android:roundIcon="@mipmap/ic_launcher_round"
        android:supportsRtl="true"
        android:theme="@style/AppTheme">
        <activity android:name=".MainActivity">
            <intent-filter>
                <action android:name="android.intent.action.MAIN" />

                <category android:name="android.intent.category.LAUNCHER" />
            </intent-filter>
        </activity>
    </application>
</manifest>
此时项目已经可以成功编译了。
2. 写一个简单的消息发布程序
MainActivity.java内容如下
package org.bwbot.rostest;

import android.support.v7.app.AppCompatActivity;
import android.os.Bundle;

import org.ros.android.RosActivity;
import org.ros.concurrent.CancellableLoop;
import org.ros.namespace.GraphName;
import org.ros.node.ConnectedNode;
import org.ros.node.Node;
import org.ros.node.NodeConfiguration;
import org.ros.node.NodeMain;
import org.ros.node.NodeMainExecutor;
import org.ros.node.topic.Publisher;

import java.net.URI;

import std_msgs.String;

public class MainActivity extends RosActivity {

    protected MainActivity() {
        super("ros_test", "ros_test", URI.create("http://192.168.0.23:11311")); // 这里是ROS_MASTER_URI
    }

    @Override
    protected void onCreate(Bundle savedInstanceState) {
        super.onCreate(savedInstanceState);
        setContentView(R.layout.activity_main);
    }

    @Override
    protected void init(NodeMainExecutor nodeMainExecutor) {
        NodeConfiguration nodeConfiguration = NodeConfiguration.newPublic(getRosHostname());
        nodeConfiguration.setMasterUri(getMasterUri());
        nodeMainExecutor.execute(new NodeMain() {
            @Override
            public GraphName getDefaultNodeName() {
                return GraphName.of("ros_test");
            }

            @Override
            public void onStart(ConnectedNode connectedNode) {
                final Publisher<std_msgs.String> pub =  connectedNode.newPublisher("/test", String._TYPE);
                connectedNode.executeCancellableLoop(new CancellableLoop() {
                    @Override
                    protected void loop() throws InterruptedException {
                        std_msgs.String msg = pub.newMessage();
                        msg.setData("hello world");
                        pub.publish(msg);
                        Thread.sleep(1000);
                    }
                });
            }

            @Override
            public void onShutdown(Node node) {

            }

            @Override
            public void onShutdownComplete(Node node) {

            }

            @Override
            public void onError(Node node, Throwable throwable) {

            }
        }, nodeConfiguration);
    }
}
编译后,在手机上运行App。然后再运行的ROS的主机上打印
/test话题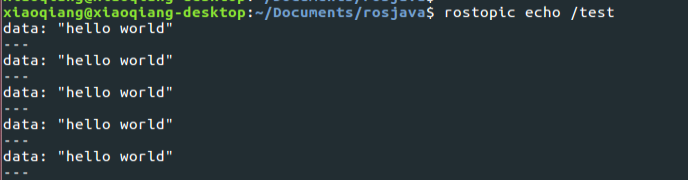
可以看到消息已经成功发送出来了。
本项目已经发布到 Github
3. 注意事项
-
compileSdkVersion 版本问题
由于在新版本的Android中,com.android.support:appcompat-v7软件包移除了一些组件。而这些组件ROS的库使用到了。所以在Android SDK > 25的版本中无法使用Android ROS. 所以我们要在配置文件中修改SDK版本。 -
Android模拟器网络
Android模拟器默认是有NAT转换,所以使用虚拟机是无法访问到局域网内的ROS Master的。开发时建议使用实际的手机。
4. 如何使用自定义的消息类型
使用自己定义的消息需要首先生成消息的jar库文件,然后导入项目依赖。
下面以小强的galileo_serial_server里面的消息为例。
首先安装rosjava相关的依赖包
sudo apt-get install ros-kinetic-genjava
sudo apt-get install ros-kinetic-rosjava*
然后catkin_make具有相关消息的软件包
catkin_make -DCATKIN_WHITELIST_PACKAGES="galileo_serial_server"可以看到其输出如下
WARNING: Package name "NLlinepatrol_planner" does not follow the naming conventions. It should start with a lower case letter and only contain lower case letters, digits, underscores, and dashes.
[ 73%] Built target galileo_serial_server_generate_messages_java
Scanning dependencies of target galileo_serial_server_node
[ 78%] Building CXX object galileo_serial_server/CMakeFiles/galileo_serial_server_node.dir/src/galileo_serial_server_node.cpp.o
[ 84%] Building CXX object galileo_serial_server/CMakeFiles/galileo_serial_server_node.dir/src/galileo_serial_server.cpp.o
[ 89%] Building CXX object galileo_serial_server/CMakeFiles/galileo_serial_server_node.dir/src/AsyncSerial.cpp.o
[ 94%] Compiling Java code for galileo_serial_server
[100%] Linking CXX executable /home/xiaoqiang/Documents/ros/devel/lib/galileo_serial_server/galileo_serial_server_node
[100%] Built target galileo_serial_server_node
warning: [options] bootstrap class path not set in conjunction with -source 1.7
1 warning
Uploading: org/ros/rosjava_messages/galileo_serial_server/1.0.0/galileo_serial_server-1.0.0.jar to repository remote at file:/home/xiaoqiang/Documents/ros/devel/share/maven/
Transferring 2K from remote
Uploaded 2K
[100%] Built target galileo_serial_server_generate_messages_java_gradle
Scanning dependencies of target galileo_serial_server_generate_messages
[100%] Built target galileo_serial_server_generate_messages
从输出中可以看出,消息的jar包已经生成到了
/home/xiaoqiang/Documents/ros/devel/share/maven/文件夹中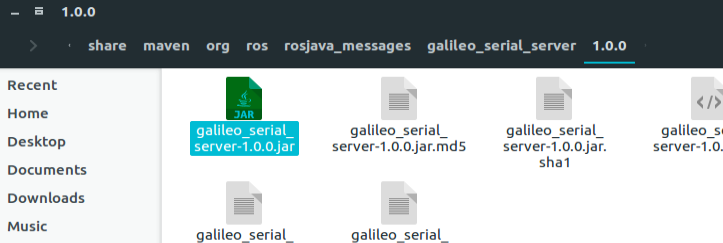
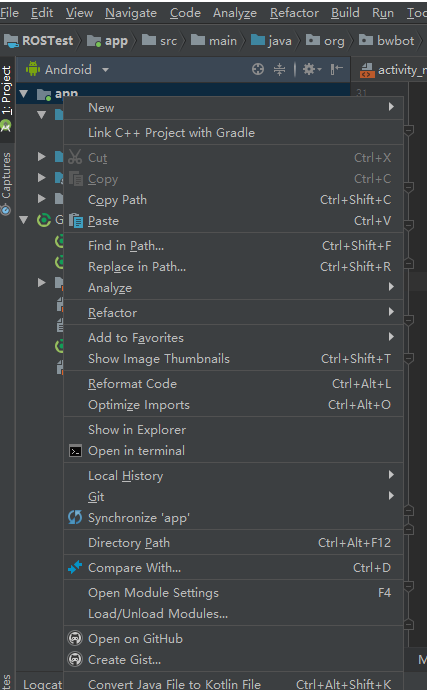
把此jar文件复制到Android项目中的
app\libs文件夹中。右键点击app,在弹出的菜单中点击Open Module Settings
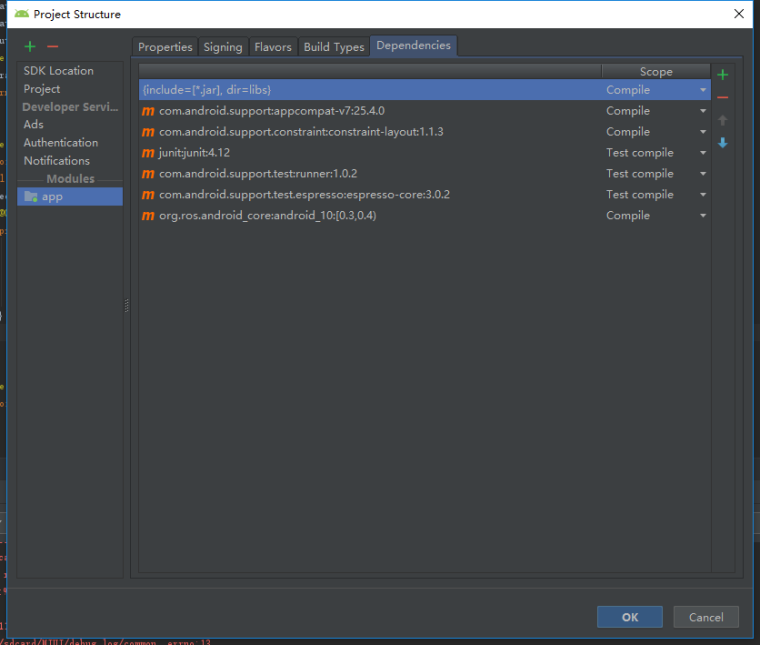
选择dependencies页面,然后点击右侧加号
选择jar dependencies,然后选择jar文件点击确认就可以了
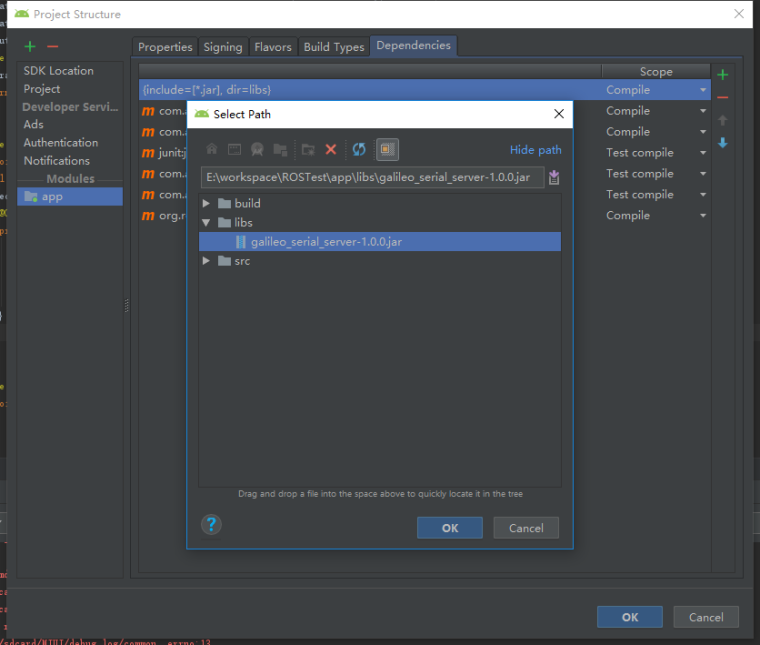
这样就可以在程序中使用自定义的消息了。
5. ROS Android的程序设计模式
在ROS Android库中,ROS的相关操作都是异步的(通过回调的方式),比如创建节点,发布和订阅消息。这个在使用中会比较麻烦。比如我们需要实现点击一个按钮就发布一个消息的功能。就需要把这个发布消息的程序封装成一个类,然后继承CancellableLoop。在loop中发布消息。同时提供一个发布消息的方法给别人调用。
比如下面的方法public class GalileoCommander extends CancellableLoop { private Publisher<galileo_serial_server.GalileoNativeCmds> pub; private ConnectedNode node; private Queue<byte[]> cmdList; public GalileoCommander(ConnectedNode connectedNode){ node = connectedNode; cmdList = new LinkedBlockingQueue<>(100); pub = connectedNode.newPublisher("/test", GalileoNativeCmds._TYPE); } public void sendCmds(byte[] cmds){ if(!cmdList.offer(cmds)){ cmdList.poll(); cmdList.offer(cmds); } } @Override protected void loop() throws InterruptedException { byte[] cmd = cmdList.poll(); if(cmd == null){ Thread.sleep(1); }else{ galileo_serial_server.GalileoNativeCmds galileo_cmd = pub.newMessage(); galileo_cmd.setLength(cmd.length); pub.publish(galileo_cmd); } } }使用时
nodeMainExecutor.execute(new NodeMain() {
    @Override
    public GraphName getDefaultNodeName() {
        return GraphName.of("test_node");
    }

    @Override
    public void onStart(ConnectedNode connectedNode) {
        galileoCommander = new GalileoCommander(connectedNode);
        connectedNode.executeCancellableLoop(galileoCommander);
    }
}, nodeConfiguration)
这是我目前想到的比较好的模式,如果有其他更好的方法也欢迎交流。
-
-
RE: 关于map_server的问题posted in 技术交流
@not-old-wang 我上传试了一下是可以的,你可以点击最右边的上传文件试试。也可以加入我们的ROS群(538456117)方便交流。
-
RE: 小强ROS机器人教程(27)___bw_auto_dock自动充电功能包的使用和实现原理posted in 产品服务
@yuggy 如果是一样的就不用remap了,直接删除这行remap from=“/odom” to=“/xqserial_server/Odom”
-
RE: 小强ROS机器人教程(27)___bw_auto_dock自动充电功能包的使用和实现原理posted in 产品服务
@yuggy 之前那位的问题是没有odom数据。你可以看看你的odom数据是不是正常。也可以加入我们的交流群 538456117
-
RE: hikey 970 debian 镜像(有opencl 和 tensorflow)posted in 技术交流
@xiaofeimo1 不会,官方也没有提供。不过这里有一个制作Ubuntu镜像的源。但是这个镜像还有一些问题。
-
Visual Navigation Path Editor Tutorialposted in 产品服务
Using Xiaoqiang can create a three-dimensional map of the surrounding environment, but how to use this map to visual tracking? The Visual Navigation Path Editor was written to implement this feature. With this tool you can mark the trajectory in map. Then export the generated track file to Xiaoqiang, and Xiaoqiang will be able to move according to the track you have drawn. The following describes in detail how to use the software.
Installation
Ubuntu deb installation package can be downloaded here and the source code is here.
After the download is complete, execute the following command to install.
Note that this path editor is not compatible with the new version of the navigation program. For the new version of the navigation program, please use theWindows clientsudo dpkg -i path-drawer_1.0.0_amd64.debWait for the installation to complete.
Collecting spatial data
The path editor needs to load the spatial data collected by Xiaoqiang to be able to operate. For detailed operations, please refer to this article. After clicking the Save button, the map information will be saved to the
/home/xiaoqiang/slamdbfolder.Launch software
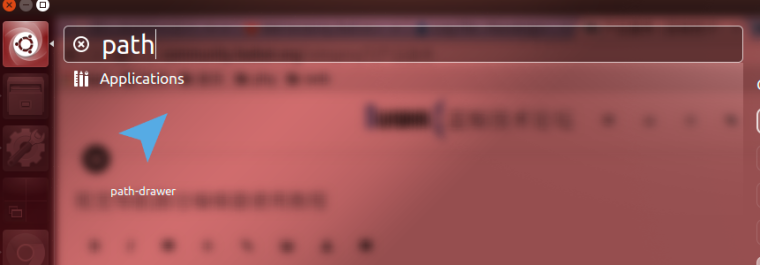
After the installation is complete, you can find the program named Path Drawer in the Ubuntu Dash menu, and click on the software icon.
Import Data
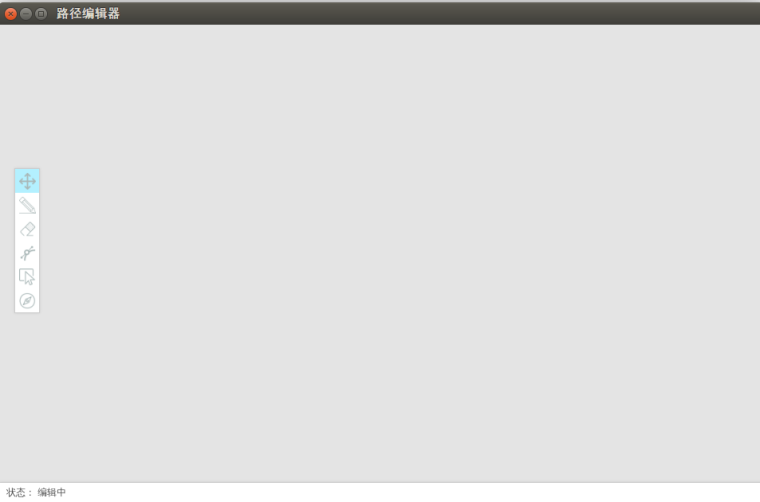
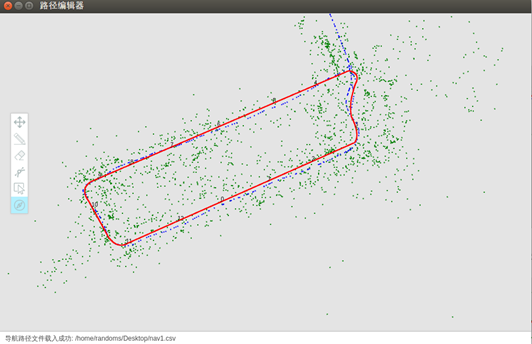
The software interface after startup is shown as below
In the menu at the top left, select File -> Import Map Data. In the file selection dialog that pops up, select the
/home/xiaoqiang/slamdb/mappoints.bsonfile. After import succeed, you can see the data of the map points in the software. This is a top view.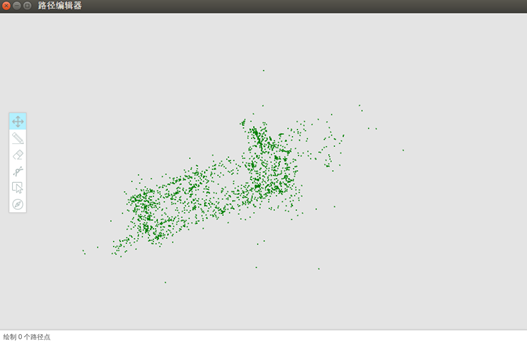
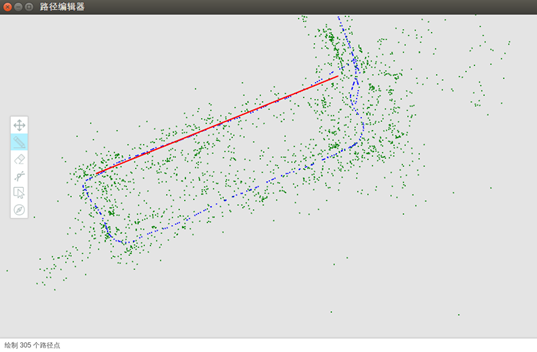
Then continue to select the file in the menu in the upper left corner and then import the path file. In the file selection dialog that pops up, select the
/home/xiaoqiang/slamdb/keyframes.bsonfile. After import succeed, you can see the path of the previous car walking in the software.
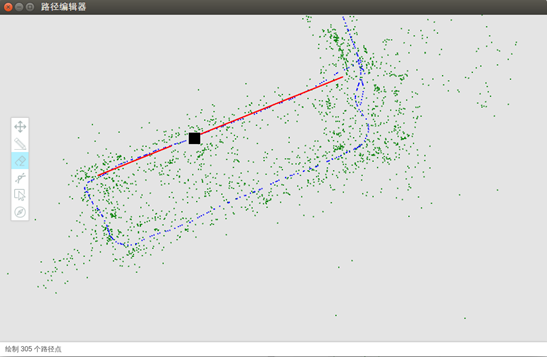
Draw a navigation route
The navigation path is the path you want xiaoqiang to walk. When the data is exported to Xiaoqiang, Xiaoqiang will move according to the path you draw. Here’s how to use the path drawing tool.
-
Basic operations Basic operations include panning and zooming. If you drag the map with the left mouse button, you can the translation of the map. The scrolling of the mouse scrolls can zooming of the map, which is very useful in the process of drawing paths. For more detailed requirements on the movement, you can zoom in and draw.
-
The line tool: clicks the pencil-like icon in the left-hand toolbar. This is the line tool. left mouse button click on any point on the graph, and then move the mouse will appear a red line. Move the mouse to the desired end position, click the left mouse button again, a straight line to draw the finished. After you click the left button, you can cancel the drawing by right-clicking.
-
The eraser tool: Click on the Eraser tool in the left-hand toolbar and then presses the left mouse button to drag to erase the previously drawn point
-
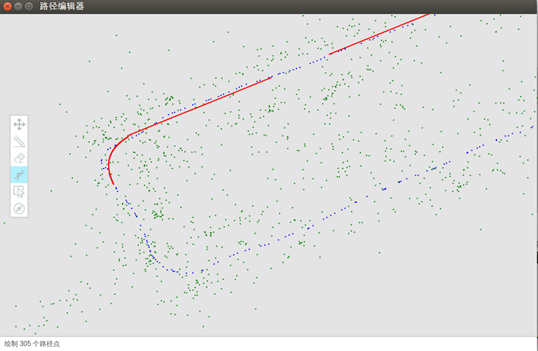
Curve tool: Click on the left Curve tool, click the left mouse button at the beginning of the curve, then click the left mouse button again in the middle of the curve, and finally click on the end point of the curve. So a curve is drawn and done.
-
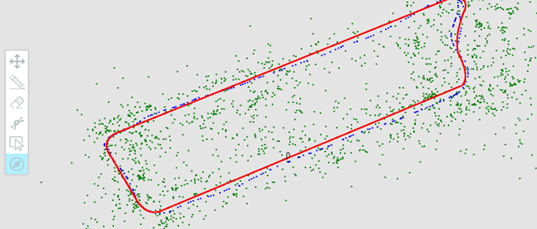
Delete tool: if you want to delete a large range of points drawn before, then you can take advantage of this removal tool. Click the Delete tool on the left and click the left mouse button to delete the starting point, you can see in the mouse movement process has a rectangle has been following. Click the left mouse button again to delete the rectangle’s selected range. Right-click to cancel the selection.
Using these tools, you can draw xiaoiang’s navigation path. Be careful to draw the line as far as possible along the original trajectory, so that the path is unobstructed during the movement. From the green map point you can see the terrain, based on the information to draw the points allowed by the range of motion.
Set navigation key points
For more complex graphics, there are many ways to move. For example, a figure-eight path, Xiaoqiang may move around one of the circles first, then move around another circle, or two circles may cross each other. Therefore, it is necessary to specify the specific way of the Xiaoqiang movement. Let’s take a circular trajectory as an example. In a circular trajectory, Xiaoqiang can move clockwise and also counterclockwise.
Click the navigation point settings button at the bottom of the toolbar on the left. Then start marking key points. Feel free to click on a point on the navigation route and you can see that there is a 0 at this point. This indicates that point 0 has been added here.
If you want to make Xiaoqiang counterclockwise, you can mark a point on the right side. Just add the key points in turn
Click the right mouse button to delete a recently added navigation point. You can also use the eraser and delete tools to delete navigation points. Xiaoqiang will move in the order of the key points.
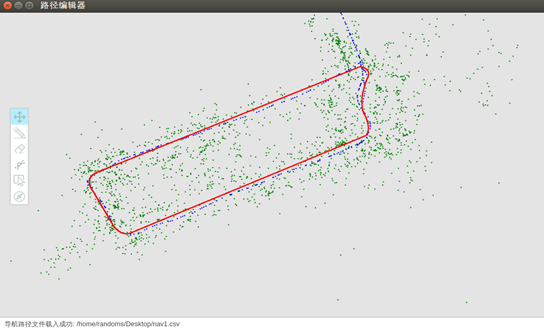
Export data
-
Export the navigation path file After the navigation path is drawn, click
File -> Export Navigation Path Filein the menu in the upper left corner and select the location where the file is saved. After exporting the file, you can also import it from the menu for secondary editing. -
Export Navigation Key File After the navigation key is drawn, click
File -> Save Navigation Pointin the menu in the upper left corner and select the file save location. After exporting the file, you can also import it from the menu again for secondary editing. Note: Navigation keys can only be imported after the navigation path file has been successfully imported.
The exported data can be placed in Xiaoqiang’s corresponding folder to start visual navigation.
-
-
Cartographer install and demoposted in 产品服务
Cartographer is a set of laser radar slam algorithm that was open sourced by Google in September 2016. Its precision and effect are among the best in the industry. This article will demonstrate how to use Cartographer in the ROS Kinetic. Click to view the result video.
Steps:
-
Installation dependency package
# Install the required libraries that are available as debs. sudo apt-get update sudo apt-get install -y \ cmake \ g++ \ git \ google-mock \ libboost-all-dev \ libcairo2-dev \ libeigen3-dev \ libgflags-dev \ libgoogle-glog-dev \ liblua5.2-dev \ libprotobuf-dev \ libsuitesparse-dev \ libwebp-dev \ ninja-build \ protobuf-compiler \ python-sphinx -
Install ceres solver
cd ~/Documents git clone https://github.com/BlueWhaleRobot/ceres-solver.git cd ceres-solver mkdir build cd build cmake .. make -j sudo make install -
Install prtobuf 3.0
cd ~/Documents git clone https://github.com/google/protobuf.git cd protobuf git checkout v3.6.1 mkdir build cd build cmake \ -DCMAKE_POSITION_INDEPENDENT_CODE=ON \ -DCMAKE_BUILD_TYPE=Release \ -Dprotobuf_BUILD_TESTS=OFF \ ../cmake make -j 2 sudo make install -
Install cartographer
cd ~/Documents git clone https://github.com/BlueWhaleRobot/cartographer.git cd cartographer mkdir build cd build cmake .. make -j sudo make install -
Install cartographer_ros
cd ~/Documents/ros/src #请修改路径到自己的ROS catkin工作空间 git clone https://github.com/BlueWhaleRobot/cartographer_ros.git cd .. catkin_make -
The installation is complete, start downloading the bag file for testing
Click the link to download the file and save it to your desktop.
-
Start the demo, you can see rviz start and start to build
According to the computing power of the personal platform, the complete running time of this demo is generally between half an hour and one hour.
roslaunch cartographer_ros offline_backpack_2d.launch bag_filenames:=${HOME}/Desktop/cartographer_paper_deutsches_museum.bag -
Save the map and end the test
roslaunch cartographer_ros assets_writer_ros_map.launch bag_filenames:=${HOME}/Desktop/cartographer_paper_deutsches_museum.bag pose_graph_filename:=${HOME}/Desktop/cartographer_paper_deutsches_museum.bag.pbstream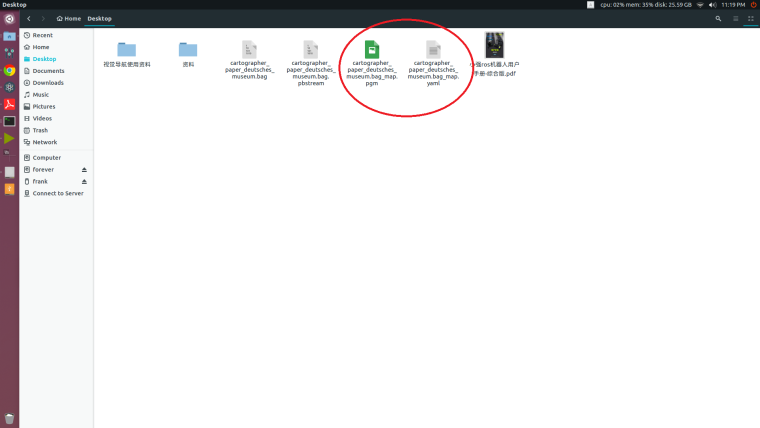
The created map file will now be generated in the .ros folder in the home directory. These two files (pgm and yaml) can be loaded in the map_server in ros.
-
-
PS3 joystick ROS driverposted in 产品服务
The ros driver of the ps3 controller is ps3joy in the joystick_drivers package. This driver supports the original Sony handle, but there is a problem with the support of some others ps3 controllers. We have modified on the basis of ps3joy, added a
ps3joyfake_node.pyscript as a driver for other joysticks, the package source code address is here. Let’s take Xiaoqiang as an example to demonstrate the installation steps and simple usage of this package.installation steps
ssh enters Xiaoqiang ros workspace, compile after downloading the source code. If you have install xiaoqiang system image, you can skip this step.
ssh xiaoqiang@192.168.xxx.xxx
cd Documents/ros/src/
git clone https://github.com/BlueWhaleRobot/joystick_drivers.git
cd ..
catkin_make
If the following error is prompted
error spnav.h no such file
First install the following package, then re-execute catkin_makee
sudo apt-get install libspnav-dev
Quick usage
After
ps3joyfake_node.pystarts, it converts the data of the joystick button received by bluetooth into the standard joy msg, and publishes it in ros with/joyas the topic, that is, a file ofps3joyfake_node.pyis equivalent to two files ofps3joy.py + joy_node. It is no longer necessary to open the joy_node node in actual use.-
Bind the joystick to the usb bluetooth adapter, just bind once, skip this step next time.
Connect the joystick to the host through the usb data cable, and plug the USB bluetooth adapter into the host.
sudo bash
rosrun ps3joy sixpair
At this point, you will get an output similar to following. The current and setting mac addresses are the same.
Current Bluetooth master: 00:22:b0:d0:5a:09
Setting master bd_addr to 00:22:b0:d0:5a:09

# If the following error occurs
Current Bluetooth master: 00:1b:dc:00:07:3c
Unable to retrieve local bd_addr from `hcitool dev`.
Please enable Bluetooth or specify an address manually.
# Run
hciconfig hci0 reset
# If you run hciconfig hci0 reset error
# Can't init device hci0: Operation not possible due to
# Run
rfkill unblock all
# and run
hciconfig hci0 reset
# rerun
rosrun ps3joy sixpair
After the binding setting is completed, disconnect the handle and the usb connection of the host.
Ctrl+D exits root mode
-
Pair the handle with the usb Bluetooth adapter
# Make sure the Bluetooth receiver is plugged into the host usb port
sudo bash
rosrun ps3joy ps3joyfake_node.py
The following prompt will appear normally.
root@xiaoqiang-desktop:~# rosrun ps3joy ps3joyfake_node.py
No inactivity timeout was set. (Run with --help for details.)
Waiting for connection. Disconnect your PS3 joystick from USB and press     the pairing button.
If the following error is prompted
ImportError: No module named bluethooth
Please install the following packages first, then re-run
sudo apt-get install libbluetooth-dev
sudo pip install PyBluez
Press the joystick pairing button in the image below
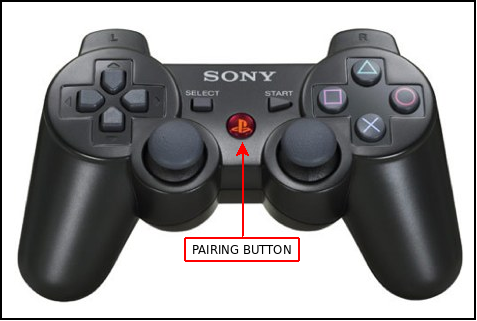
If the pairing is successful, the above window will output a result similar to the following.
root@xiaoqiang-desktop:~# rosrun ps3joy ps3joyfake_node.py No inactivity timeout was set. (Run with --help for details.) Waiting for connection. Disconnect your PS3 joystick from USB and press the pairing button. Connection activated -
View handle output
# Open a new window and print the button output
rostopic echo /joy
Normally the following similar results will appear
header:
  seq: 297
  stamp:
    secs: 1488877867
    nsecs: 535818099
  frame_id: ''
axes: [0.0, 0.0, 0.0, 0.0, -1.0, 0.0, 0.0, 0.0, 0.0, 0.0, 0.0, 0.0, 0.0, 0.0, 0.0, 0.0, 0.0, 0.0, 0.21316899359226227, 0.0]
buttons: [0, 0, 0, 0, 1, 0, 0, 0, 0, 0, 0, 0, 0, 0, 0, 0, 0]
As we can see that the fourth button was pressed.
-
Start the relevant joy msg processing node
Be careful not to start the joy_node again.
# Take Xiaoqiang as an example. After launching the following launch file, you can remotely move Xiaoqiang.
roslaunch turtlebot_teleop ps3fakexiaoqiang_teleop.launch
For xiaoqiang user with a joystick you can also use the joystick according to this tutorial
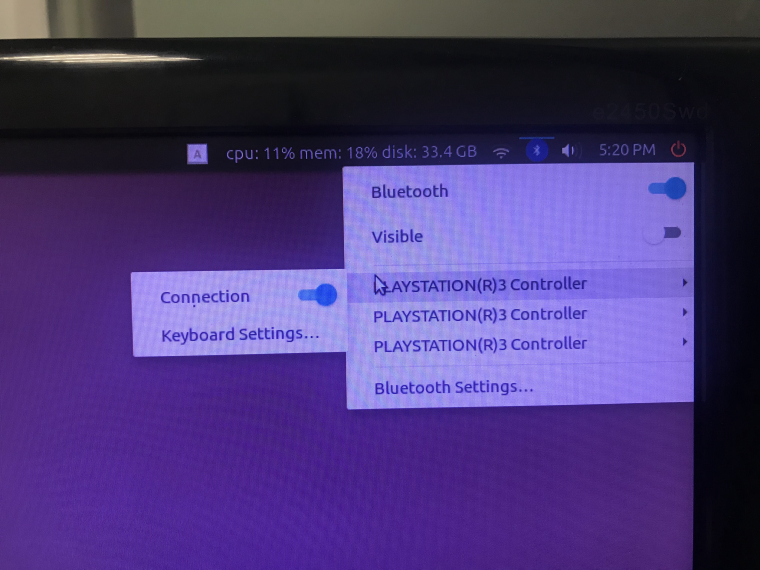
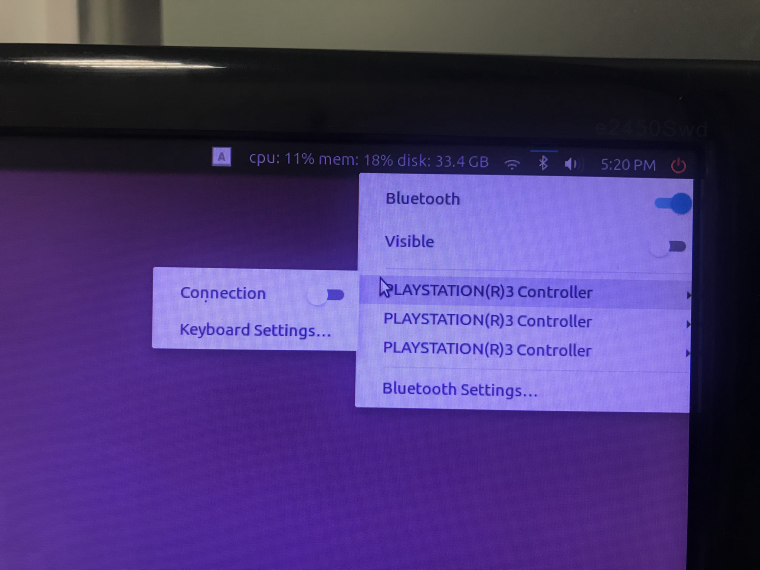
When step 1 is bound, if the prompt cannot find the handle device and cannot be bound, you can perform the following two steps to solve the problem: 1. Click the Bluetooth icon in the upper right corner of the system desktop to close the connected Bluetooth handle service.
-
-
Install VNC on Ubuntuposted in 产品服务
When using Ubuntu often requires Remote Desktop connection, the most common software is VNC. VNC is an open protocol that implements a lot of clients. But after comparing the various implementations, the best is now x11vnc. This program is not only free of charge, open source, but also supports OpenGL programs. For example, rviz and other programs can also open normally.
The X11VNC is already installed by default in the xiaoqiang system image, and if you use a xiaoqiang host or mirror, you can skip the installation process directly. Just follow the instructions for accessing the service.The installation method is described below. The following is an example of Ubuntu 14.04, if it is 16.04 and later version, you need to edit the service configuration file.
Installing X11VNC
sudo apt-get install x11vnc -ySet access password
sudo x11vnc -storepasswd /etc/x11vnc.passCreate a service file
Under/etc/init, create a x11vnc.conf file with the following file contents
description "xiaoqiang vnc server"
start on runlevel [2345]
stop on runlevel [06]

script
    exec /usr/bin/x11vnc -auth guess -capslock -forever -loop -noxdamage -repeat -rfbauth /etc/x11vnc.pass -rfbport 5900 -shared
end script
Start the service
sudo service x11vnc startAccess the service
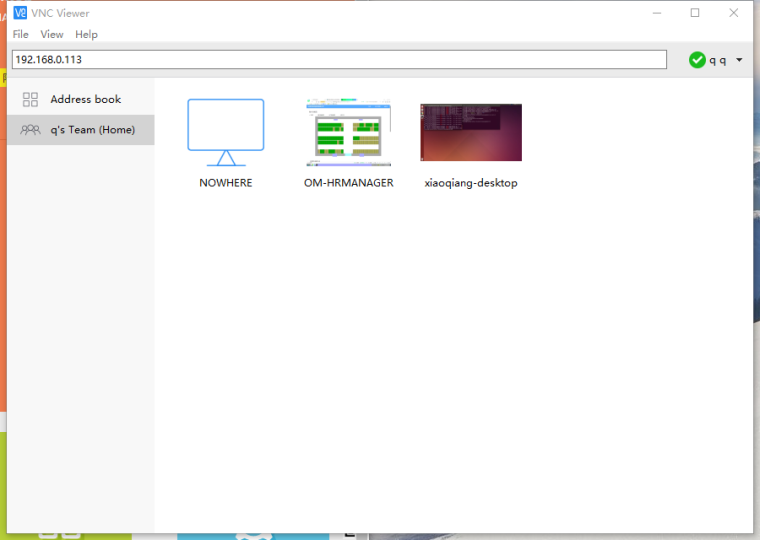
Download a VNC client, such as download from here
Start the client, enter target ip address
and then enter access password
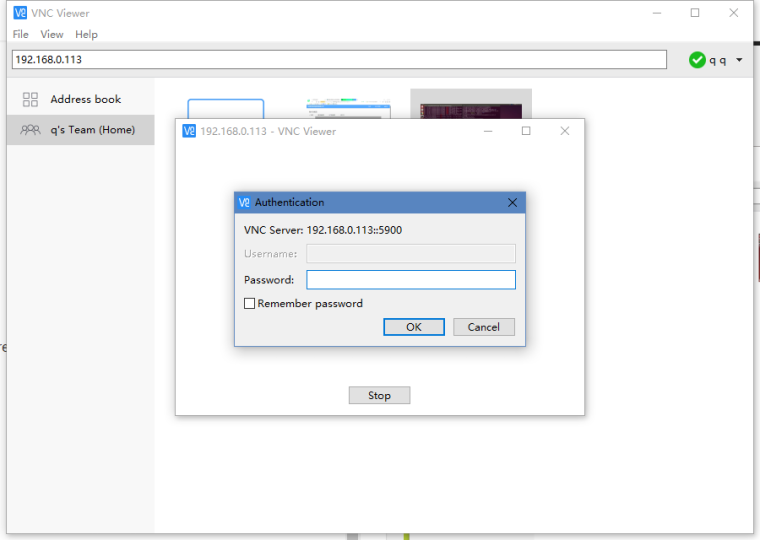
Then you can connect normally.
For Ubuntu 16.04 and later, You can configure your service file according to this script
Note When the installation is complete, you may still get an error when you use rviz without plugging in the monitor. Just plug in the HDMI to VGA adapter (do not connect the monitor, just the adapter) can be turned on normal use. If you want to adjust the resolution in the same way as normal computer settings, adjust the settings inside system settings
-
xiaoqiang tutorialsposted in 产品服务
Quick Start
Xiaoqiang ROS tutorial
- 1. Basic operation introduction and remote control in LAN
- 2. Bluewhale Robot Open source code repository usage and ROS startup task configuration
- 3. Displaying Xiaoqiang Robot Model in rviz
- 4. Inertial navigation test
- 5. xiaoqiang remote control app for Android
- 6. xiaoqiang remote control Windows client
- 7. use PS3 joystick to control xiaoqiang
- 8. kinect v1 ROS driver test and installation
- 9. use rostopic to control kinect tilt angle
- 10. use kinect for autonomous mobile and obstacle avoidance
- 11. kinect follow package turtlebot_follower
- 12. display point cloud for kinect2
- 13. rplidar A2 LiDAR useage and set udev rules for serial devices for xiaoqiang
- 14. using rplidar A2 with gmapping
- 15. AMCL navigation test
- 16. large-scale lidar slam and real-time loop closure test
- 17. using ORB_SLAM2 to create a three-dimensional model of the environment
- 18. 3D modeling using DSO_SLAM
- 19. usage of NLlinepatrol_planner
- 20. get vision odometer and display the xiaoqiang track in the rviz
- 21. get USB camera 30fps 1080p image stream and 120fps VGA resolution image stream
- 22. Operating 6 DOF robotic arm
- 23. ROS introductions
Maintenance
- Maintenance
- Xiaoqiang Bottom Driver Firmware Download and Upgrade Methods
- Upgrade chassis ros driver package xqserial_server
- Recalibrate the chassis IMU
- Bluewhale ROS system image released
Other Tutorials